TL;DR
In this post I comprehensively show how apps written using the Uno Platform can leverage Azure AD B2C & MSAL.Net to provide Identity and Access Management services across platforms as diverse as Windows, Android, iOS and the web. As you will see, this combination of technologies provides extremely cheap, simple and flexible identity management functionality that runs from a single code base.
Intro
Seamless identity management in client-facing apps is critically important to customer engagement yet extremely difficult to implement correctly. In recent years, numerous IDentity as a Service (IDaaS) providers have emerged to help developers address this challenge yet somehow secure authentication and authorization remain one of the most arduous parts of app development.
In this article I present a suite of technologies that can be leveraged to provide identity management in a simple and affordable yet flexible and scalable manner. I show how recent changes to these technologies allow you to leverage the most recent and secure authentication flows (i.e. "Authorization Code with PKCE" instead of "Implicit Grant") and I illustrate how this technology stack can be used to implement apps that run across all major platforms - including the web - without the need for the developer to maintain onerous platform-specific code.
Finally, much of this post is composed of information from - and links to - other articles from around the web. I have aggregated and annotated these posts below such that the reader is provided a comprehensive guide to using these technologies within a cross-platform Uno application. While I specifically discuss only the major platforms (UWP, Android, iOS and Web) the approaches used below should be pertinent to any platform supported by Uno.
Technologies
The suite of technologies used in this article is comprised of: Uno Platform, Azure AD B2C and MSAL.Net. I provide a brief introduction to these technologies below before proceeding to show how they can be combined to provide a holistic cloud-based user-management solution.
Uno Platform
Regular readers of my blog will be well aware of the Uno Platform by now but, for new readers, the Uno Platform allows UWP apps to run natively on every major platform including desktop (Windows, Mac, Linux), mobile (Android & iOS) and the web (in pretty much any browser). It achieves this by implementing WinRT APIs on top of Xamarin (for desktop/mobile) and WASM (for the web) which allows the developer to write a single code-base which can be transparently shared across each of these platforms.
I have blogged about Uno Platform extensively over the past year as, in my opinion, it represents the best platform for cross-platform UI develop and empowers developers to utilise a "one-stack" solution architecture. My consultancy - Cogenity - specialise in providing support for, and bespoke development of, cross-platform applications written using the Uno Platform. Should you have any questions regarding this article or the Uno Platform in general, please feel free to drop us a line - we love to hear about applications being built with Uno and help our clients deliver on the promise of this amazing technology.
Azure AD B2C
Azure Active Directory B2C (AAD B2C) is Microsoft's Azure based Identity and Access Management (IAM) offering for business-to-consumer (B2C) applications. Unlike regular Azure Active Directory which is very much aimed at B2B and LoB applications, AAD B2C has been designed from the ground up for providing seamless IAM for customer-facing apps. As such it allows the developer to easily leverage advanced scenarios such as social login and multi-factor authentication while simultaneous providing the means to customise "every pixel of the registration and sign-in experience".
Amazingly, this service is offered at an incredibly low price-point. The first 50,000 monthly actives users are free and subsequent users cost just £0.002423p/m! This is easily enough to bootstrap an application and gain market traction prior to being faced with a significant bill for IDaaS and, in any event, these costs will almost certainly be less than the cost of writing and hosting a bespoke solution.
MSAL.Net
Microsoft Authentication Library for .NET (MSAL.NET) is Microsoft's successor to Active Directory Authentication Library for .NET (ADAL.NET). It is part of the Microsoft Identify Platform for Developers and represents current best practise for Azure AD authentication from .NET applications.
As we will see below, authentication with MSAL.NET is really very simple and works beautifully in cross-platform scenarios on the Uno Platform.
Getting started with Azure AD B2C
So, with introductions out the way, let get started with Azure AD B2C by creating a new tenant. This is by far the most complicated part of the process and covering it in detail could easily balloon this post to an unmanageable size. Fortunately Matthew Soucoup has covered all the steps for creating a Azure AD B2C tenant on his blog. In the steps below I will be pointing you to Matt's blog posts which I very much encourage you to read and follow before continuing.
Step 1 - Understanding terminology
One of the most confusing parts of authentication is understanding the various terminology. In his first post about Azure AD B2C Matt digs into the various terminology you'll need to understand in order to correctly setup and use Azure AD B2C. If you're at all unsure about terms such as Tenant, Providers or Policies, I'd very much recommend a read of this post before continuing.
Step 2 - Creating A Tenant
Now we understand the terminology used, we can go ahead and create an Azure AD B2C Tenant. Again, Matt covers this fantastically well in a blog post. He also covers the process in a YouTube video which helps convey some of the "tricky" behaviour of Azure Directories. Read or view either of these links and follow the steps therein. Once complete you should have a new "[tenant].onmicrosoft.com" directory with an Azure AD B2C service as shown here:
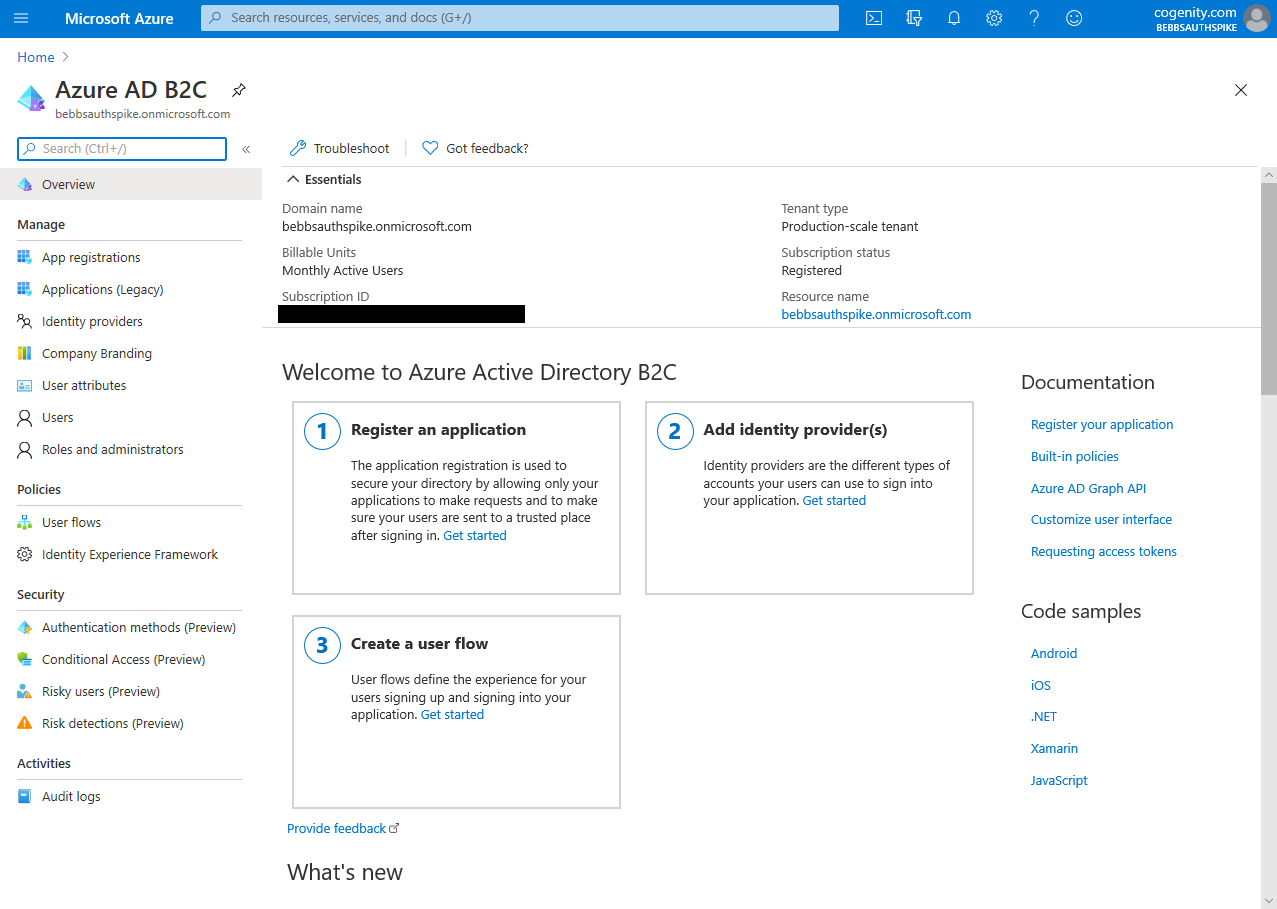
Step 3 - Adding A Policy
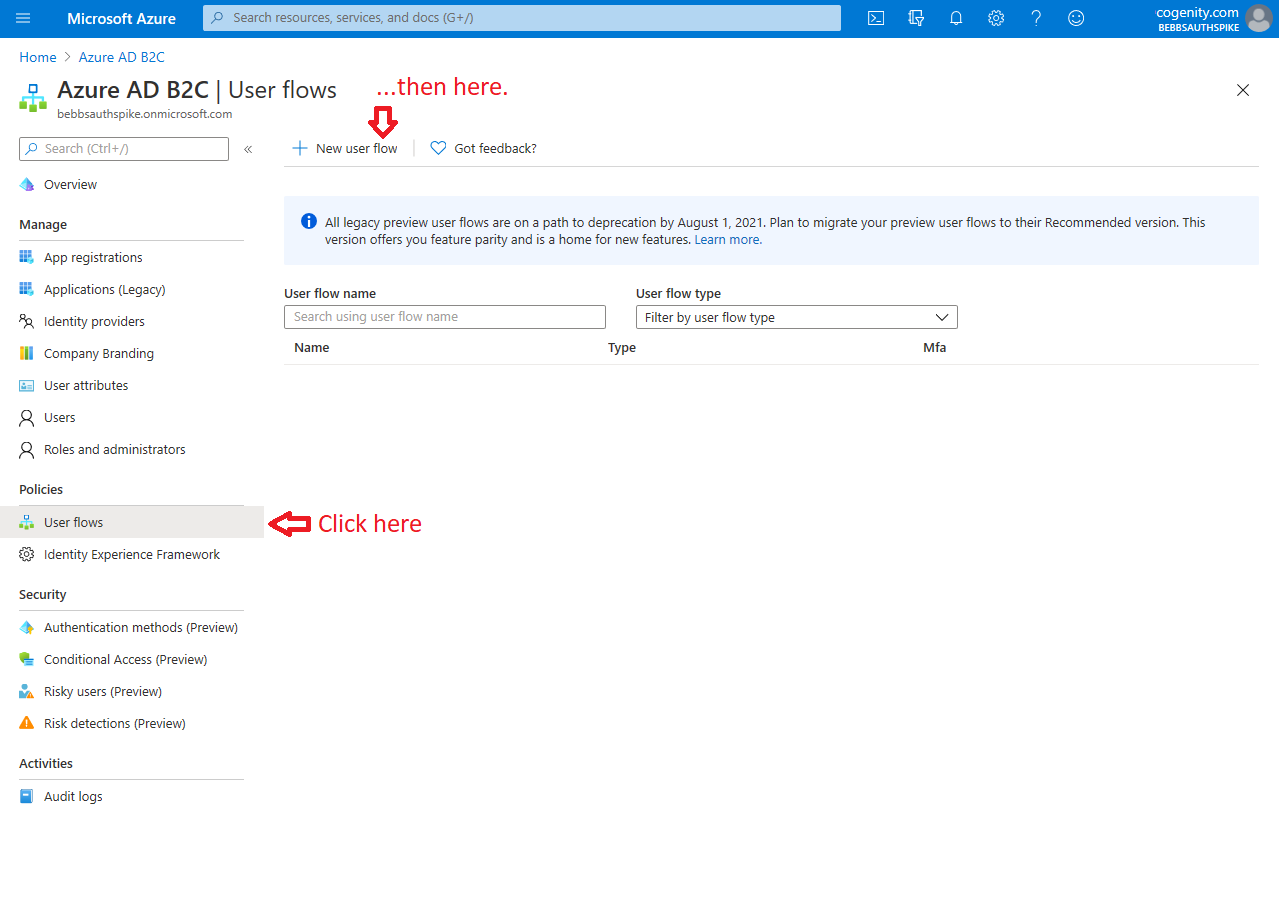
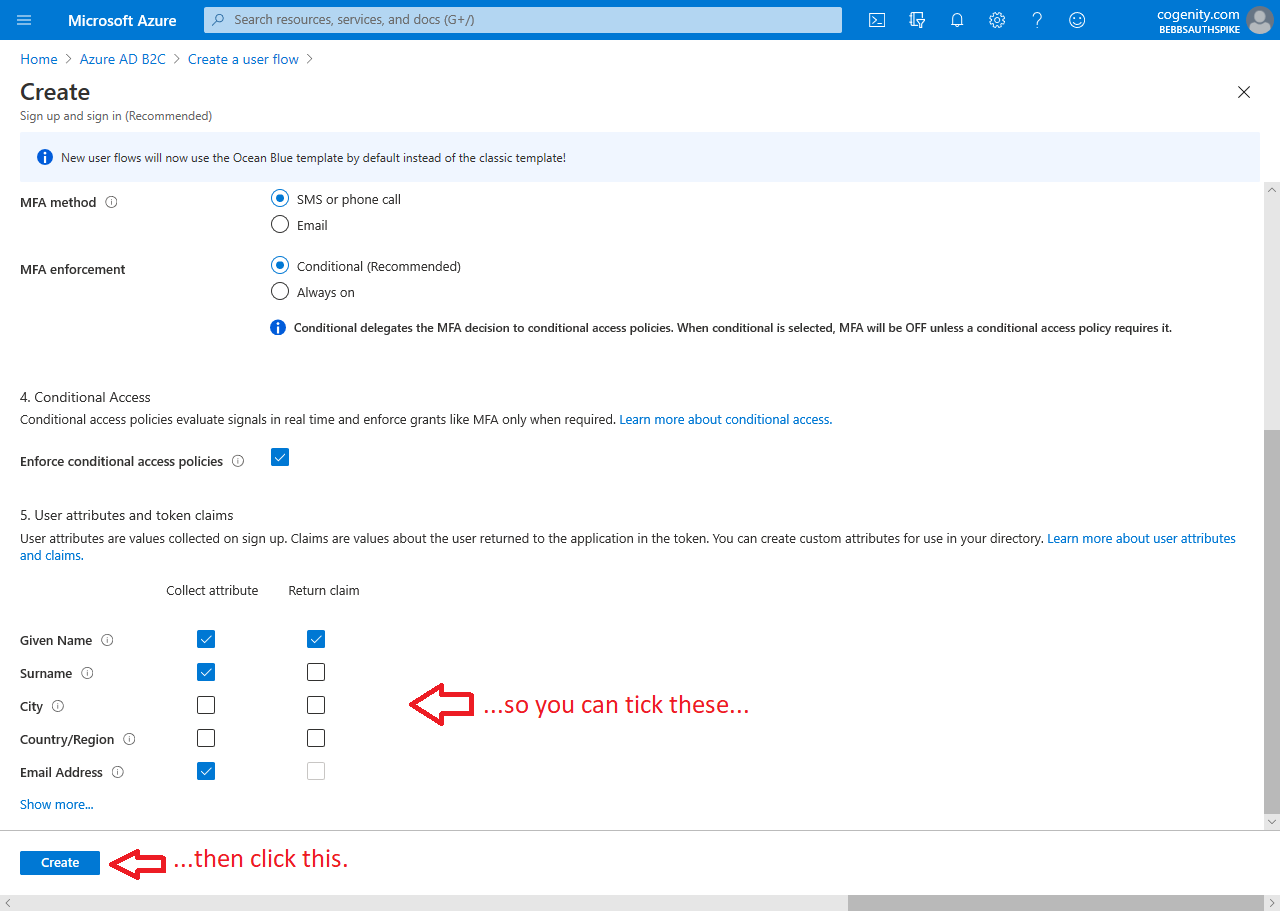
While the Azure AD B2C Tenant provides the infrastructure for cloud-based IDaaS, policies dictate who can use this service and how. In order for users of your app to be able to register and/or log in, you need to create a "User flow" policy in your tenant. Matt covers this process in the "Creating A Policy" section of this blog post however the post is slightly out of date as the Azure Portal has changed significantly since he authored it. I would suggest reading Matt's blog post so you understand the process then following the screen shots shown below (tap to enlarge):
 |
 |
1. Create a new user flow |
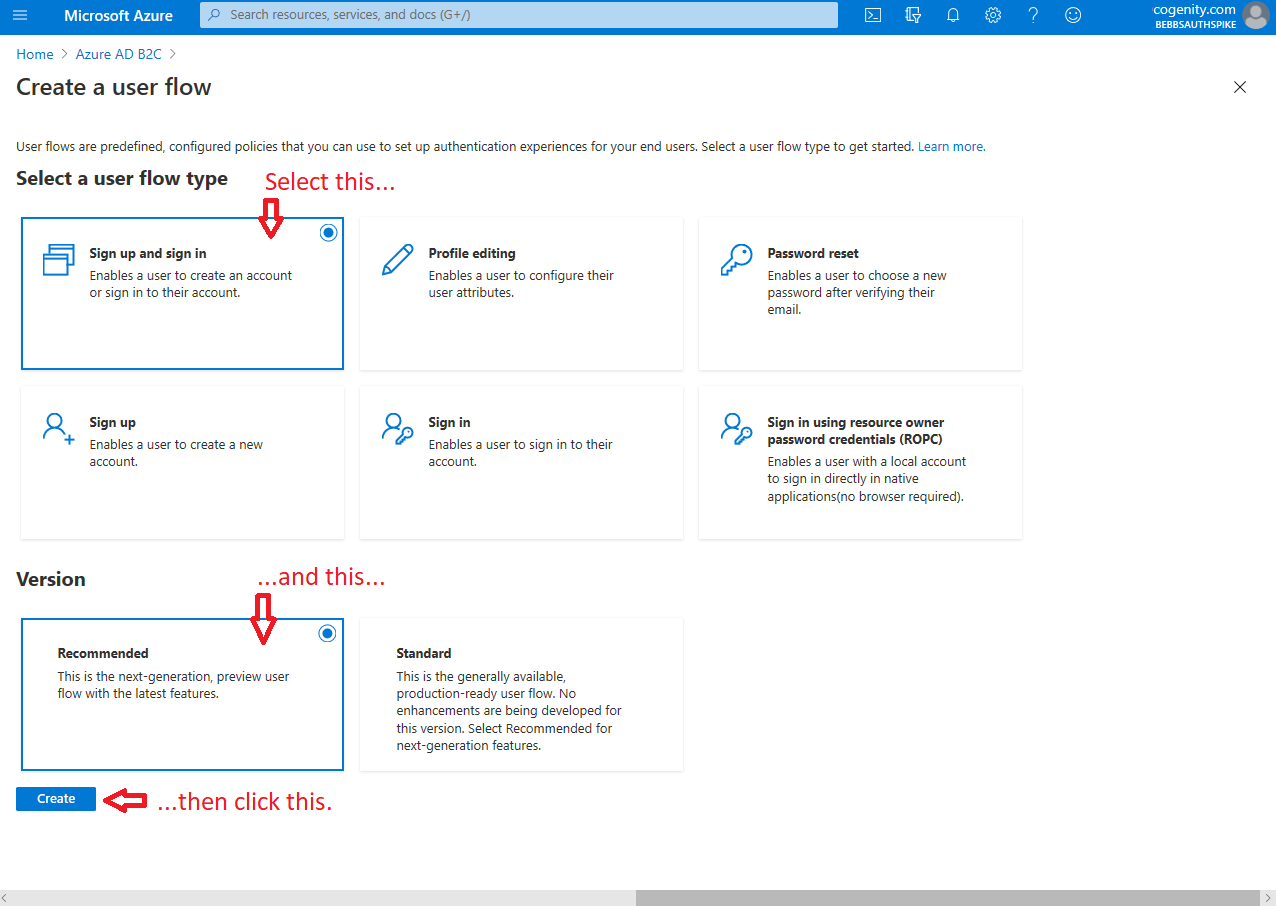
2. Select recommended sign up and sign in flow |
 |
 |
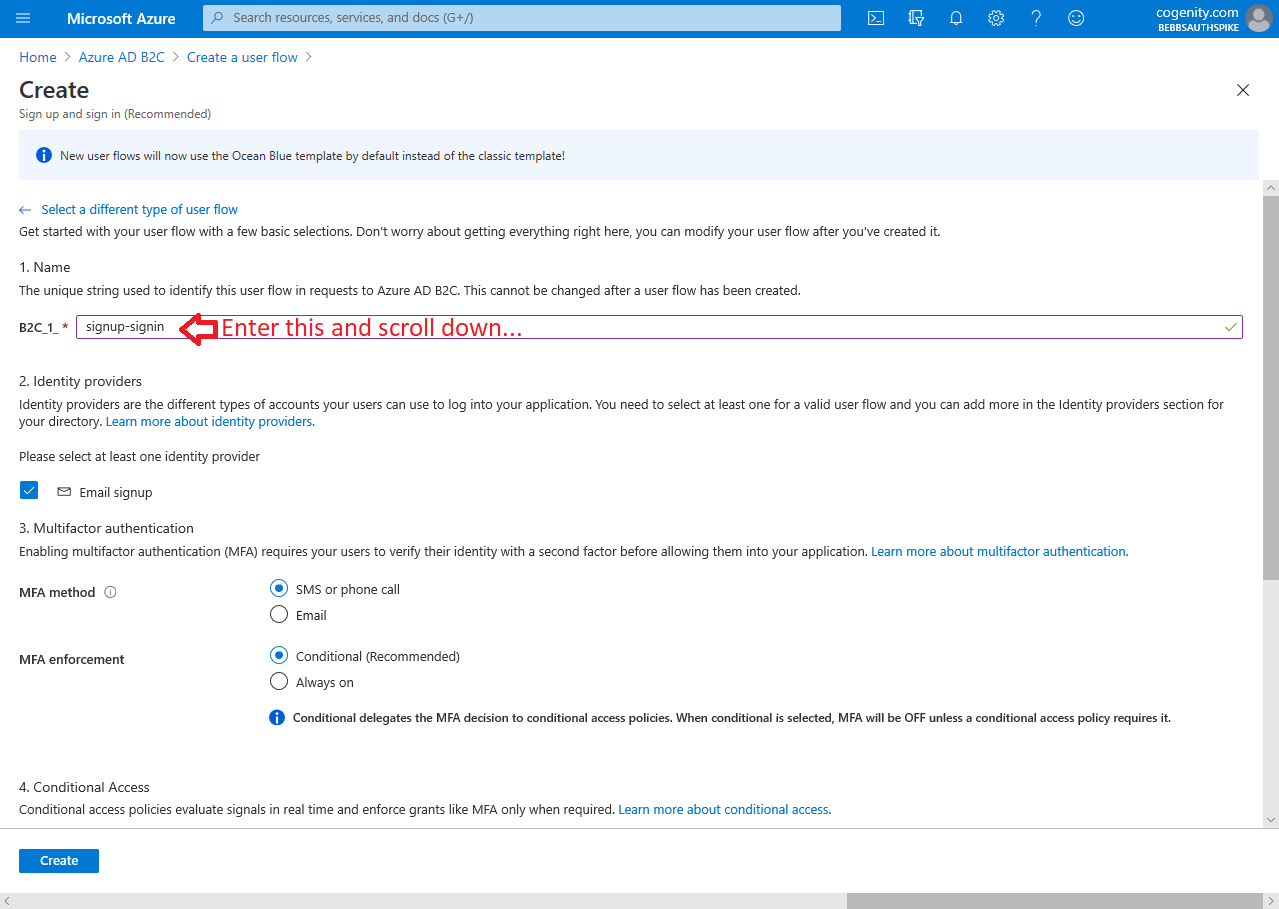
3. Name the user flow |
4. Select registration attributes and token claims |
Make sure you take note of your sign-up and sign-in flow name as you'll need this later.
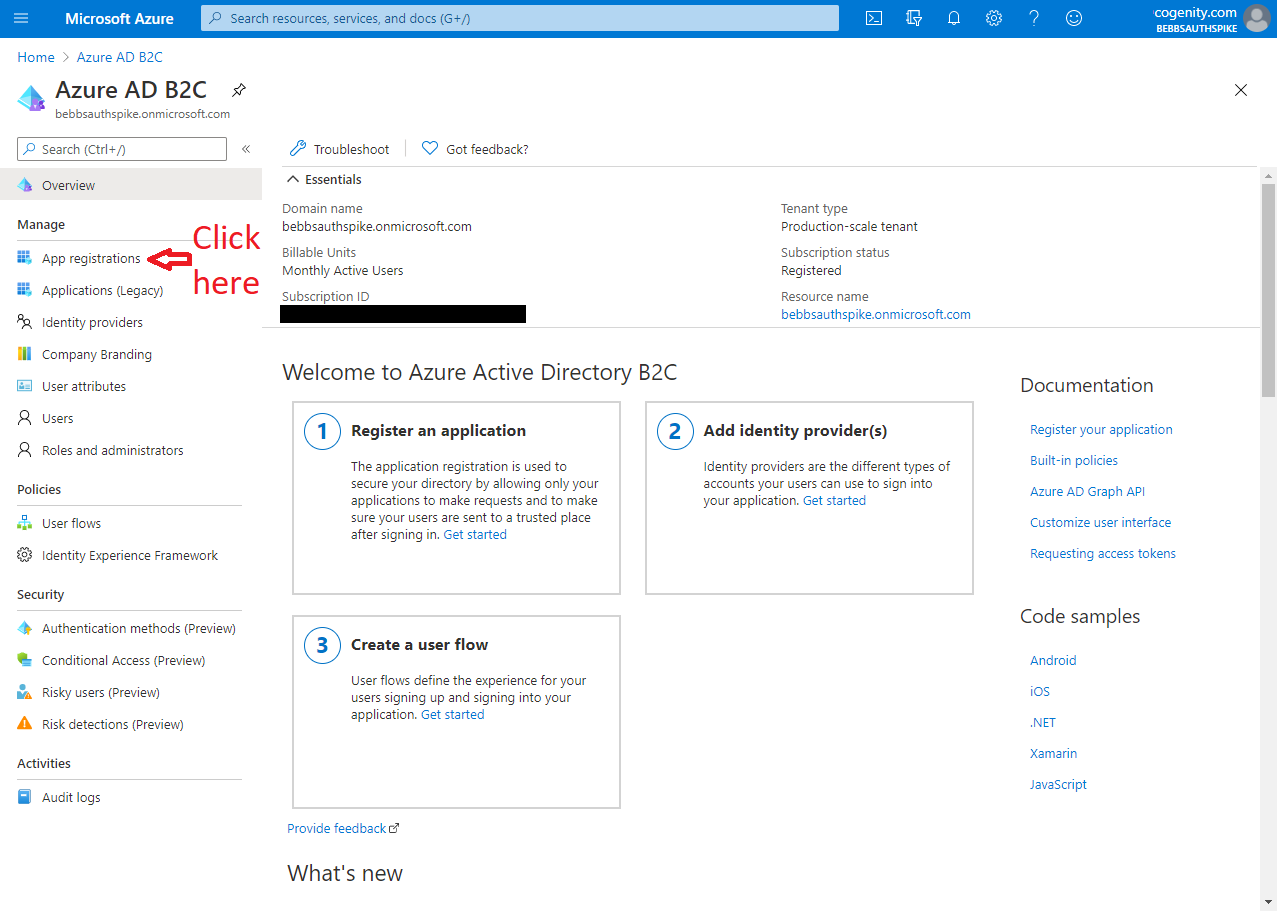
Step 4 - Add App Registration
The last step is to add an app registration. This controls how your app is expected to interact with Azure AD B2C and it's credentials for doing so. Again Matt has us covered but again, his descriptions and screenshots are a little out of date. Furthermore we need to add a couple of "platforms" to the app registration in order to support the variety of operating systems and devices available to Uno applications.
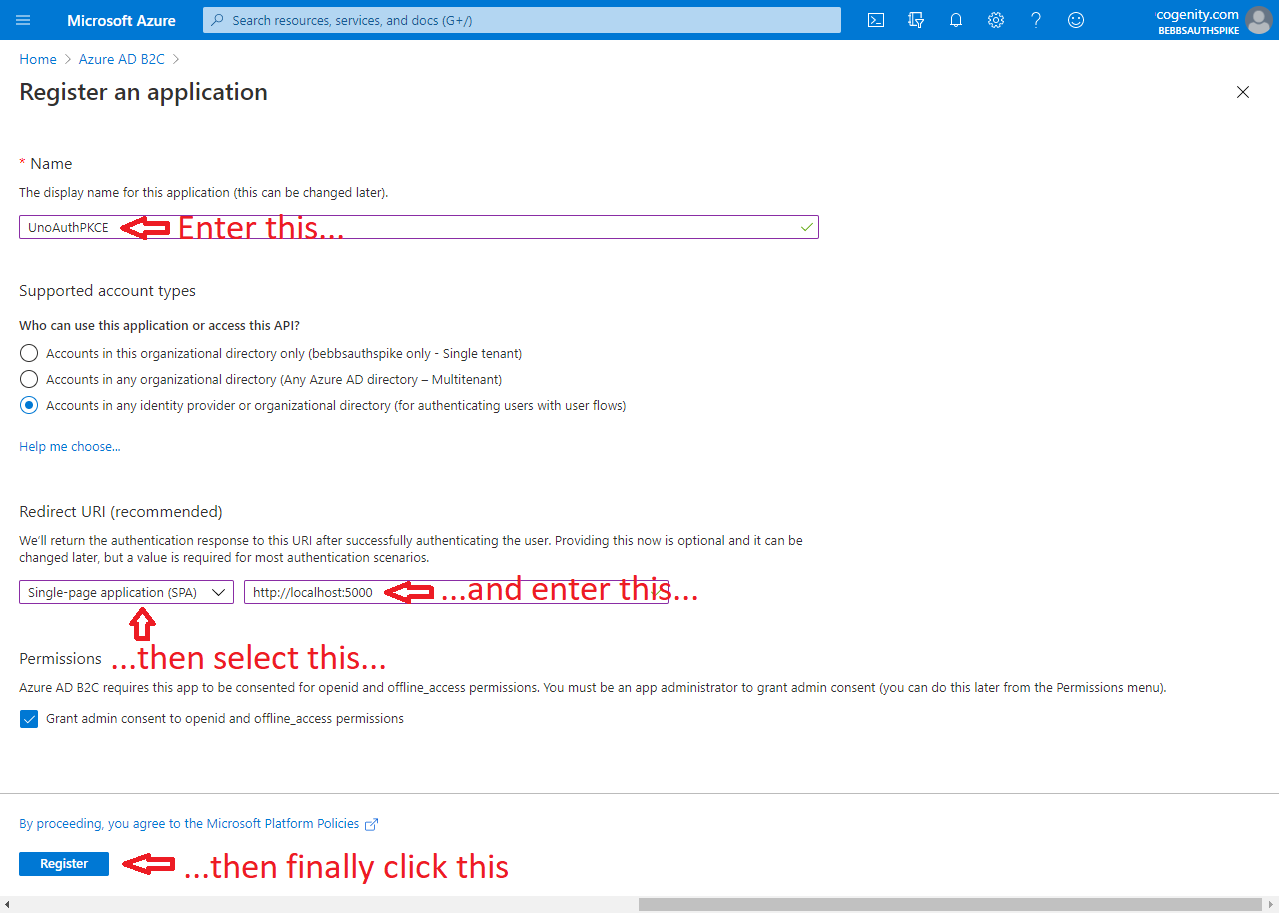
The screen shots below show how to set up an app registration that leverages Authorization Code Flow with PKCE for UWP/WASM authentication and protocol activation for Android / iOS:
 |
 |
1. Navigate to app registration |
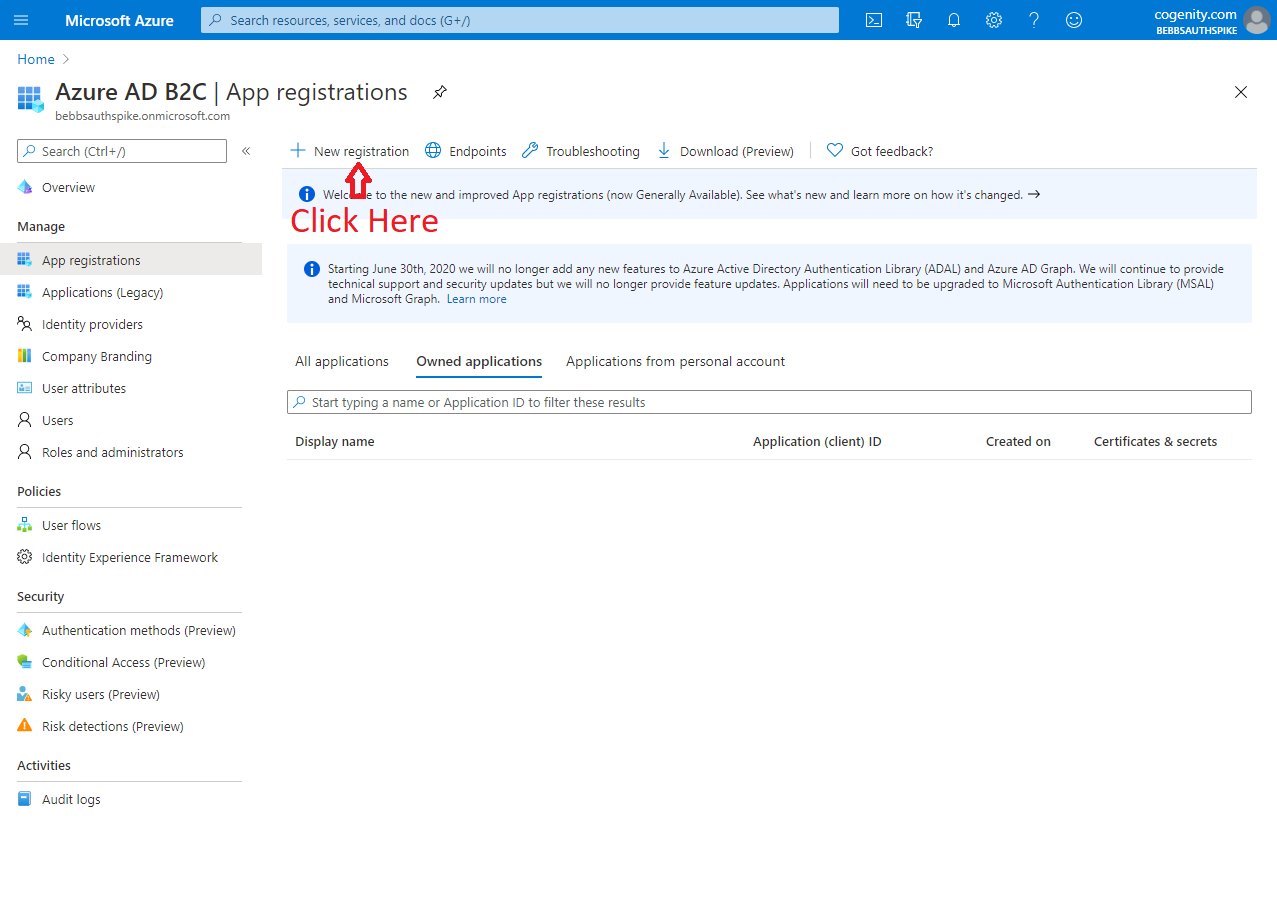
2. Add a new registration |
 |
 |
3. Name the application and change Redirect URI |
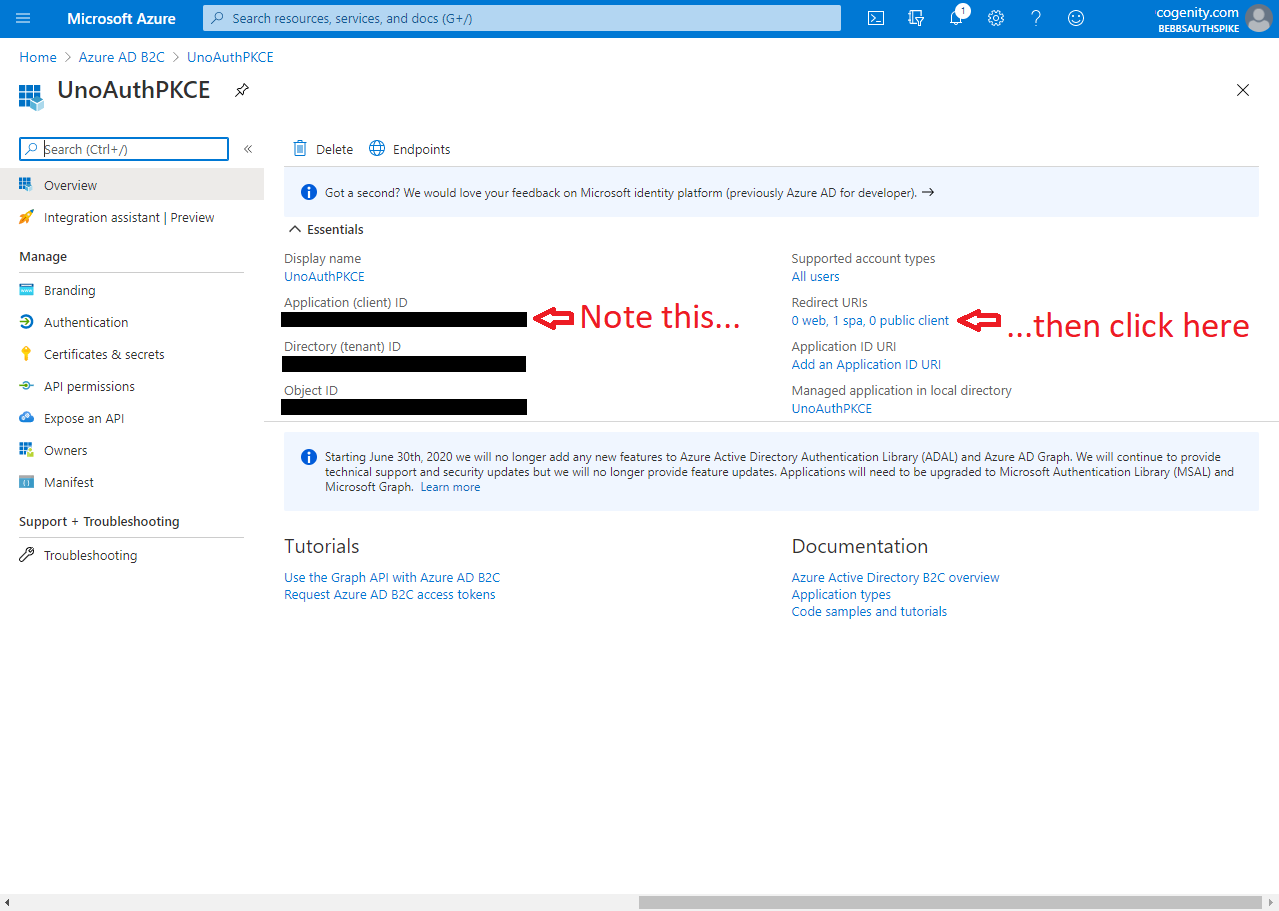
4. Note the application id and click Redirect URIs |
 |
 |
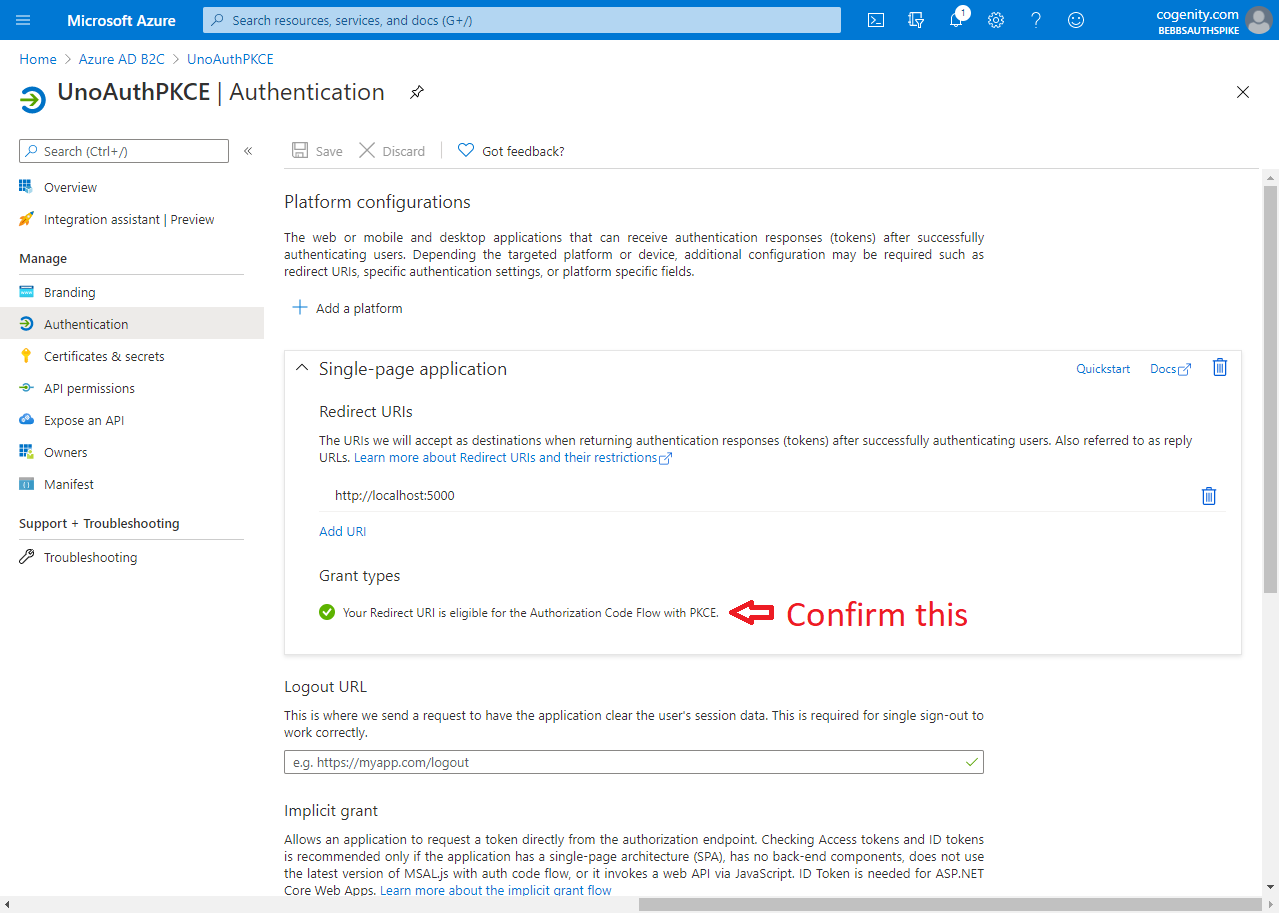
5. Confirm Authorization Code Flow with PKCE |
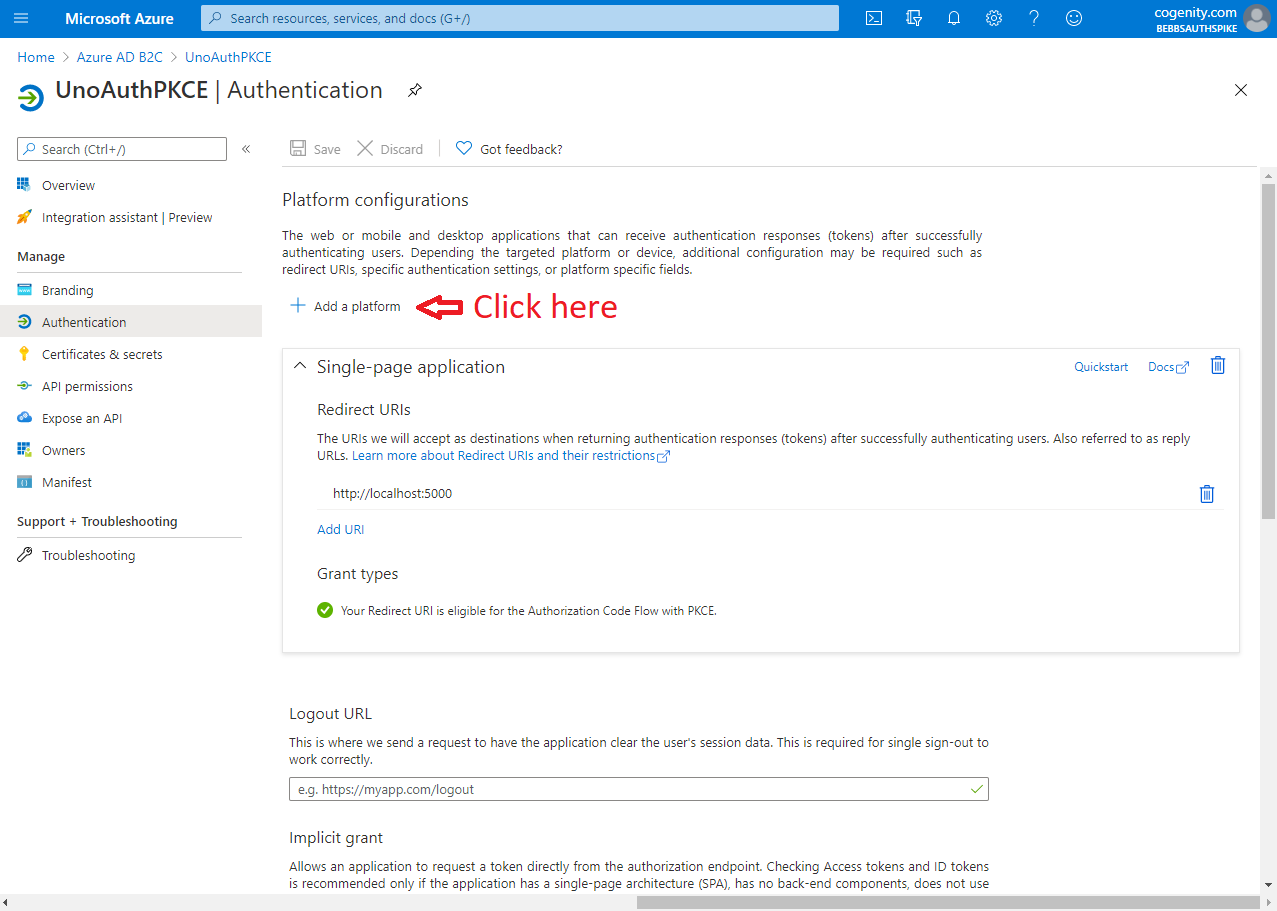
6. Click 'Add a platform' |
 |
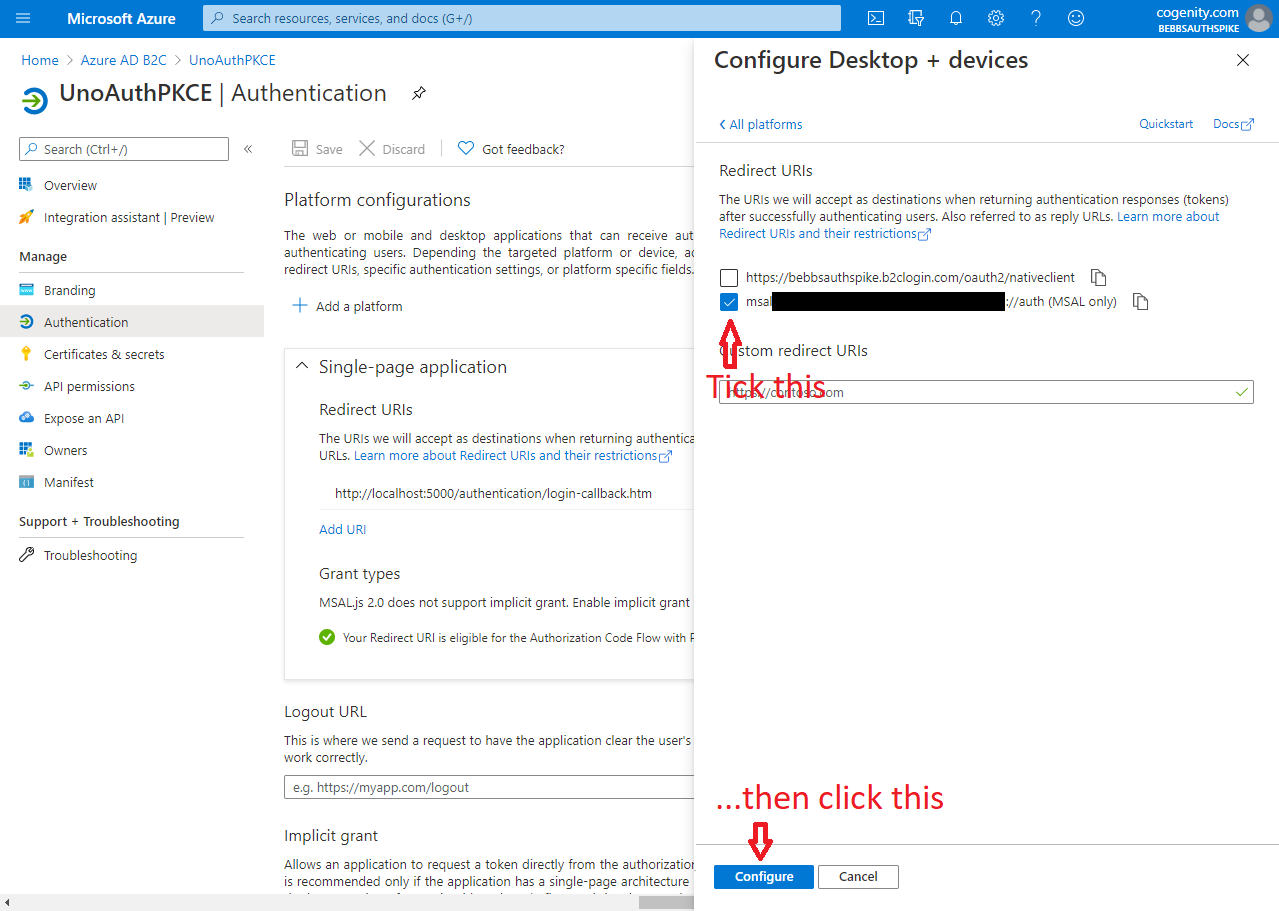 |
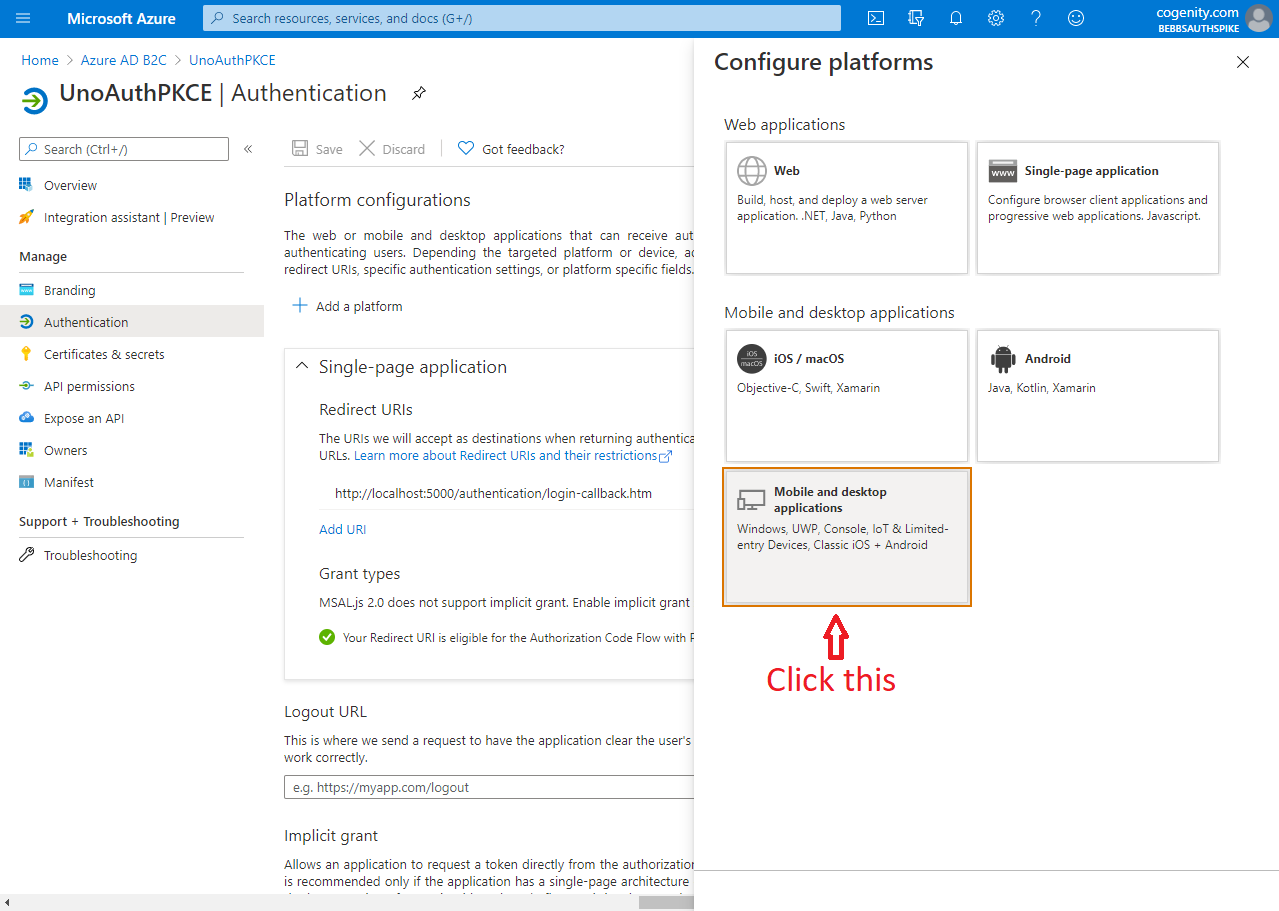
7. Select 'Mobile and desktop applications' |
8. Add MSAL Redirect URI then click Configure |
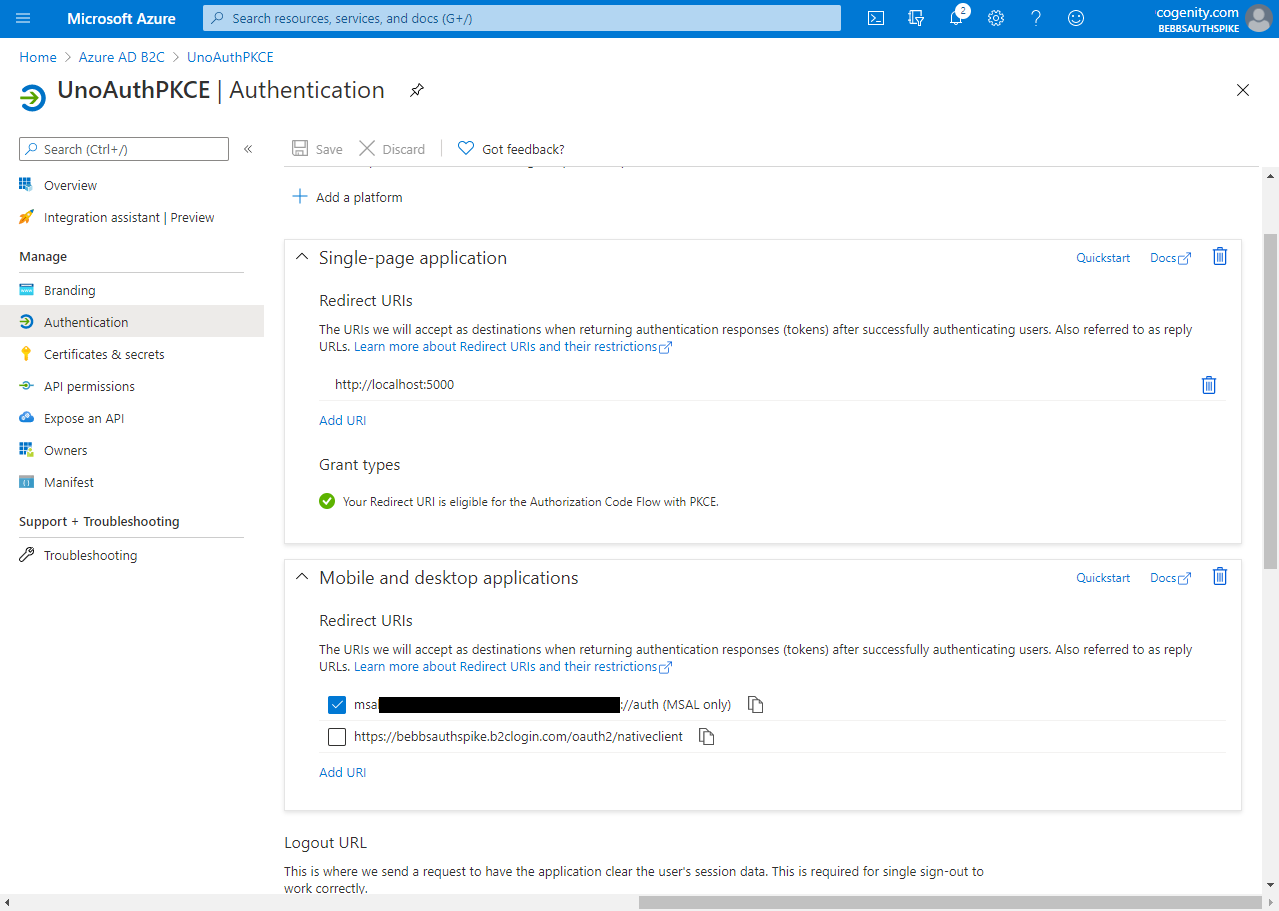
And there we go. We now have an Azure AD B2C tenant set up that is able to authenticate users using best practices across a variety of platforms. If everything is set up correctly, your tenant should look similar to this:
Create an Uno Application
We'll now use Visual Studio to create a cross-platform Uno Platform application which is able to authenticate users using the Azure AD B2C tenant we set up above. If you're not sure how to create a new Uno Platform application then follow the steps here. I'm going to name my project UnoAuth.
Install Dependencies
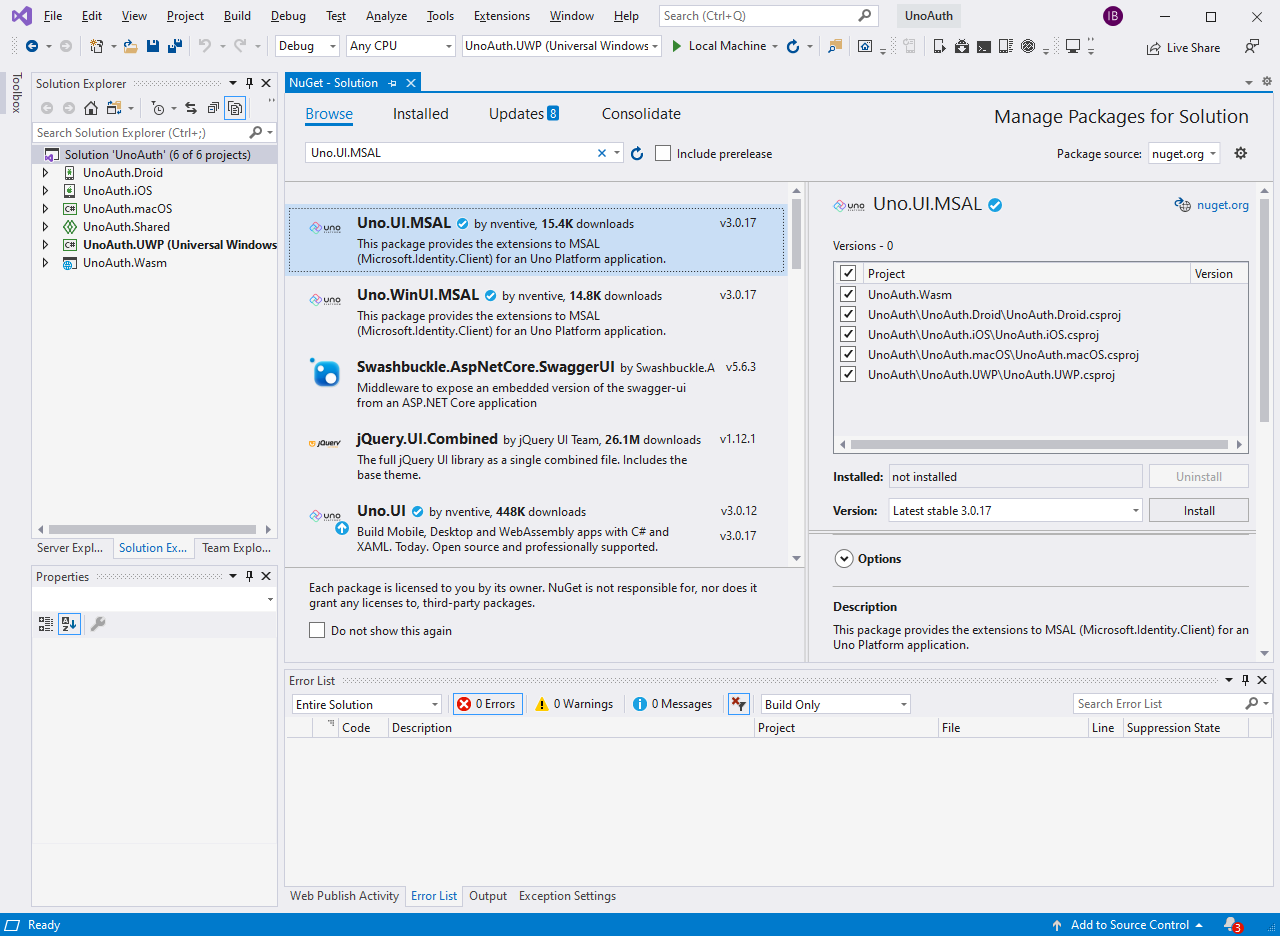
We're going to need to install the following packages to all projects in the solution:
The easiest way to do this is the "Manage Packages for Solution" (via right-clicking on the solution in Solution Explorer) as shown here:
Authentication Configuration
With the prerequisite dependencies installed we're going to provide the authentication settings required by Azure AD B2C. As some of these settings should be considered sensitive (i.e. the ClientId) we're going to use a partial class (Authentication) split between two files (Authentication.cs and Authentication.Secrets.cs) so that we can put access logic in one and sensitive values in the other. We can then ensure the second file doesn't get committed to source control (via .gitignore).
The Authentication.cs should look like this:
using System.Collections.Generic;

namespace UnoAuth
{
    public static partial class Authentication
    {
        // ClientIdSecret should be provided in `Authentication.Secrets.cs` as part of the
        // partial class
        public static string Tenant => TenantSecret;

        // ClientIdSecret should be provided in `Authentication.Secrets.cs` as part of the
        // partial class
        public static string ClientId => ClientIdSecret;

        // PolicySecret should be provided in `Authentication.Secrets.cs` as part of the
        // partial class
        public static string Policy => PolicySecret;

        // RedirectUriSecret should be provided in `Authentication.Secrets.cs` as part of the
        // partial class
#if __ANDROID__ || __IOS__
        public static string RedirectUri => RedirectUriSecretDesktop;
#else
        public static string RedirectUri => RedirectUriSecret;
#endif

#if __IOS__
        // BundleNameSecret should be provided in `Authentication.Secrets.cs` as part of the
        // partial class
        public static string BundleName => BundleNameSecret;
#endif

        // ScopesSecret should be provided in `Authentication.Secrets.cs` as part of the
        // partial class
        public static IEnumerable<string> Scopes => ScopesSecret;

        public static string AuthorityBase => $"https://{Tenant}.b2clogin.com/tfp/{Tenant}.onmicrosoft.com/";

        public static string Authority => $"{AuthorityBase}{Policy}";

        public static string GivenNameClaimType => "given_name";
    }
}
Note the #if ... #else ... #endif compiler directives. These directives allows us to use platform specific code such that the correct redirect URI is used on each platform and platform specific values can be provided only only the platforms that require them.
Next, Authentication.Secrets.cs should look like this (but with the appropriate values):
using System.Collections.Generic;

namespace UnoAuth
{
    public static partial class Authentication
    {
        // In this sample, this value will be "bebbsauthspike"
        private static readonly string TenantSecret = "[REPLACE THIS VALUE]";

        // This is the ClientId value from the app registration.
        // It will be in the form of "aaaaaaaa-bbbb-cccc-dddd-eeeeeeeeeeee"
        private static readonly string ClientIdSecret = "[REPLACE THIS VALUE]";

        // In this sample, this value will be "B2C_1_signup-signin"
        private static readonly string PolicySecret = "[REPLACE THIS VALUE]";

        // In this sample, this value will be "http://localhost:5000"
        private static readonly string RedirectUriSecret = "[REPLACE THIS VALUE]";

        private static readonly string RedirectUriSecretDesktop = $"msal{ClientIdSecret}://auth";

        // In this sample, this value will be "com.companyname.UnoAuth"
        private static readonly string BundleNameSecret = "[REPLACE THIS VALUE]";

        // Note, we're currently only interested in authenticating, not defining any additional scopes which a
        // user may or may not have access to. As such, we only request access to the `openid` scope.
        private static readonly IEnumerable<string> ScopesSecret = new[] { "https://graph.microsoft.com/openid" };
    }
}
Create the UI
Finally we're going to create the UI. Given our app will have three distinct states - Unauthenticated, Authenticating & Authenticated - we're going to use visual states to directly reflect these states in the UI. So, in Main.xaml, update the Xaml to the following:
<Page
    x:Class="UnoAuth.MainPage"
    xmlns="http://schemas.microsoft.com/winfx/2006/xaml/presentation"
    xmlns:x="http://schemas.microsoft.com/winfx/2006/xaml"
    xmlns:d="http://schemas.microsoft.com/expression/blend/2008"
    xmlns:mc="http://schemas.openxmlformats.org/markup-compatibility/2006"
    mc:Ignorable="d">

    <Grid x:Name="StateGrid" Background="{ThemeResource ApplicationPageBackgroundThemeBrush}">
        <VisualStateManager.VisualStateGroups>
            <VisualStateGroup x:Name="AuthenticationStates">
                <VisualState x:Name="Unauthenticated"/>
                <VisualState x:Name="Authenticating">
                    <VisualState.Setters>
                        <Setter Target="AuthenticatingGrid.(UIElement.Visibility)" Value="Visible"/>
                        <Setter Target="AuthenticatedGrid.(UIElement.Visibility)" Value="Collapsed"/>
                        <Setter Target="UnauthenticatedGrid.(UIElement.Visibility)" Value="Collapsed"/>
                    </VisualState.Setters>
                </VisualState>
                <VisualState x:Name="Authenticated">
                    <VisualState.Setters>
                        <Setter Target="AuthenticatedGrid.(UIElement.Visibility)" Value="Visible"/>
                        <Setter Target="AuthenticatingGrid.(UIElement.Visibility)" Value="Collapsed"/>
                        <Setter Target="UnauthenticatedGrid.(UIElement.Visibility)" Value="Collapsed"/>
                    </VisualState.Setters>
                </VisualState>
            </VisualStateGroup>
        </VisualStateManager.VisualStateGroups>
        <Grid x:Name="UnauthenticatedGrid" Visibility="Visible" Background="#FF1D437C">
            <StackPanel HorizontalAlignment="Center" VerticalAlignment="Center">
                <TextBlock Text="Click 'Sign In' To Authenticate" TextWrapping="Wrap" HorizontalAlignment="Center" Style="{ThemeResource TitleTextBlockStyle}" Margin="32,32,32,32" Foreground="White"/>
                <Button x:Name="SignInButton" HorizontalAlignment="Center" Padding="32,16,32,16" Margin="32,32,32,32" Click="SignInButton_Click" Background="#FF412663">
                    <TextBlock Text="Sign In" TextWrapping="Wrap" Style="{ThemeResource SubtitleTextBlockStyle}" Foreground="White"/>
                </Button>
            </StackPanel>
        </Grid>
        <Grid x:Name="AuthenticatingGrid" Visibility="Collapsed" Background="#FFC07000">
            <StackPanel Orientation="Vertical" HorizontalAlignment="Center" VerticalAlignment="Center">
                <TextBlock HorizontalAlignment="Center" Text="Authenticating" Style="{ThemeResource TitleTextBlockStyle}" Margin="32" Foreground="White"/>
                <TextBlock HorizontalAlignment="Center" Text="One Sec..." Style="{ThemeResource SubtitleTextBlockStyle}" Margin="32" Foreground="White"/>
            </StackPanel>
        </Grid>
        <Grid x:Name="AuthenticatedGrid" Visibility="Collapsed" Background="#FF1F6900">
            <StackPanel Orientation="Vertical" HorizontalAlignment="Center" VerticalAlignment="Center">
                <TextBlock HorizontalAlignment="Center" Style="{ThemeResource TitleTextBlockStyle}" Margin="32" Foreground="White">
                    <Run Text="Hi "/><Run Text="{x:Bind Path=GivenName, Mode=OneWay}"/><Run Text="!"/>
                </TextBlock>
                <TextBlock HorizontalAlignment="Center" Text="How are you?" Style="{ThemeResource SubtitleTextBlockStyle}" Margin="32" Foreground="White"/>
                <Button x:Name="SignOutButton" HorizontalAlignment="Center" Padding="32,16,32,16" Margin="32,32,32,32" Click="SignOutButton_Click" Background="#FF412663">
                    <TextBlock Text="Sign Out" TextWrapping="Wrap" Style="{ThemeResource SubtitleTextBlockStyle}" Foreground="White"/>
                </Button>
            </StackPanel>
        </Grid>
    </Grid>
</Page>
Here you can see the three visual states named: Unauthenticated, Authenticating & Authenticated. In the Unauthenticated state the UnauthenticatedGrid will be visible while both the AuthenticatingGrid and AuthenticatedGrid will be collapsed. This pattern is repeated in the other states (Authenticating only showing AuthenticatingGrid & Authenticated only showing AuthenticatedGrid) such that only elements pertinent to the current state are displayed.
In the UnauthenticatedGrid we have a SignInButton from which we use the Click event handler to invoke the authentication process. While authentication is taking place, the AuthenticatingGrid will be shown which asks the user to wait. Finally in the AuthenticatedGrid we have a TextBlock which will shown the given name of the authenticated user and a SignOutButton which allows the user to sign-out.
Implement the Code
In the MainPage.xaml.cs code-behind file we implement the SignInButton_Click method to perform authentication using Azure AD B2C and the SignOutButton_Click method to remove the cached authentication tokens. Here's the code:
using Microsoft.Identity.Client;
using System.Collections.Generic;
using System.IdentityModel.Tokens.Jwt;
using System.Linq;
using Uno.UI.MSAL;
using Windows.UI.Xaml;
using Windows.UI.Xaml.Controls;

namespace UnoAuth
{
    [TemplateVisualState(GroupName = AuthenticationStatesGroupName, Name = UnauthenticatedStateName)]
    [TemplateVisualState(GroupName = AuthenticationStatesGroupName, Name = AuthenticatingStateName)]
    [TemplateVisualState(GroupName = AuthenticationStatesGroupName, Name = AuthenticatedStateName)]
    public sealed partial class MainPage : Page
    {
        private const string AuthenticationStatesGroupName = "AuthenticationStates";
        private const string UnauthenticatedStateName = "Unauthenticated";
        private const string AuthenticatingStateName = "Authenticating";
        private const string AuthenticatedStateName = "Authenticated";

        public static readonly DependencyProperty GivenNameProperty = DependencyProperty.Register("GivenName", typeof(string), typeof(MainPage), new PropertyMetadata(string.Empty));

        private readonly IPublicClientApplication _authenticationClient;

        public MainPage()
        {
            this.InitializeComponent();

            _authenticationClient = PublicClientApplicationBuilder
                .Create(Authentication.ClientId)
#if __IOS__
                .WithIosKeychainSecurityGroup(Authentication.BundleName)
#endif
                .WithB2CAuthority(Authentication.Authority)
                .WithRedirectUri(Authentication.RedirectUri)
                .WithUnoHelpers()
                .Build();
        }

        private void TransitionToAuthenticated(AuthenticationResult authResult)
        {
            var token = new JwtSecurityToken(authResult.IdToken);

            GivenName = token.Claims
                .Where(claim => Authentication.GivenNameClaimType.Equals(claim.Type))
                .Select(claim => claim.Value)
                .First();

            VisualStateManager.GoToState(this, AuthenticatedStateName, true);
        }

        private async void SignInButton_Click(object sender, RoutedEventArgs e)
        {
            VisualStateManager.GoToState(this, AuthenticatingStateName, true);

            try
            {
                var accounts = await _authenticationClient.GetAccountsAsync();

                var result = await _authenticationClient
                    .AcquireTokenSilent(Authentication.Scopes, accounts.FirstOrDefault())
                    .ExecuteAsync();

                TransitionToAuthenticated(result);
            }
            catch (MsalUiRequiredException)
            {
                try
                {
                    var result = await _authenticationClient
                        .AcquireTokenInteractive(Authentication.Scopes)
                        .WithPrompt(Prompt.ForceLogin)
                        .WithUnoHelpers()
                        .ExecuteAsync();

                    TransitionToAuthenticated(result);
                }
                catch
                {
                    // Something went wrong, the the user try again
                    VisualStateManager.GoToState(this, UnauthenticatedStateName, true);
                }
            }
        }

        private async void SignOutButton_Click(object sender, RoutedEventArgs e)
        {
            IEnumerable<IAccount> accounts = await _authenticationClient.GetAccountsAsync();

            while (accounts.Any())
            {
                await _authenticationClient.RemoveAsync(accounts.First());
                accounts = await _authenticationClient.GetAccountsAsync();
            }

            VisualStateManager.GoToState(this, UnauthenticatedStateName, true);
        }

        public string GivenName
        {
            get { return (string)GetValue(GivenNameProperty); }
            set { SetValue(GivenNameProperty, value); }
        }
    }
}
There's a lot here so lets break it down:
PublicClientApplicationBuilder
_authenticationClient = PublicClientApplicationBuilder
    .Create(Authentication.ClientId)
#if __IOS__
    .WithIosKeychainSecurityGroup(Authentication.BundleName)
#endif
    .WithB2CAuthority(Authentication.Authority)
    .WithRedirectUri(Authentication.RedirectUri)
    .WithUnoHelpers()
    .Build();
The PublicClientApplicationBuilder class is used to configure and build a PublicClientApplication instance. This class is used to:
acquire tokens in desktop or mobile applications (Desktop / UWP / Xamarin.iOS / Xamarin.Android). Public client applications are not trusted to safely keep application secrets, and therefore they only access Web APIs in the name of the user only
To rephrase, because apps that get installed on desktop or mobile devices can be relatively easily decompiled, they can't effectively keep secrets in the way apps that run on a remote machine (i.e. server rendered web-apps) can. As such, this class is able to invoke an authentication flow using only a ClientId and RedirectUri which, while sensitive, do not directly grant the app any authentication rights and are therefore not considered secret. Equally, while this application is running in a browser (via WASM) as an SPA, we need to ensure no secrets are held in the JavaScript VM instance as these can also be retrieved by malicious actors.
To build a PublicClientApplication instance we need to provide the PublicClientApplicationBuilder with the ClientId, Authority and RedirectUri values we encountered while creating our tenant. For iOS we also need to provide the 'IosKeychainSecurityGroup' value which we enclose in a compiler directive so that it is only used on that platform. We provide these values via the Authentication class which will read the values from Authentication.Secret.cs.
Of particular note here is the .WithUnoHelpers() line. This extension method provides a custom implementation of ICustomWebUI and IMsalHttpClientFactory to MSAL.NET which allows it to perform authentication in WASM in exactly the same way as it would for an app running on a desktop or mobile device. This is just fantastic and both the MSAL.NET team and Uno Platform deserve kudos for creating and exploiting hooks that allow this use-case to function with so little friction.
AcquireTokenSilent
var accounts = await _authenticationClient.GetAccountsAsync();

var result = await _authenticationClient
    .AcquireTokenSilent(Authentication.Scopes, accounts.FirstOrDefault())
    .ExecuteAsync();
When a user successfully authenticates with Azure AD B2C, they are provided both an access token and a refresh token. Both these tokens are stored in a local cache associated with the application. These cached tokens can be used across/between sessions to ensure a user isn't constantly being prompted to authenticate with a service.
As such, the first thing we endeavour to do when starting the authentication process is to check to see if there is a valid access token or refresh token (which will be automatically exchanged for a new access token) in the local cache. If there is, then the user has already authenticated and we should use the current tokens to avoid prompting the user to authenticate a second time.
And this is what AcquireTokenSilent silent does. We first get a list of accounts in the token cache and (for simplicity) use the first account we find to check for the presence of a valid token. If one is found, authentication succeeds and no further action is required. If a valid token is not found, then the MsalUiRequiredException is thrown which we handle to perform authentication interactively.
AcquireTokenInteractive
var result = await _authenticationClient
    .AcquireTokenInteractive(Authentication.Scopes)
    .WithPrompt(Prompt.ForceLogin)
    .WithUnoHelpers()
    .ExecuteAsync();
If a cached token was not available, we need to prompt the user to authenticate using an interactive process. This process involves opening a browser window and navigating to the authentication page for your Azure AD B2C tenant. Once authentication is complete, an authorization code is returned via the RedirectUri that MSAL is able to exchange for access and refresh tokens which are then stored in the local cache.
Again, note the call to .WithUnoHelpers(). This call performs platform dependent set-up such that the browser/device is able to correctly display a browser and return to the calling application once authentication is complete.
Finally, you may be wondering about the .WithPrompt(Prompt.ForceLogin). Well, currently MSAL.NET doesn't support a unified means to "sign out" of an account. While you are able to remove cached tokens (see the "sign out" code below) it doesn't clear cookies in the browser used to sign in to an account. This would result in a subsequent call to AcquireTokenInteractive simply logging the user in to the previously used account without prompting them for credentials. To prevent this the .WithPrompt(Prompt.ForceLogin) line is used to ensure the user is prompted for credentials regardless of cookie state.
TransitionToAuthenticated
private void TransitionToAuthenticated(AuthenticationResult authResult)
{
    var token = new JwtSecurityToken(authResult.IdToken);

    GivenName = token.Claims
        .Where(claim => Authentication.GivenNameClaimType.Equals(claim.Type))
        .Select(claim => claim.Value)
        .First();

    VisualStateManager.GoToState(this, AuthenticatedStateName, true);
}
Once a user has been authenticated (either silently or interactively) we transition to the Authenticated state. Before doing so however, we use the access token returned from the authentication process to determine the name of the person who authenticated. As Azure AD B2C returns the access token as a JSON Web Token (JWT) we use the JwtSecurityToken class from the System.IdentityModel.Tokens.Jwt package to parse the token. The token will contain many claims many determined by the registration attributes and tokens claims we selected while setting up the policy for our Azure AD B2C tenant.
In this instance, we're interested in the given_name claim so we enumerate through the claims and set the GivenName property to the value of the first claim of this type.
Finally we use the VisualStateManager to transition the UI to the Authenticated state which will greet the user by name.
Sign Out
IEnumerable<IAccount> accounts = await _authenticationClient.GetAccountsAsync();

while (accounts.Any())
{
    await _authenticationClient.RemoveAsync(accounts.First());
    accounts = await _authenticationClient.GetAccountsAsync();
}
If we're able to sign-in then we need to be able to sign-out. Unfortunately this process is not quite a slick as the fluent, async methods we used for sign-in and, as described above, doesn't do anything to remove browser cookies which can be used to transparently re-authenticate. This does seem to be the subject of much confusion on both StackOverflow and Github where many of the associated issues have been closed without a satisfactory solution. Any mention of improving the sign-out experience even seems to have disappeared from the MSAL.NET project boards.
Still, the .WithPrompt(Prompt.ForceLogin) workaround resolves the primary issue for now so we're able to just rely on the code above to remove cached tokens.
Android Changes
In order for authentication to succeed on Android we need to modify both AndroidManifest.xml and the MainActivity.cs
AndroidManifest.xml
In the 'UnoAuth.Droid' project, expand 'Properties' to show the "AndroidManifest.xml" file. Double-click this file to edit it such that it looks similar to the following:
<?xml version="1.0" encoding="utf-8"?>
<manifest xmlns:android="http://schemas.android.com/apk/res/android" package="UnoAuth" android:versionCode="1" android:versionName="1.0">
  <uses-sdk android:minSdkVersion="16" android:targetSdkVersion="29" />
  <application android:label="UnoAuth">
    <activity android:name="microsoft.identity.client.BrowserTabActivity">
      <intent-filter>
        <action android:name="android.intent.action.VIEW" />
        <category android:name="android.intent.category.DEFAULT" />
        <category android:name="android.intent.category.BROWSABLE" />
        <data android:scheme="msal[ClientId]" android:host="auth" />
      </intent-filter>
    </activity>
  </application>
</manifest>
Make sure you amend the android:scheme value to use the ClientId from your App Registration then save changes and close the file.
MainActivity
Open the 'MainActivity.cs' file and amend it to include the following:
using Android.App;
using Android.Content;
using Android.Views;
using Microsoft.Identity.Client;

namespace UnoAuth.Droid
{
  [Activity(
    MainLauncher = true,
    ConfigurationChanges = global::Uno.UI.ActivityHelper.AllConfigChanges,
    WindowSoftInputMode = SoftInput.AdjustPan | SoftInput.StateHidden)]
  public class MainActivity : Windows.UI.Xaml.ApplicationActivity
  {
    protected override void OnActivityResult(int requestCode, Result resultCode, Intent data)
    {
      base.OnActivityResult(requestCode, resultCode, data);
      AuthenticationContinuationHelper.SetAuthenticationContinuationEventArgs(requestCode, resultCode, data);
    }
  }
}
iOS Changes
As with most everything on iOS, the changes to make authentication work are a little more tricky. We need to change the iOS project properties and both the 'Info.plist' and 'Entitlements.plist' files.
Project Properties
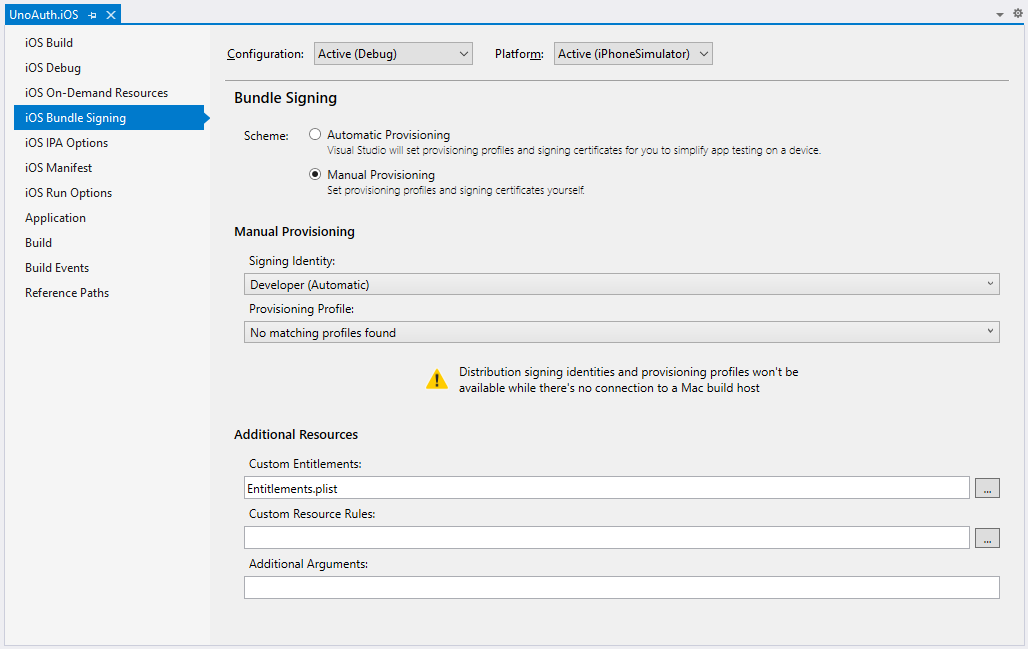
Right click on the iOS project properties, navigate to "iOS Bundle Signing" and select "Manual Provisioning". Next, under Additional Resources, make sure the Custom Entitlements setting is set to "Entitlements.plist".
Your iOS Bundle Signing page should now look like this:
Info.plist
Right click on the 'Info.plist' file in the iOS project and select View Code. At the end of the root <dict> element add the CFBundleURLTypes key and value shown below (amending the CFBundleURLSchemes value to use the ClientId for your app registration):
<?xml version="1.0" encoding="UTF-8"?>
<!DOCTYPE plist PUBLIC "-//Apple//DTD PLIST 1.0//EN" "http://www.apple.com/DTDs/PropertyList-1.0.dtd">
<plist version="1.0">
<dict>
	<key>CFBundleDisplayName</key>
	<string>UnoAuth</string>
	<key>CFBundleIdentifier</key>
	<string>com.companyname.UnoAuth</string>

  ...

	<key>CFBundleURLTypes</key>
	<array>
		<dict>
			<key>CFBundleURLName</key>
			<string>MSAL</string>
			<key>CFBundleURLSchemes</key>
			<array>
				<string>msal[ClientID]</string>
			</array>
			<key>CFBundleTypeRole</key>
			<string>None</string>
		</dict>
	</array>
</dict>
</plist>
Finally copy the CFBundleIdentifier value (in this case com.companyname.UnoAuth) then save and close the file.
Entitlements.plist
Double click on the 'Entitlements.plist' file in the iOS project to open the visual editor. In the 'Entitlements' list select "Keychain" and then tick "Enable Keychain" in the 'Description' section. Finally, paste the bundle identifier you copied from 'Info.plist' into the 'Keychain Groups' text box so it looks like this:
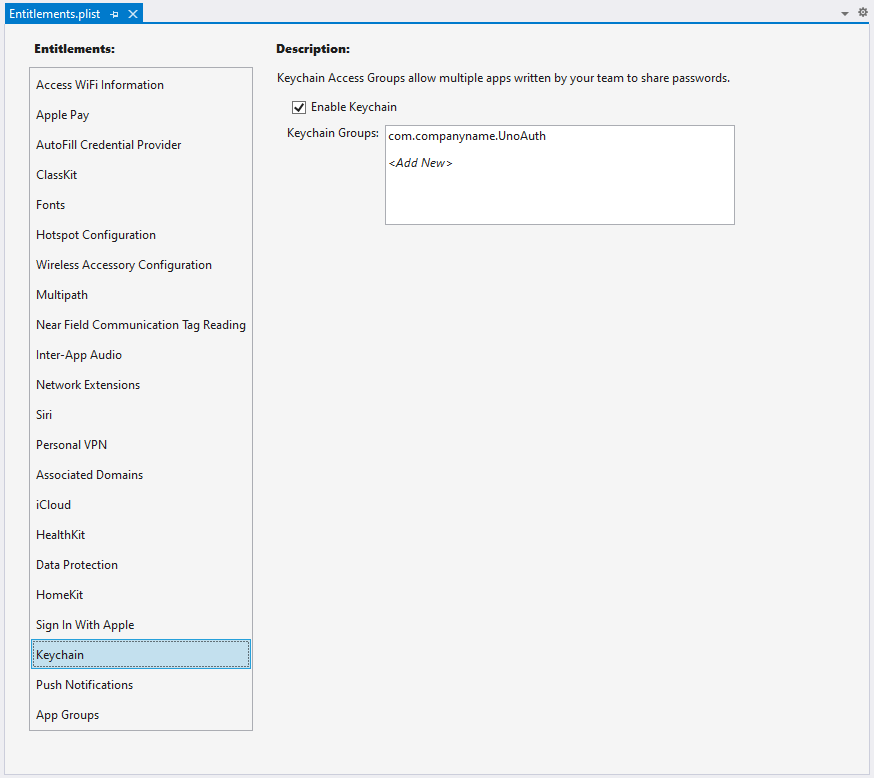
Finally save the changes and close the file.
Testing
Now, if everything is set up correctly, you should be able to use Azure AD B2C and MSAL.NET to authenticate users. Here is UnoAuth running on...
UWP
WASM
Android
iOS
Conclusion
As we can see, it is now possible to use Azure AD B2C and MSAL.NET to perform client-side authentication, across multiple platforms, using a single code-base. Furthermore, while a few platform specific tweaks are required in a couple of the head projects, the code to perform authentication is both concise, understandable and shared by all platforms.
While IAM remains a complicated subject (as attested to by the length of this post!) I hope the above provides sufficient information that a reader is able to quickly get these technologies working together and allow them to move on to more engaging parts of their app.
Finally
If you're interested in using the Uno Platform to deliver cross-platform apps or have an upcoming project for which you'd like evaluate Uno Platform's fit, then please feel free to drop me a line using any of the links below or from my about page. As a freelance software developer and remote contractor I'm always interested in hearing from potential new clients or ideas for new collaborations.