Intro
A project I'm working on requires a microservice like evaluation environment. A brief google revealed very little that would suffice so I decided to quickly knock up my own. At the same time, I thought it would be a great opportunity to evaluate Hot Chocolate by Chilli Cream; a relative newcomer to the (very sparse) GraphQL for .NET scene. In this post I'll also be using NSwag to generate OpenAPI documents and Typed Clients for downstream services and, finally, I will be containerizing the microservices using Docker and employing Docker Compose to run and test them.
Contents
- Requirements
- About Hot Chocolate
- Solution Structure
- ReST Services
- GraphQL Service
- Containerization
- Testing
- Conclusion
Requirements
Solution
The requirements for the test environment were pretty simple:
- A .net core web service which, when called, fetched and collated data from two other .net core web services. As (conditionally) aggregating data from multiple sources is one of GraphQL's primary use cases I decided a GraphQL endpoint would make for a great entry point into this flow.
- Avoid any tight coupling between the GraphQL endpoint and the underlying web-services yet provide strong compile-time guarantees of cohesion with these services.
- A simple build/deployment/debug loop.
- Embrace 'modern' methodologies; for example asynchronous controller actions and Nullable Reference Types
Environment
To follow the following steps you will need:
- .Net Core 3.1 SDK
- Powershell (I'd recommend the new Windows Terminal)
- A text editor (VSCode perhaps?)
- Docker for Windows
About Hot Chocolate
I have only just started using Hot Chocolate but really like it. It allows code-first schema modelling using basic POCO classes leaving all the GraphQL magic to be implemented using a neat fluent syntax rooted from a SchemaBuilder class. While this post is most certainly aimed at GraphQL beginners you may glean some additional information about Hot Chocolate from their "Quick Start" or by watching any one of the many talks by Michael Steib on it's use.
Now, if you do watch/have seen any of the videos here, you will notice that Schema Stitching is mentioned numerous times. In fact, in a couple of videos it is discussed specifically in relation to "stitching" ReST services into a GraphQL schema (along with other GraphQL schemas). This sounded fantastic and was certainly a desired use case when I started using Hot Chocolate. Unfortunately, there is zero documentation or guidance on how this can be achieved at the current time so the project that follows uses basic resolvers to fetch data from ReST services and AutoMapper to map between schemas.
Before getting set up, be sure to install Hot Chocolate's template into the dotnet CLI as follows:
dotnet new -i HotChocolate.Templates.Server
Solution Structure
Here's how I set up my solution:
# Create directories and initialize git
mkdir Cheeze
cd Cheeze
git init
mkdir src
cd src
# Create projects and remove superfluous files
dotnet new graphql -n Cheeze.Graph
dotnet new webapi -n Cheeze.Store
dotnet new classlib -n Cheeze.Store.Client
rm .\Cheeze.Store.Client\Class1.cs
dotnet new webapi -n Cheeze.Inventory
dotnet new classlib -n Cheeze.Inventory.Client
rm .\Cheeze.Inventory.Client\Class1.cs
# Create solution for easy of use from VS
dotnet new sln -n Cheeze
dotnet sln add .\Cheeze.Graph\Cheeze.Graph.csproj
dotnet sln add .\Cheeze.Store\Cheeze.Store.csproj
dotnet sln add .\Cheeze.Store.Client\Cheeze.Store.Client.csproj
dotnet sln add .\Cheeze.Inventory\Cheeze.Inventory.csproj
dotnet sln add .\Cheeze.Inventory.Client\Cheeze.Inventory.Client.csproj
# Add project references
dotnet add .\Cheeze.Graph\Cheeze.Graph.csproj reference .\Cheeze.Store.Client\Cheeze.Store.Client.csproj
dotnet add .\Cheeze.Graph\Cheeze.Graph.csproj reference .\Cheeze.Inventory.Client\Cheeze.Inventory.Client.csproj
Unfortunately, if we do a dotnet build now we'll see a couple of errors due to a bug in the Hot Chocolate server template which fails to add the HotChocolate namespace to the list of using statements in Startup.cs. This can be resolved with the following command:
@(Get-Content .\Cheeze.Graph\Startup.cs)[0..2] + "using HotChocolate;" + @(Get-Content .\Cheeze.Graph\Startup.cs)[3..44] | Set-Content .\Cheeze.Graph\Startup.cs
Everything should now build correctly.
ReST Services
We'll start by building out our ReST services.
Note: These ReST services simply return static (and somewhat bare) data as that's all the need to be for my test environment. As such there is no persistence layer implemented and much of the schema for each type is unused.
The two services are as follows:
Cheeze.Store
This web api will provide a full list of all cheeses available through the store along with descriptions and image URLs. It will (for simplicity) have a single endpoint which allows a consumer to retrieve all available cheeses.
To set this up, do the following:
- Delete the
Controllersfolder - We're a microservice and will be providing a single endpoint so there's no need for plurality here. - Delete
WeatherForecast.cs - Add the following files:
Controller.cs
using System;
using System.Collections.Generic;
using System.Net;
using System.Threading.Tasks;
using Microsoft.AspNetCore.Mvc;

namespace Cheeze.Store
{
    [Route("api/store")]
    public class Controller : Microsoft.AspNetCore.Mvc.Controller
    {
        [HttpGet]
        [ProducesResponseType(typeof(IEnumerable<Cheese>), (int)HttpStatusCode.OK)]
        public Task<ActionResult<IEnumerable<Cheese>>> Get()
        {
            var result = new[]
            {
                new Cheese
                {
                    Id = Guid.Parse("1468841a-5fbe-41c5-83b3-ab136b7ae70c"),
                    Name = "API Cheese"
                }
            };

            return Task.FromResult<ActionResult<IEnumerable<Cheese>>>(Ok(result));
        }
    }
}
Cheese.cs
using System;
using System.ComponentModel.DataAnnotations;

namespace Cheeze.Store
{
    public class Cheese
    {
        public Guid Id { get; set; }

        public Uri? Uri { get; set; }

        [Required]
        public string Name { get; set; } = string.Empty;

        public string Description { get; set; } = string.Empty;

        public decimal Price { get; set; }
    }
}
Cheeze.Inventory
This web api provides up to date inventory information for cheeses available through the store. It will have two endpoints which allow a consumer to get the availability of a specific cheese or a list of cheeses by id.
To set this up, do the following:
- Delete the
Controllersfolder - same as above - Delete
WeatherForecast.cs - Add the following files:
Controller.cs
using Microsoft.AspNetCore.Mvc;
using System;
using System.Collections.Generic;
using System.Linq;
using System.Net;
using System.Threading.Tasks;

namespace Cheeze.Inventory
{
    [Route("api/inventory")]
    public class Controller : Microsoft.AspNetCore.Mvc.Controller
    {
        private static readonly Random Random = new Random();

        [HttpGet("{id}")]
        [ProducesResponseType(typeof(uint), (int)HttpStatusCode.OK)]
        public Task<ActionResult<uint>> Get(Guid id)
        {
            return Task.FromResult<ActionResult<uint>>(Ok((uint)Random.Next(10)));
        }

        [HttpPost]
        [ProducesResponseType(typeof(IEnumerable<Available>), (int)HttpStatusCode.OK)]
        public Task<ActionResult<IEnumerable<Available>>> Post([FromBody] Request request)
        {
            var available = request.Ids
                .Select(id => new Available { Id = id, Quantity = (uint)Random.Next(10) })
                .ToArray();

            return Task.FromResult<ActionResult<IEnumerable<Available>>>(Ok(available));
        }
    }
}
Request.cs
using System;
using System.Collections.Generic;
using System.Linq;

namespace Cheeze.Inventory
{
    public class Request
    {
        public IEnumerable<Guid> Ids { get; set; } = Enumerable.Empty<Guid>();
    }
}
Available.cs
using System;

namespace Cheeze.Inventory
{
    public class Available
    {
        public Guid Id { get; set; }

        public uint Quantity { get; set; }
    }
}
Providing Swagger Endpoints
Both ReST services will provide a swagger endpoints to facilitate their use. We're using 'NSwag' to generate these endpoints for each project as follows:
- Add the required packages to each project:
dotnet add .\Cheeze.Store\Cheeze.Store.csproj package NSwag.AspNetCore
dotnet add .\Cheeze.Inventory\Cheeze.Inventory.csproj package NSwag.AspNetCore
In the
Startup.ConfigureServicesmethod, register the required Swagger services:public void ConfigureServices(IServiceCollection services) { services.AddControllers(); // Register the Swagger services services.AddOpenApiDocument(); }In the
Startup.Configuremethod, enable the middleware for serving the generated Swagger specification and the Swagger UI:public void Configure(IApplicationBuilder app) { if (env.IsDevelopment()) { app.UseDeveloperExceptionPage(); } // Remove HTTP->HTTPS redirection for simplified hosting in Docker //app.UseHttpsRedirection(); app.UseRouting(); // Register the Swagger generator and the Swagger UI middlewares app.UseOpenApi(); app.UseSwaggerUi3(); app.UseAuthorization(); app.UseEndpoints(endpoints => { endpoints.MapControllers(); }); }
Build the solution to restore all dependencies:
dotnet build
If you now build and run either project you should now be able to navigate to the swagger endpoint UI. For example:
dotnet run --project .\Cheeze.Store\Cheeze.Store.csproj
start "microsoft-edge:http://localhost:5000/swagger"
Generating Typed Clients
We're now going to use NSwag`s MSBuild package to generate a Typed Client for each project at build time. To do this:
Install the required packages
dotnet add .\Cheeze.Store\Cheeze.Store.csproj package NSwag.MSBuild
dotnet add .\Cheeze.Inventory\Cheeze.Inventory.csproj package NSwag.MSBuild
Build project to restore packages
Edit the project file to enable Nullable Reference Types and include all assemblies on build:
<Project Sdk="Microsoft.NET.Sdk.Web">
    <PropertyGroup>
        <TargetFramework>netcoreapp3.1</TargetFramework>
        <Nullable>enable</Nullable> <!-- Add this line -->
        <CopyLocalLockFileAssemblies>true</CopyLocalLockFileAssemblies> <!-- And this line -->
    </PropertyGroup>
    ...
</Project>
Generate an NSwag configuration file
Building the solution after adding the
NSwag.MSBuildpackage should have added the NSwag tools to your nuget package cache (usually in the following directory:%userprofile%\.nuget\packages\nswag.msbuild\13.2.0\tools\NetCore31). Using these build tools we can generate the required configuration file for each project with the following command:cd .\Cheeze.Inventory ~\.nuget\packages\nswag.msbuild\13.2.0\tools\NetCore31\dotnet-nswag.exe new cd ..\Cheeze.Store ~\.nuget\packages\nswag.msbuild\13.2.0\tools\NetCore31\dotnet-nswag.exe new cd ..Now we need to replace sections the generated configuration file with populated values. In each of files do the following:
Set the
runtimeversion:{ "runtime": "NetCore31", ... }Modify the
documentGeneratorsection to generate an OpenAPI document from the generated web assembly. Do this by replacing thedocumentGeneratorsection with the following (ensuring to replace thecontrollerNames,defaultUrlTemplateandassemblyPathsto the correct values for each project):{ ... "documentGenerator": { "webApiToOpenApi": { "controllerNames": [ "Cheeze.Store.Controller" ], "isAspNetCore": true, "resolveJsonOptions": false, "defaultUrlTemplate": "api/store", "addMissingPathParameters": false, "includedVersions": null, "defaultPropertyNameHandling": "Default", "defaultReferenceTypeNullHandling": "Null", "defaultDictionaryValueReferenceTypeNullHandling": "NotNull", "defaultResponseReferenceTypeNullHandling": "NotNull", "defaultEnumHandling": "Integer", "flattenInheritanceHierarchy": false, "generateKnownTypes": true, "generateEnumMappingDescription": false, "generateXmlObjects": false, "generateAbstractProperties": false, "generateAbstractSchemas": true, "ignoreObsoleteProperties": false, "allowReferencesWithProperties": false, "excludedTypeNames": [], "serviceHost": null, "serviceBasePath": null, "serviceSchemes": [], "infoTitle": "My Title", "infoDescription": null, "infoVersion": "1.0.0", "documentTemplate": null, "documentProcessorTypes": [], "operationProcessorTypes": [], "typeNameGeneratorType": null, "schemaNameGeneratorType": null, "contractResolverType": null, "serializerSettingsType": null, "useDocumentProvider": true, "documentName": "v1", "aspNetCoreEnvironment": null, "createWebHostBuilderMethod": null, "startupType": null, "allowNullableBodyParameters": true, "output": null, "outputType": "Swagger2", "assemblyPaths": [ "bin/$(Configuration)/netcoreapp3.1/Cheeze.Store.dll" ], "assemblyConfig": null, "referencePaths": [], "useNuGetCache": true } }, ... }Remove the
openApiToTypeScriptClientandopenApiToCSharpControllersections from within thecodeGeneratorssection of each file.Modify the
openApiToCSharpClientsection to generate C# typed clients from the OpenAPI document. Do this by replacing theopenApiToCSharpClientsection with the following (ensuring to replace theclassName,namespaceandoutputto the correct values for each project):{ ... "codeGenerators": { "openApiToCSharpClient": { "clientBaseClass": null, "configurationClass": null, "generateClientClasses": true, "generateClientInterfaces": true, "injectHttpClient": true, "disposeHttpClient": true, "protectedMethods": [], "generateExceptionClasses": true, "exceptionClass": "ApiException", "wrapDtoExceptions": true, "useHttpClientCreationMethod": false, "httpClientType": "System.Net.Http.HttpClient", "useHttpRequestMessageCreationMethod": false, "useBaseUrl": false, "generateBaseUrlProperty": false, "generateSyncMethods": false, "exposeJsonSerializerSettings": false, "clientClassAccessModifier": "public", "typeAccessModifier": "public", "generateContractsOutput": false, "contractsNamespace": null, "contractsOutputFilePath": null, "parameterDateTimeFormat": "s", "parameterDateFormat": "yyyy-MM-dd", "generateUpdateJsonSerializerSettingsMethod": true, "serializeTypeInformation": false, "queryNullValue": "", "className": "StoreClient", "operationGenerationMode": "MultipleClientsFromOperationId", "additionalNamespaceUsages": [], "additionalContractNamespaceUsages": [], "generateOptionalParameters": false, "generateJsonMethods": false, "enforceFlagEnums": false, "parameterArrayType": "System.Collections.Generic.IEnumerable", "parameterDictionaryType": "System.Collections.Generic.IDictionary", "responseArrayType": "System.Collections.Generic.ICollection", "responseDictionaryType": "System.Collections.Generic.IDictionary", "wrapResponses": false, "wrapResponseMethods": [], "generateResponseClasses": true, "responseClass": "SwaggerResponse", "namespace": "Cheeze.Store.Client", "requiredPropertiesMustBeDefined": true, "dateType": "System.DateTimeOffset", "jsonConverters": null, "anyType": "object", "dateTimeType": "System.DateTimeOffset", "timeType": "System.TimeSpan", "timeSpanType": "System.TimeSpan", "arrayType": "System.Collections.Generic.ICollection", "arrayInstanceType": "System.Collections.ObjectModel.Collection", "dictionaryType": "System.Collections.Generic.IDictionary", "dictionaryInstanceType": "System.Collections.Generic.Dictionary", "arrayBaseType": "System.Collections.ObjectModel.Collection", "dictionaryBaseType": "System.Collections.Generic.Dictionary", "classStyle": "Poco", "generateDefaultValues": true, "generateDataAnnotations": true, "excludedTypeNames": [], "excludedParameterNames": [], "handleReferences": false, "generateImmutableArrayProperties": false, "generateImmutableDictionaryProperties": false, "jsonSerializerSettingsTransformationMethod": null, "inlineNamedArrays": false, "inlineNamedDictionaries": false, "inlineNamedTuples": true, "inlineNamedAny": false, "generateDtoTypes": true, "generateOptionalPropertiesAsNullable": false, "templateDirectory": null, "typeNameGeneratorType": null, "propertyNameGeneratorType": null, "enumNameGeneratorType": null, "serviceHost": null, "serviceSchemes": null, "output": "$(Target)/StoreClient.Generated.cs" } } }
Edit the project file to use the configuration file to generate the typed client for each project (replacing
[PROJECT_NAME]withCheeze.Store.ClientorCheeze.Inventory.Clientas appropriate):<Project Sdk="Microsoft.NET.Sdk.Web"> ... <Target Name="NSwag" AfterTargets="Build"> <Copy SourceFiles="@(ReferencePath)" DestinationFolder="$(OutDir)References" /> <Exec Condition="'$(NSwag)'=='true'" Command="$(NSwagExe_Core31) run nswag.json /variables:Configuration=$(Configuration),OutDir=$(OutDir),Target=$(SolutionDir)[PROJECT_NAME]" /> <RemoveDir Directories="$(OutDir)References" /> </Target> ... </Project>Add a
build.ps1file to thesrcdirectory containing:$solutionDir = Get-Location dotnet build .\Cheeze.Store\Cheeze.Store.csproj /p:NSwag=true /p:SolutionDir=$solutionDir dotnet build .\Cheeze.Inventory\Cheeze.Inventory.csproj /p:NSwag=true /p:SolutionDir=$solutionDir dotnet build .\Cheeze.Store.Client\Cheeze.Store.Client.csproj dotnet build .\Cheeze.Inventory.Client\Cheeze.Inventory.Client.csproj dotnet build .\Cheeze.Graph\Cheeze.Graph.csprojThe build script is required to ensure projects are built in the correct order and to ensure we don't try to regenerate our typed clients while containerizing our projects (see below).
Adding
Newtonsoft.JsonandSystem.ComponentModel.Annotationspackages to the client projects:dotnet add .\Cheeze.Store.Client\Cheeze.Store.Client.csproj package Newtonsoft.Json dotnet add .\Cheeze.Store.Client\Cheeze.Store.Client.csproj package System.ComponentModel.Annotations dotnet add .\Cheeze.Inventory.Client\Cheeze.Inventory.Client.csproj package Newtonsoft.Json dotnet add .\Cheeze.Inventory.Client\Cheeze.Inventory.Client.csproj package System.ComponentModel.AnnotationsBuild!
.\build.ps1If all the above is correct, we should have a successful build and see that
StoreClient.Generated.csandInventoryClient.Generated.csappear in theCheeze.StoreandCheeze.Inventorydirectories respectively.
GraphQL Service
Finally we can get around to implementing our GraphQL service. We'll undertake the following steps to get this service running as expected:
- Create an object model of our DTOs and Graph Query as POCO objects
- Build a GraphQL schema from these objects using the SchemaBuilder
- Configure the .Net Core host to correctly run the GraphQL Service
First however, as we're not currently able to use Schema Stitching, we need to perform mapping between the Cheeze.Store and Cheeze.Graph schemas ourselves. To facilitate this, we're going to use Automapper so we need to add the package to Cheeze.Graph using:
dotnet add .\Cheeze.Graph\Cheeze.Graph.csproj package AutoMapper
Object Model
Add a Cheese.cs to Cheeze.Graph with the following content:
using System;

namespace Cheeze.Graph
{
    public class Cheese
    {
        public Guid Id { get; set; }

        public Uri? Uri { get; set; }

        public string Name { get; set; } = string.Empty;

        public string Description { get; set; } = string.Empty;

        public decimal Price { get; set; }

        public int Available { get; set; }
    }
}
There are two things to note here:
Firstly, the Cheese type is very similar - but not identical - to the Cheese type declared in Cheeze.Store. Crucially this Cheese type has an Available property which is not in the data provided by Cheeze.Store and instead will be populated by dependent calls to Cheeze.Inventory.
Secondly this type does not implement any behaviour, it merely declares the shape (i.e. schema) of the data that can be provided by this service. All GraphQL functionality is provided via the SchemaBuilder and associated Resolvers as see below.
Schema & Resolvers
Add a Schema.cs file to Cheeze.Graph with the following content:
using AutoMapper;
using HotChocolate;
using HotChocolate.Resolvers;
using HotChocolate.Types;
using System;
using System.Collections.Generic;
using System.Linq;
using System.Threading.Tasks;

namespace Cheeze.Graph
{
    public static class Schema
    {
        private static readonly IMapper Mapper;

        static Schema()
        {
            var mapping = new MapperConfiguration(
                configuration =>
                {
                    configuration.CreateMap<Cheeze.Store.Client.Cheese, Cheese>()
                        .ForMember(cheese => cheese.Available, options => options.Ignore());
                }
            );

            Mapper = mapping.CreateMapper();
        }
        private static async Task<IReadOnlyDictionary<Guid, int>> FetchInventory(this Cheeze.Inventory.Client.IInventoryClient inventoryClient, IReadOnlyList<Guid> cheeses)
        {
            var response = await inventoryClient.PostAsync(new Cheeze.Inventory.Client.Request { Ids = cheeses.ToArray() });

            return cheeses
                .GroupJoin(response, id => id, available => available.Id, (id, available) => (Id: id, Available: available.Select(a => a.Quantity).FirstOrDefault()))
                .ToDictionary(tuple => tuple.Id, tuple => tuple.Available);
        }

        private static async Task<int> ResolveInventory(this IResolverContext context)
        {
            var dataLoader = context.BatchDataLoader<Guid, int>(
                "availableById",
                context.Service<Cheeze.Inventory.Client.IInventoryClient>().FetchInventory);

            return await dataLoader.LoadAsync(context.Parent<Cheese>().Id, context.RequestAborted);
        }

        private static async Task<IEnumerable<Cheese>> ResolveCheeses(this IResolverContext context)
        {
            var results = await context.Service<Cheeze.Store.Client.IStoreClient>().GetAsync();

            return results.Select(source => Mapper.Map<Cheeze.Store.Client.Cheese, Cheese>(source));
        }

        public static ISchemaBuilder Build()
        {
            return SchemaBuilder.New()
                .AddQueryType(
                    typeDescriptor => typeDescriptor
                        .Field("Cheese")
                            .Resolver(context => context.ResolveCheeses()))
                .AddObjectType<Cheese>(
                    cheese => cheese
                        .Field(f => f.Available)
                            .Resolver(context => context.ResolveInventory()))
                .ModifyOptions(o => o.RemoveUnreachableTypes = true);
        }
    }
}
Amazingly, this single class implements all the functionality needed to provide a GraphQL compliant endpoint in ~70 SLoC. There is rather a lot going on though so lets break it down starting with the static public method Build.
The Build method uses (and returns) a SchemaBuilder to define the schema that will be presented through the GraphQL endpoint. This comprises two main elements: the QueryType - provided by the .AddQueryType() fluent method - and the Cheese object type - provided by the .AddObjectType<Cheese>() fluent method. We'll dig into each of these here.
The AddQueryType defines the types of queries that can be executed by this GraphQL endpoint in a purely code-first manner. The code above adds a field Cheese which, when used in the query, uses the ResolveCheeses() extension method to provide data for the query. The ResolveCheeses() extension method uses the IResolverContext to retrieve the typed client for the Cheeze.Store ReST endpoint and calls the GetAsync() method on it. Finally, AutoMapper is used to map between the Cheeze.Store.Client.Cheese and Cheeze.Graph.Cheese types, specifically ignoring the Available property of Cheeze.Graph.Cheese.
Similarly, the AddObjectType<Cheese> method intercepts objects of type Cheese and uses the ResolveInventory() extension method to populate the Available property. This time however, a BatchDataLoader is used from within the extension method to neatly avoid the N+1 problem.
Service Binding & Configuration
Finally we need to bind required service and configuration types so, again in Cheeze.Graph add the following:
A
Configuration.csfile in anInventoryfolder containing:using System; namespace Cheeze.Graph.Inventory { public class Configuration { public Uri BaseAddress { get; set; } = new Uri("https://inventory"); } }A
Configuration.csfile in aStorefolder containing:using System; namespace Cheeze.Graph.Store { public class Configuration { public Uri BaseAddress { get; set; } = new Uri("https://store"); } }In
Program.csrefactorCreateWebHostBuildermethod to the following:public static IWebHostBuilder CreateWebHostBuilder(string[] args) { return WebHost .CreateDefaultBuilder(args) .ConfigureAppConfiguration((hostingContext, config) => config.AddEnvironmentVariables("Cheeze:Graph:")) .ConfigureServices( (hostContext, services) => { services.AddOptions<Store.Configuration>().Bind(hostContext.Configuration.GetSection("Store")); services.AddOptions<Inventory.Configuration>().Bind(hostContext.Configuration.GetSection("Inventory")); }) .UseStartup<Startup>(); }And add the two required usings:
using Microsoft.Extensions.Configuration;
using Microsoft.Extensions.DependencyInjection;
Here we're adding configuration from Environment Variables (prefixed with
Cheeze:Graph) to our application and binding this configuration to the types added above.In
Startup.csrefactor theConfigureServicesmethod to the following:public void ConfigureServices(IServiceCollection services) { services.AddHttpClient<Cheeze.Store.Client.IStoreClient, Cheeze.Store.Client.StoreClient>( (serviceProvider, httpClient) => httpClient.BaseAddress = serviceProvider.GetRequiredService<IOptions<Store.Configuration>>().Value.BaseAddress ); services.AddHttpClient<Cheeze.Inventory.Client.IInventoryClient, Cheeze.Inventory.Client.InventoryClient>( (serviceProvider, httpClient) => httpClient.BaseAddress = serviceProvider.GetRequiredService<IOptions<Inventory.Configuration>>().Value.BaseAddress ); // this enables you to use DataLoader in your resolvers. services.AddDataLoaderRegistry(); // Add GraphQL Services services.AddGraphQL(Schema.Build()); }And again add the required using:
using Microsoft.Extensions.Options;Here we're binding the typed clients for
Cheeze.StoreandCheeze.Inventoryand ensuring they're configured with the appropriate base addresses. Finally we're using theSchema.Build()method to provide the GraphQL schema to theservices.AddGraphQL()method.
And that - as the say - is that. If we run our build script now we should find everything builds successfully.
Containerization
Now, rather than configuring and spinning up all the services manually, we'll simplify our debug/deploy loop by containerizing our services and using Docker Compose to do the job for us. From Visual Studio this would be a simple case of using the "Add > Docker Support" and "Add > Container Orchestration Support" options from the "Solution Explorer" as described here. However, as we've so far done pretty much everything from the command-line, lets try carrying that on.
Docker Support
First we'll add docker support to each of the top-level projects by using the standard multi-stage dockerfile template. I was unable to find an official source for this template so uploaded a version to my DotnetCliDocker repository which we're be using here.
@(Invoke-WebRequest "https://raw.githubusercontent.com/ibebbs/DotnetCliDocker/master/Dockerfile3_1" | Select-Object -ExpandProperty Content) -replace "\(ProjectName\)","Cheeze.Graph" | Set-Content .\Cheeze.Graph\Dockerfile
@(Invoke-WebRequest "https://raw.githubusercontent.com/ibebbs/DotnetCliDocker/master/Dockerfile3_1" | Select-Object -ExpandProperty Content) -replace "\(ProjectName\)","Cheeze.Store" | Set-Content .\Cheeze.Store\Dockerfile
@(Invoke-WebRequest "https://raw.githubusercontent.com/ibebbs/DotnetCliDocker/master/Dockerfile3_1" | Select-Object -ExpandProperty Content) -replace "\(ProjectName\)","Cheeze.Inventory" | Set-Content .\Cheeze.Inventory\Dockerfile
Container Orchestration Support
Now lets add a couple of files so that we can use Docker Compose to run our microservice environment
Add a
docker-compose.ymlfile to thesrcdirectory containing:version: '3.4' services: cheeze.store: image: ${DOCKER_REGISTRY-}cheezestore build: context: . dockerfile: Cheeze.Store/Dockerfile cheeze.inventory: image: ${DOCKER_REGISTRY-}cheezeinventory build: context: . dockerfile: Cheeze.Inventory/Dockerfile cheeze.graph: image: ${DOCKER_REGISTRY-}cheezegraph build: context: . dockerfile: Cheeze.Graph/Dockerfile ports: - "8081:80" environment: - Cheeze__Graph__Store__BaseAddress=http://cheeze.store - Cheeze__Graph__Inventory__BaseAddress=http://cheeze.inventory depends_on: - cheeze.store - cheeze.inventoryAdd a
.dockerignoreto thesrcdirectory by running:@(Invoke-WebRequest "https://raw.githubusercontent.com/ibebbs/DotnetCliDocker/master/.dockerignore") | Set-Content .\.dockerignoreBuild and run our containers
docker-compose buildThis might take some time but should result in a successful build afterwhich you can run the containers using:
docker-compose run
Testing
With our composed containers running, open up a browser and navigate to http://localhost:8081/playground. You should see something like the following:
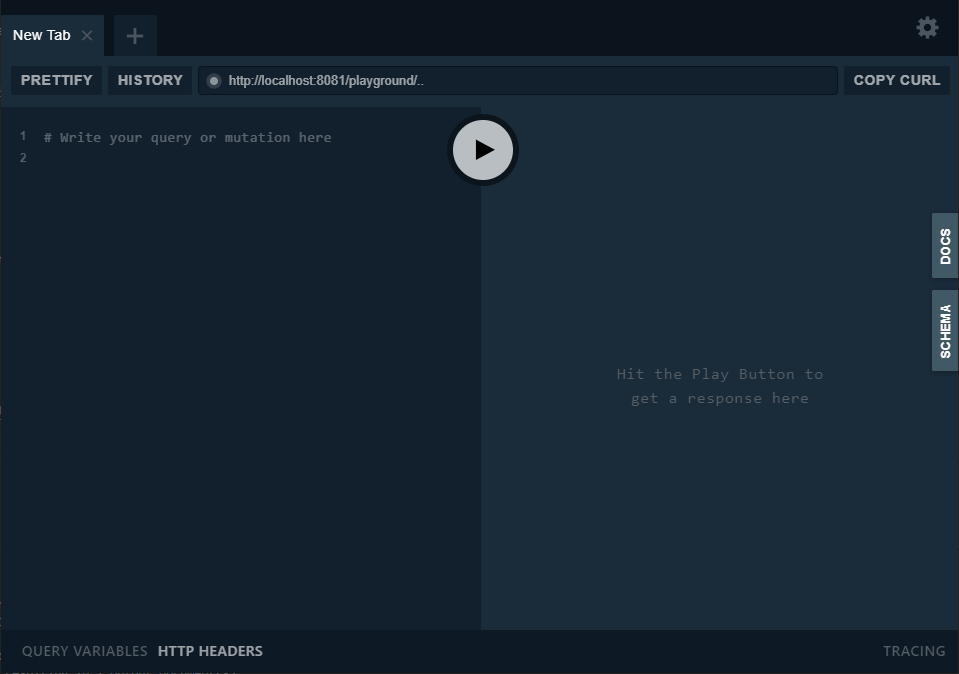
The two tabs on the right hand side of the screen - "Docs" & "Schema" - allow you to examine the GraphQL endpoint to determine the queries you can execute and the content the service is able to receive. As we've got very little data in our services, we'll just use a basic query to retrieve the data we've defined. In the left pain of the playground (underneath "# Write your query or mutation here") enter the following:
{
  Cheese {
    id,
    name,
    available
  }
}
Note: As you're typing this, you should see that auto-complete is available and extremely quick.
Finally, once the query is complete, click the "Play" button in the centre of the screen. If everything has compiled and build correctly, you should see the following in the right hand pane:
{
  "data": {
    "Cheese": [
      {
        "id": "1468841a-5fbe-41c5-83b3-ab136b7ae70c",
        "name": "API Cheese",
        "available": 9
      }
    ]
  }
}
And there we go. We've successfully used GraphQL to integrate and intelligently query two independent ReST services. Nice!
Conclusion
If you're hitting up against some of the limitations of ReST - particularly for mobile client applications - I would very much recommend taking a look at GraphQL and ChilliCream's Hot Chocolate library in particular. Hot Chocolate makes setting up a GraphQL endpoint incredibly easy, and it's code-first capabilities allow you to concentrate on modelling a domain that works for you and your customers rather than the GraphQL framework.
Hot Chocolate is under very heavy development with fantastic new features getting added at an amazing cadence (hopefully ReST based Schema Stitching will bubble to the top of ChilliCream's priority list soon). Furthermore support for this library is excellent; in point of fact, while authoring this article I posted a question in their Slack workspace only to get it answered by Michael Steib himself just moments later and which culminated in a discussion that lasted the better part of an hour.
ChilliCream also have a client-side library for GraphQL called "Strawberry Shake". While currently in alpha it looks extremely promising for creating strongly-typed GraphQL clients as it will - apparently - provide "protobuff style" code generation for the client direct from a GraphQL service's schema.
Lastly, if you are authoring ReST endpoints, I would very much recommend considering NSwag over Swashbuckle. For me, NSwag's integration is a bit nicer than Swashbuckle and has a greater focus on the OpenAPI toolchain. Furthermore NSwag's tooling is first class allowing you to generate OpenAPI documents and/or client side libraries (in a number of languages) using a variety of tools, not least of which being the MSBuild target we used here.
All code for from this post can be found in my "Cheeze" repository on GitHub.
As always, if you have any questions or comments on the above or would like to discuss any point further, please don't hesitate to contact me using any of the links below or from my about page.