TL;DR
Azure Functions and Azure Blob Storage provide an incredibly quick, easy and cheap way of adding dynamic content to a static website. In this post I show how I used this combo to add a list of completed "code kata" to my blog's sidebar.
Intro
A code kata is an exercise in programming which helps programmers hone their skills through practice and repetition.
There are many ways of practising code katas and many sites that provide code katas for you to practise with. I use Codewars.
While completing a kata yesterday, I thought it would be good to show the katas I'm completing on my blog. A quick search revealed that Codewars has an API for retrieving profile and kata information and webhooks for notifying external services when this information changes. A workable solution for getting kata information on my blog quickly came to mind and I simply couldn't resist taking time out to implement it.
Just a few - very enjoyable - hours later, I had this:
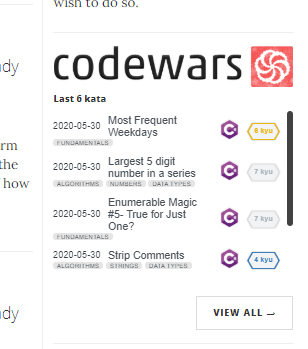
Here's how I did it.
Static & Serverless
My blog is written in Markdown and uses Wyam.io to translate the markdown (plus other content) into a static site which is hosted on Github Pages. All content is source controlled and the process of adding a new blog post is very smooth.
As such I didn't really want to add any complexity to the process by trying to regenerate the site when I complete a kata. This meant I needed to a) embed an external page within my blog, and b) write a service which would generate this page whenever I complete a kata. Furthermore, given the relative infrequency with which I undertake code katas, I didn't want a service running 24/7. This meant going serverless.
These requirements led to this architecture:

Which can be read as follows:
- When a Kata is submitted to Codewars ...
- ... a webhook is used to call the Http Trigger of our Azure Function.
- The Azure Function queries the Codewars API for the data it needs to generate an HTML page.
- The generated page is saved to Azure Blob Storage in a container which is configured to allow "Public read access for blobs only"
- The homepage for my blog is modified to include an
<embed/>element pointing to the generated page meaning ... - ... visitors to my blog now receive both the content from GitHub Pages and the new page from Azure Blob Storage.
Implementation
Azure Function
If you're using Visual Studio 2019, writing this kind of Azure Function is an absolute doddle:
- Create a new project and select the "Azure Functions" template.
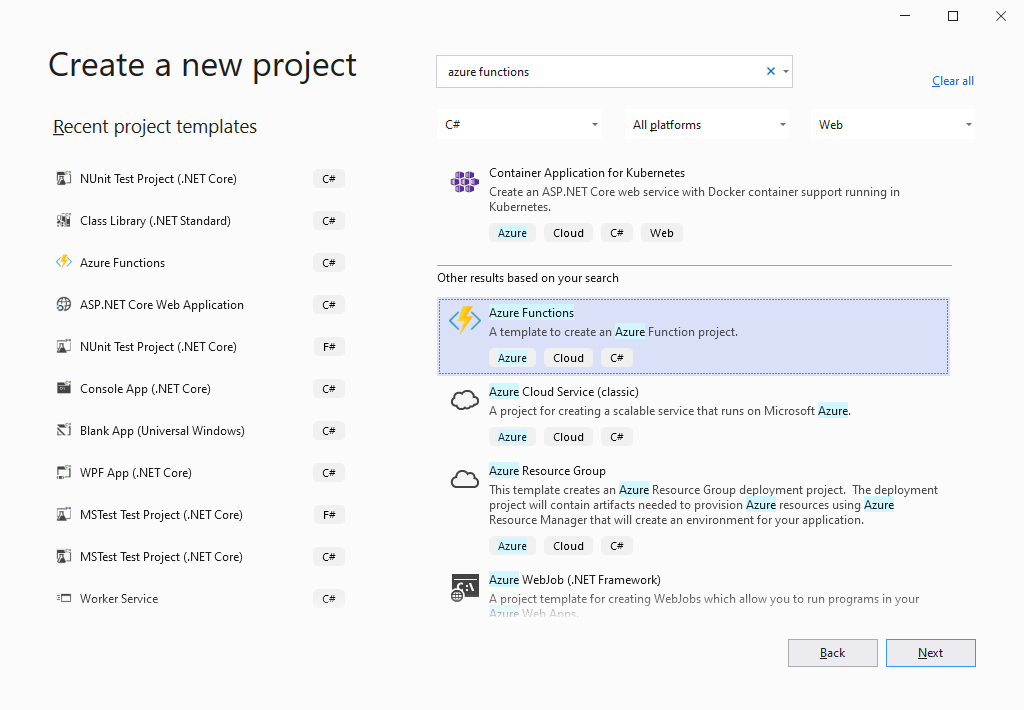
- Name the project - in this example I've used the name "Blog.FunctionsExample"
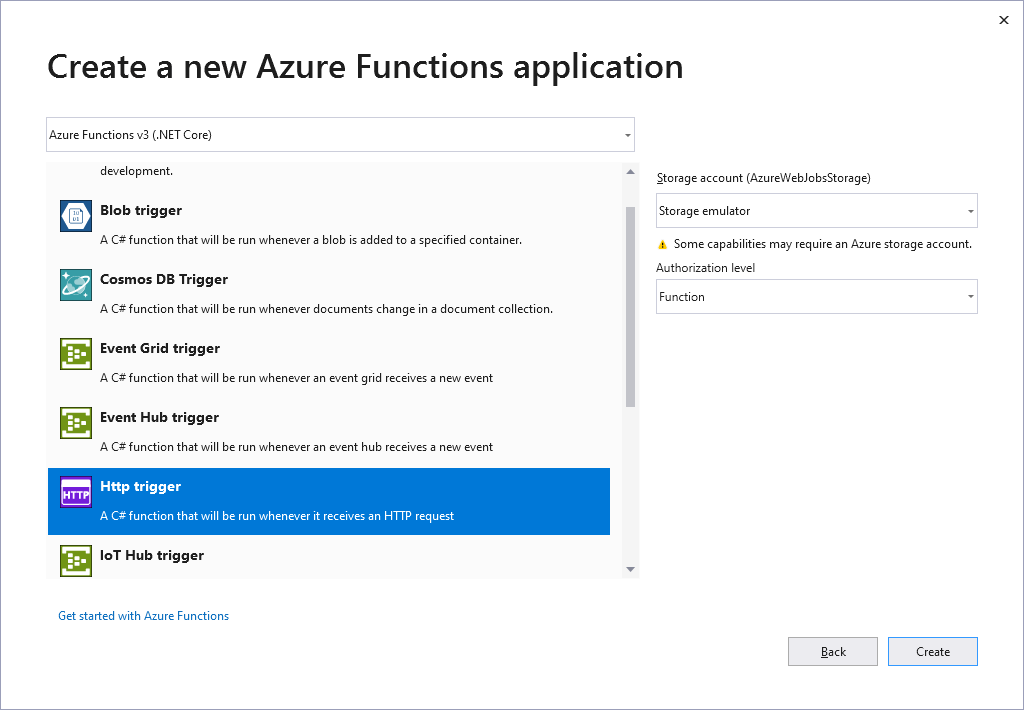
- In the "Create a new Azure Functions application" dialog, ensure you've selected:
- "Azure Functions v3 (.NET Core)" (the latest Azure Blob Storage packages don't play so nice with older versions)
- "Http trigger"
- "Storage Emulator" for the "Storage account (AzureWebJobsStorage)"
- "Function" for Authorization level
- Clicking the "Create" button should result in a new project which looks something like this:
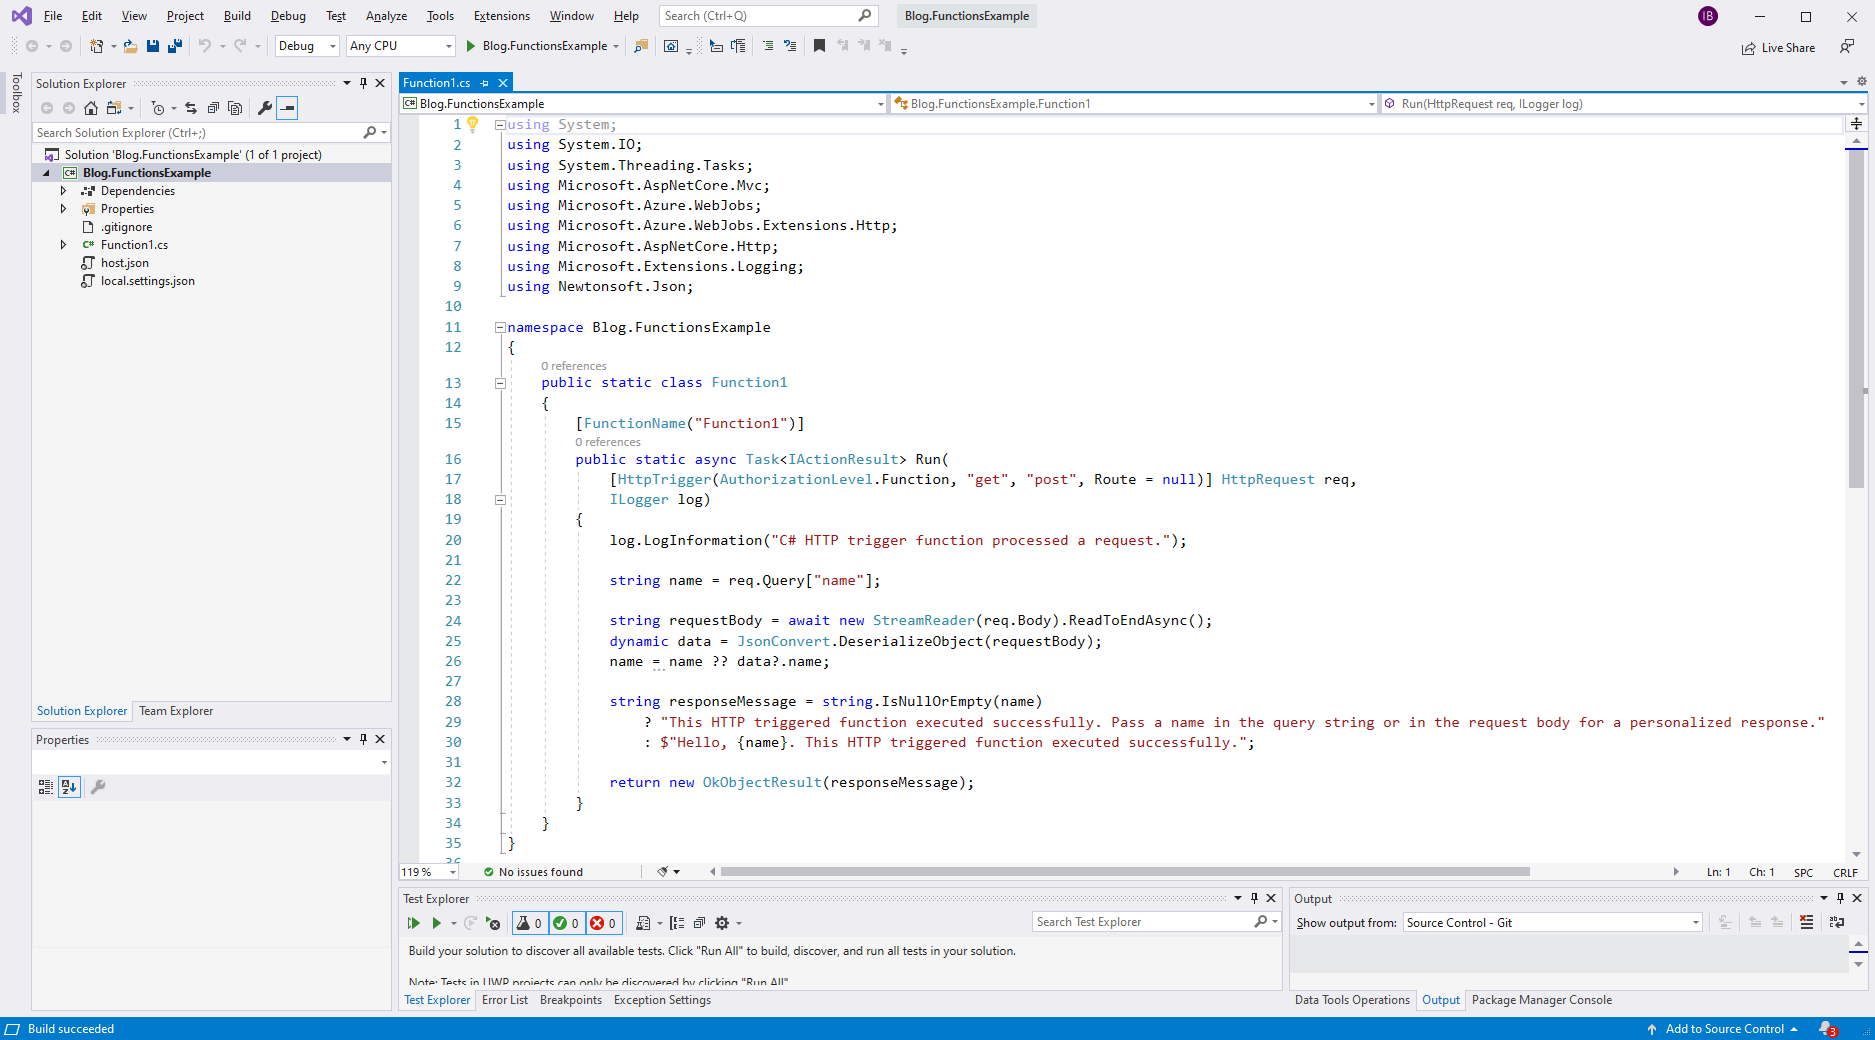
Now, here comes the magic part: Hit F5.
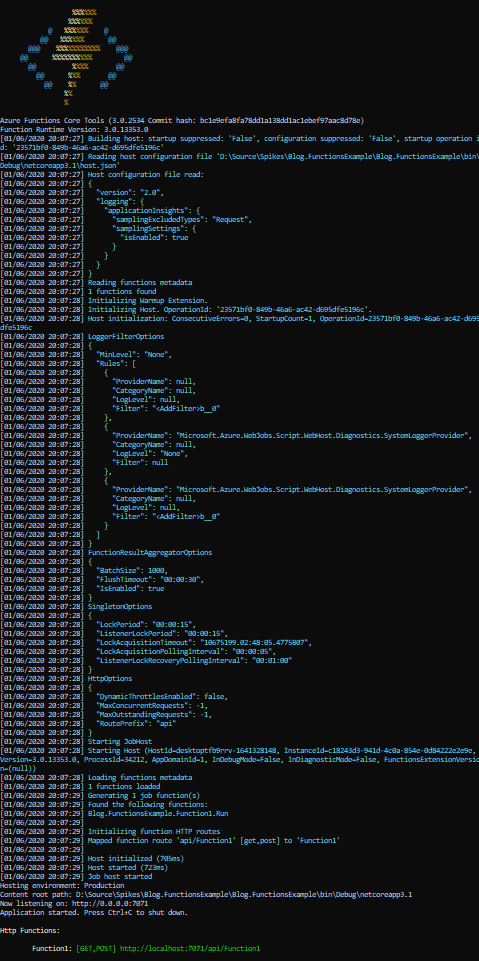
If everything is set up correctly (you may get prompted to install a few packages), running the Functions app should have started the "Azure Storage Emulator" and then spun up your function within the "Azure Functions Core Tools" debugging host. Yup, this is a fully local debug environment for Azure Functions including Azure Storage emulation. Wow.
Once started, the debugging host should provide you an HTTP endpoint from which you can trigger your function; in the screenshot above it's Function1: [GET,POST] http://localhost:7071/api/Function1. Simply GET this URL from a browser (or Postman, or curl) and your function will run, returning the responseMessage.
You are completely free to use breakpoints or any other means of interactive debugging which effectively makes writing a cloud hosted and serverless Azure Functions app no more difficult than a basic console app.
Now all we need to do is flesh out the function.
Writing to Azure Blob Storage
First we want to make our function output an HTML page to Azure Blob Storage. While there are many ways to interact with Azure Blob Storage from within an Azure Function, by far the easiest is to lean on Azure Functions' built in bindings. To do this we first need to add a the Microsoft.Azure.WebJobs.Extensions.Storage nuget package to our project. Then we add a new parameter to our function - (CloudBlockBlob output below) - with attributes - ([Blob()] below) - that detail how to bind this parameter. Finally we can save our generated content to the blob as shown here:
[FunctionName("Function1")]
public static async Task<IActionResult> Run(
    [HttpTrigger(AuthorizationLevel.Function, "get", "post", Route = null)] HttpRequest req,
    [Blob("output/content.html", FileAccess.Write, Connection = "AzureWebJobsStorage")] CloudBlockBlob output,
    ILogger log)
{
    log.LogInformation("C# HTTP trigger function processed a request.");

    string name = req.Query["name"];

    string requestBody = await new StreamReader(req.Body).ReadToEndAsync();
    dynamic data = JsonConvert.DeserializeObject(requestBody);
    name = name ?? data?.name;

    string responseMessage = string.IsNullOrEmpty(name)
        ? "<html><body>This HTTP triggered function executed successfully. Pass a name in the query string or in the request body for a personalized response.</body></html>"
        : $"<html><body>Hello, {name}. This HTTP triggered function executed successfully.</body></html>";

    output.Properties.ContentType = "text/html";
    await output.UploadTextAsync(responseMessage);

    return new NoContentResult();
}
If we trigger this function now we should see a new container - output - added to the Storage Emulator containing a single file: content.html.
Quick tip: If you're doing anything with any form of Azure Storage, do yourself a favour and download the "Azure Storage Explorer". This app provides a very easy to use GUI over many forms of Azure Storage hosted in the cloud or locally. While it won't match a CLI for repetitive tasks, during development this app can really help you see what files are ending up where and with which characteristics.
Note that in most cases it would be sufficient to bind the Blob attributed parameter to a simple Stream type. However, this would result in files written to Azure Blob Store having a Content-Type of application/octet-stream which would not be displayed correctly (or at all!) by most browsers when encountering this type of file within an <embed/> tag. As such we elect to bind to a CloudBlockBlob type which allows us to set the Content-Type directly.
Collecting and aggregating Kata information
Great, so now we have a function which, when triggered, will write an HTML document to Azure Blob Storage. Now, we need to start working on filling out the HTML document with the information we're interested in. The first step here is to collect this information from Codewars which involves HTTP calls to three endpoints - none of which require authentication:
- The Profile endpoint - to get my current honor and rank information
- The Completed Challenges endpoint - to get the katas I have completed
- Repeated calls to the Code Challenge endpoint - to get information for the last X katas I have completed ('X' will be specified in config)
For each endpoint, I first craft an example request in Postman, copy the JSON returned from the endpoint invocation and employ Visual Studio's insanely useful "Paste JSON as classes" to create DTOs which I can deserialize into. This makes calls to each endpoint as simple as doing this:
private static async Task<Profile.Rootobject> Profile(HttpClient client)
{
    var completedResponse = await client.GetAsync("https://www.codewars.com/api/v1/users/ibebbs/");

    using (var stream = await completedResponse.Content.ReadAsStreamAsync())
    {
        return await JsonSerializer.DeserializeAsync<Profile.Rootobject>(stream);
    }
}
Note that all IO has to be async. Calling the synchronous versions of any of the methods above will result in an exception being thrown stating "Synchronous operations are disallowed". This slightly complicates the retrieval of completed code challenges as each challenge needs to be fetched asynchronously then projected into a DTO asynchronously and these asynchronous operations need to be performed a specific number of times.
My go to approach for dealing with collections in a functional manner - LINQ - can't handle asynchronous operations but fortunately a recent addition to C# 8 - IAsyncEnumerable - can. Coupled with System.Linq.Async I can write "LINQ style" projections over asynchronous operations, as shown below:
private static async Task<IEnumerable<Completion>> Completions(HttpClient client, int numberOfCompletionstoInclude)
{
    var completed = await Completed(client);

    var result = await completed.data
        .ToAsyncEnumerable()
        .SelectAwait(d => AsCompletion(d, client))
        .Take(numberOfCompletionstoInclude)
        .ToArrayAsync();

    return result;
}
Finally all the collected information is projected into a Model class for use in the next step.
Generating an HTML page
To create the HTML page containing all the kata information in an appropriate layout I use (a prelease version of) RazorLight. This allows me to template the desired output using "cshtml" (a.k.a. Razor pages) and bind values from the Model into appropriate places within the template. Here's the cshtml file:
@model Blog.Codewars.Generator.Model
<!DOCTYPE html>

<html lang="en" xmlns="http://www.w3.org/1999/xhtml">
<head>
    <meta charset="utf-8" />
    <title>Codewars!</title>
    <link rel="stylesheet" href="https://www.codewars.com/assets/application-776f7eebc122613f70443dfee33518104673ba7dced96422ca993601702f6456.css">
    <style>
        table td {
            border-bottom: none;
            padding-top: 2px;
            padding-bottom: 2px;
            line-height: normal;
            padding: 0px;
            padding-right: 10px;
        }
        td.fitwidth {
            width: 1px;
            white-space: nowrap;
        }
        div.minitag {
            line-height: normal;
            font-size: 9px;
            margin: 0px
        }
        .tight {
            line-height: normal;
            margin-top: 4px;
            margin-bottom: 0px;
        }
        .tight-last {
            line-height: normal;
            margin-top: 4px;
            margin-bottom: 8px;
        }
        .tagrow {
            margin-bottom: 8px;
            margin-top: -2px
        }
    </style>
</head>
<body style="background-color: white;padding-top: 0px">
    <h2 class="tight">Honor: @Model.Honor</h2>
    <h3 class="tight-last">Showing @Model.Completions.Count() of @Model.TotalCompleted completed kata</h3>
    <table style="width: 100%;background-color: white;">
        <tbody>
            @foreach (var item in @Model.Completions)
            {
                <tr>
                    <td class="fitwidth" style="border-bottom: none;">
                        <p class="tight">@item.Date.ToString("yyyy-MM-dd")</p>
                    </td>
                    <td>
                        <a href="@item.Uri" target="_blank"><h5 class="tight">@item.Name</h5></a>
                    </td>
                    <td class="fitwidth" rowspan="2" >
                        @if (@item.Language == "csharp")
                        {
                            <img src="https://ian.bebbs.co.uk/Content/csharp.png" style="max-width: 32px; margin-top: -6px" />
                        }
                        else
                        {
                            <img src="https://ian.bebbs.co.uk/Content/fsharp.png" style="max-width: 32px; margin-top: -6px" />
                        }
                    </td>
                    <td class="fitwidth" rowspan="2">
                        @{
                            switch (item.Colour)
                            {
                                case "white":
                            <div class="small-hex is-extra-wide is-inline mr-15px is-white-rank"><div class="inner-small-hex is-extra-wide "><span>@item.Ktu</span></div></div>
                                    break;
                                case "yellow":
                            <div class="small-hex is-extra-wide is-inline mr-15px is-yellow-rank"><div class="inner-small-hex is-extra-wide "><span>@item.Ktu</span></div></div>
                                    break;
                                case "blue":
                            <div class="small-hex is-extra-wide is-inline mr-15px is-blue-rank"><div class="inner-small-hex is-extra-wide "><span>@item.Ktu</span></div></div>
                                    break;
                                case "purple":
                            <div class="small-hex is-extra-wide is-inline mr-15px is-purple-rank"><div class="inner-small-hex is-extra-wide "><span>@item.Ktu</span></div></div>
                                    break;
                            }
                        }
                    </td>
                </tr>
                <tr class="bottom-margin">
                    <td colspan="2">
                        <div class="mt-15px tagrow">
                            @foreach (var tag in @item.Tags)
                            {
                            <div class="keyword-tag minitag tight">@tag</div>
                            }
                        </div>
                    </td>
                </tr>
            }
        </tbody>
    </table>
</body>
</html>
Please excuse the crappy CSS. I still maintain CSS is a terrible way to style UI elements - particularly when compared to the elegance of XAML.
Anyway, this codewars.cshtml file is added to the project as an "Embedded Resource" and used as follows:
public static class Implementation
{
    public static async Task<string> GenerateBlogPage(int numberOfCompletionstoInclude)
    {
        var engine = new RazorLightEngineBuilder()
            .SetOperatingAssembly(Assembly.GetExecutingAssembly())
            .UseEmbeddedResourcesProject(typeof(Implementation))
            .UseMemoryCachingProvider()
            .Build();

        var model = await Source.Create(numberOfCompletionstoInclude);

        string result = await engine.CompileRenderAsync("codewars", model);

        return result;
    }
}
Securing the Function
While this function will be exposed publicly, we don't want just anyone to be able to invoke it as this would directly cost us money. By using the "'Function' Authorization Level" when we created the function, we ensured that the function can be invoked only if an appropriate "code" value is passed in the URL, but this is still just "security through obscurity" which we should look to bolster further. As we'd like to ensure only Codewars can invoke this function (or at least cause the page to be regenerated) we can provide a "secret" to Codewars which they pass back to us - and we can check for - when the function is invoked.
Furthermore, Codewars will call this function for a variety of reasons, not just when I complete a kata. As generating the page is a relatively costly process (in terms of resources at least), we want to ensure this happens only when required. We therefore flesh out the function as follows:
private static bool IsCodeWars(HttpRequest request)
{
    return request.Headers.TryGetValue("X-Webhook-Secret", out var values) && values.Contains(Settings.CodewarsSecret);
}

private static async Task<bool> IsMyHonorChange(HttpRequest request, ILogger log)
{
    using (StreamReader reader = new StreamReader(request.Body))
    {
        var body = await reader.ReadToEndAsync();

        log.LogInformation($"Body: '{body}'");

        return body.Contains("honor_changed") && body.Contains(Settings.MyCodewarsId);
    }
}

[FunctionName("WebHook")]
public static async Task<IActionResult> Run(
    [HttpTrigger(AuthorizationLevel.Function, "post", Route = null)] HttpRequest request,
    [Blob("blog/codewars.html", FileAccess.Write, Connection = "AzureWebJobsStorage")] CloudBlockBlob output,
    ILogger log)
{
    log.LogInformation("C# HTTP trigger function processed a request.");

    if (IsCodeWars(request))
    {
        if (await IsMyHonorChange(request, log))
        {
            var content = await Generator.Implementation.GenerateBlogPage(Settings.NumberOfCompletionstoInclude);
            output.Properties.ContentType = "text/html";
            await output.UploadTextAsync(content);

            return new NoContentResult();
        }
        else
        {
            return new StatusCodeResult(304);
        }
    }
    else
    {
        return new UnauthorizedResult();
    }
}
Note that Settings is a façade for retrieving configuration values as shown here:
public static class Settings
{
    public static string CodewarsSecret => Environment.GetEnvironmentVariable("CodewarsSecret");

    public static string MyCodewarsId => Environment.GetEnvironmentVariable("MyCodewarsId");

    public static int NumberOfCompletionstoInclude => Int32.Parse(Environment.GetEnvironmentVariable("NumberOfCompletionstoInclude"));
}
Deployment
Finally we need to get the function deployed and connected to Codewars. As this isn't something that is going to change regularly, deployment of the function to Azure is performed with a "right click -> publish" from within Visual Studio. Once deployed, the function URL and CodewarsSecret value are copied from the Azure portal and added to my Codewars Account Settings page as shown below:


Once saved, completing a kata automatically generates a new page in Azure Blob Storage which then appears on my blog. Nice!
Conclusion
Sometimes I'm amazed at how fast and inexpensive it has become to assemble solutions to problems that, just a few years ago, would have been a major undertaking and cost a significant amount to run. Indeed, this solution took just a few hours from concept to deployment and costs...
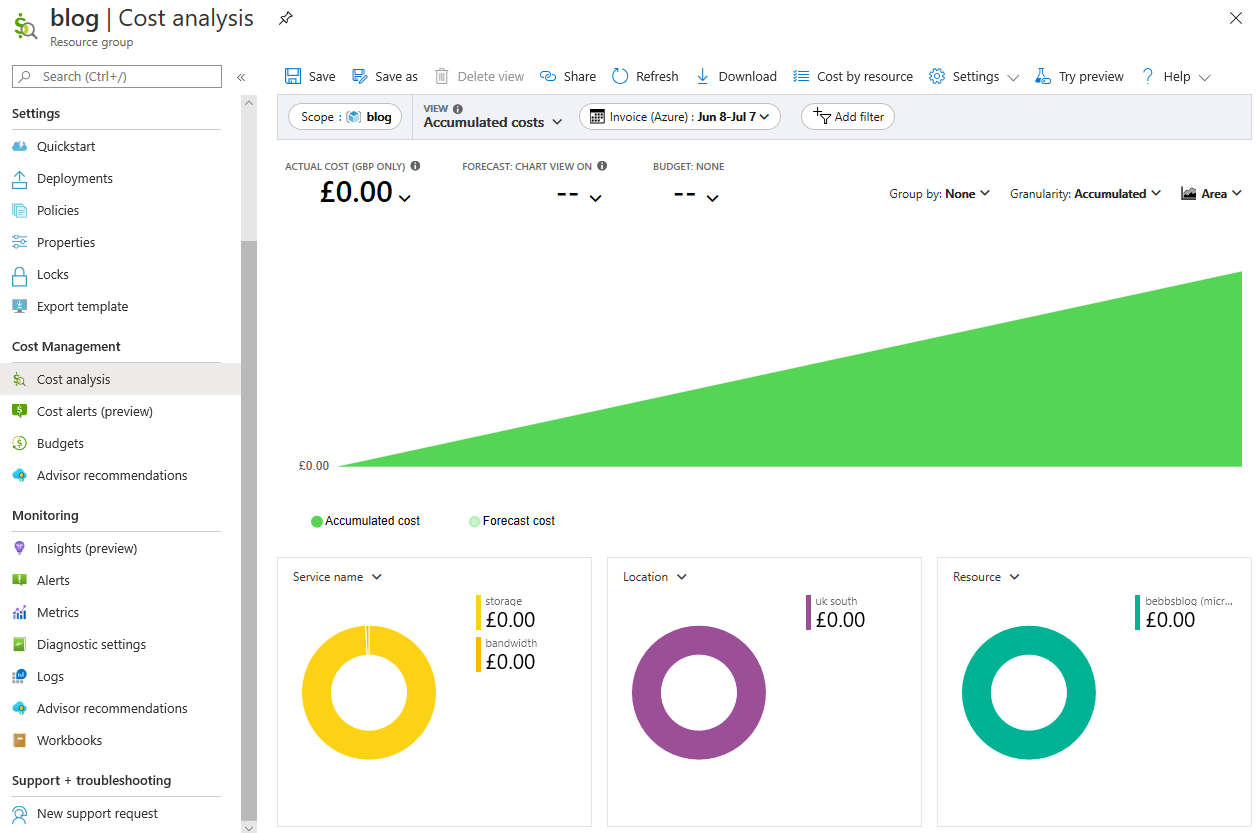
... yup, less than a penny a month to run!
As developers we truly are spoiled by the tooling provided to us by Visual Studio and the hosting options available in Azure. While I'm fairly proficient in variety of other languages and frameworks, I always find myself back in VS because it makes everything just so damn easy!
Anyway, the source code for this project can be found in my "Blog.Codewars" repository on Github. Please star it if you find it - or this blog post - useful.