TL;DR
In this article we will see how to use Uno Platform and SignalR to create applications that run on all major platforms - PC, Mac, Android, iOS and Web - and are capable of receiving real-time updates from a SignalR service. As you will see, these two technologies work incredibly well together, providing an elegant solution to a use-case which, just a few years ago, would have been fiendishly difficult.
All the source code for this post can be found in my UnoChat repository on GitHub.
Intro
A project I'm working on features a web-dashboard. Being a XAML fan, using Uno to create a web-assembly app was a complete a no-brainer... until I realised that I wanted the dashboard to feature real-time updates. Thanks to SignalR (and a host of subsequent technologies) real-time updates is nothing new for traditional web apps but how would these technologies fare when used with Uno/WebAssembly.
Hunting around, I had seen that a couple of people had tried this approach a while back but had hit various stumbling blocks along the way. As far as I could tell, no-one had yet managed to get a working solution which, as you might imagine, was a tad worrying.
Regardless, I knew that Uno and its compilation to WebAssembly (driven by the amazing work undertaken by the Mono team) had progressed massively in the last year so I figured I'd give it a go to see if I could get any further. I was very much prepared for a bit of a slog here, expecting to have to dig into the internals of both Uno and SignalR in order to get it working. But I was not prepared for what actually happened:
It... just... worked.
First time.
With no kludges, no work-arounds, no untoward platform-specific code and no conditional compilation.
It really did Just Work™.
The following post shows how you can use these amazing technologies together to deliver real-time updates to a cross-platform app.
Ingredients
To cook up this little sumptuous little dish, you will need a copy of Visual Studio 2019 with the following installed:
- "ASP.NET and Web development" workload
- "Azure development" workload
- "Universal Windows Platform development" workload
- "Mobile development with .NET" workload
- ".NET Core cross-platform development" toolset
- The Uno Platform Solution Templates.
You will also need a (free) Azure account to which we'll publish our SignalR service so it's easily available to our client platforms.
Objective
We're going to be building a version of the "Get started with ASP.NET Core SignalR" sample app but, instead of an "HTML+js" client, we're going to be using Uno to write an app which can be compiled and run natively across multiple platforms including the web.
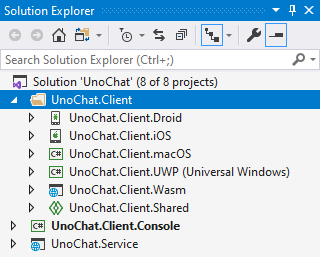
When we're finished, we'll have a solution which looks like this:
UnoChat
|- UnoChat.Service
|- UnoChat.Client.Console
|- UnoChat.Client.App
   |- UnoChat.Client.App.Droid
   |- UnoChat.Client.App.iOS
   |- UnoChat.Client.App.macOS
   |- UnoChat.Client.App.UWP
   |- UnoChat.Client.App.Wasm
   |- UnoChat.Client.App.Shared
We'll dive into each of these projects individually below with the occasional "F5" to test our progress.
Right, lets go!
Service, Console Client, Testing & Deployment
UnoChat.Service
We'll first create the SignalR service. As this is covered quite extensively in the sample app we're basing this article on I'm going to shoot through this pretty quickly, only covering notable differences and the code we should end up with.
Ok, start up Visual Studio 2019 and create a new project as shown here:
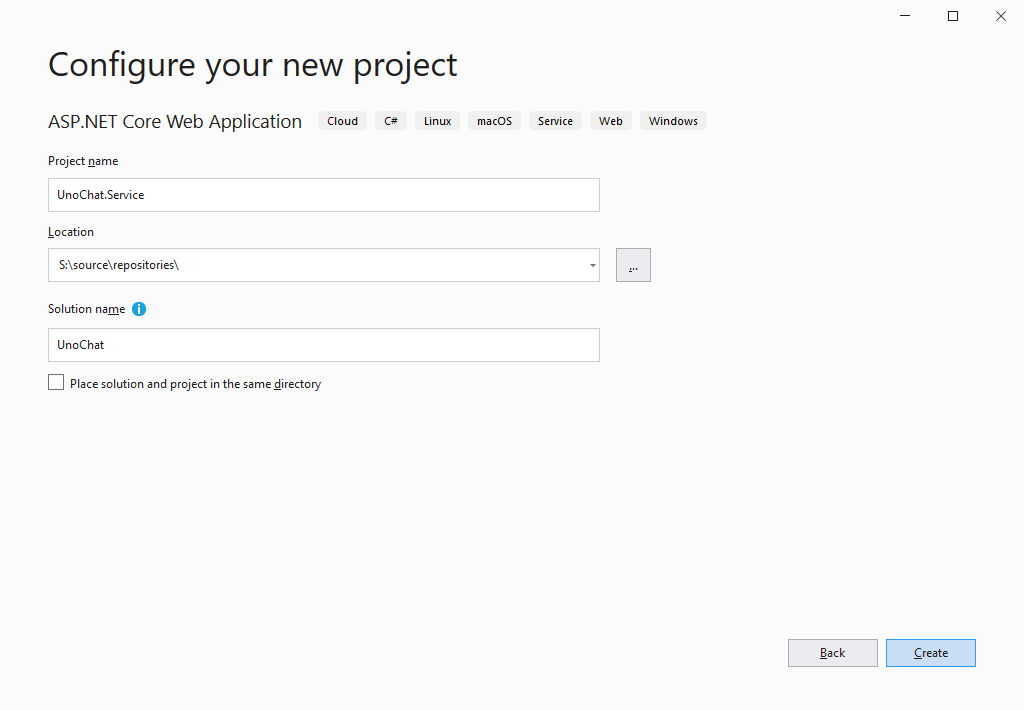 |
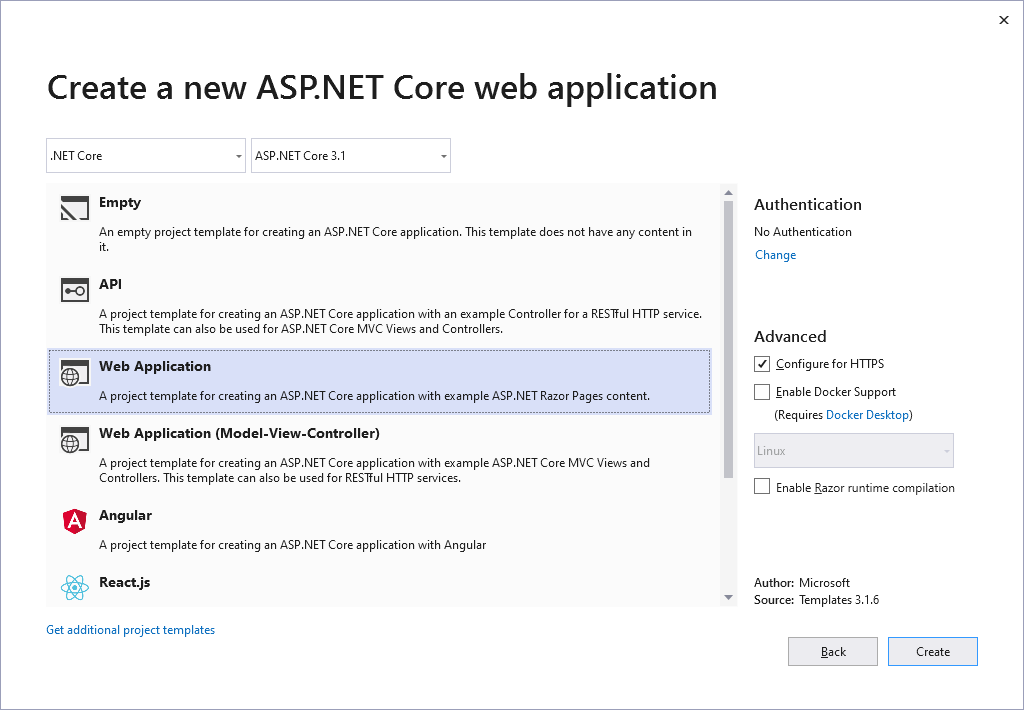 |
Now, follow the steps in the "Create a SignalR hub" section of the sample app to create a ChatHub : Hub class in a Hubs folder within the UnoChat.Service project.
We'll continue with the configuration described in the "Configure SignalR" but we'll also be adding a CORS policy such that we're able to connect to it from a locally hosted Wasm app. The final configuration of the Startup class in the UnoChat.Service project should look like this:
using Microsoft.AspNetCore.Builder;
using Microsoft.AspNetCore.Hosting;
using Microsoft.Extensions.Configuration;
using Microsoft.Extensions.DependencyInjection;
using Microsoft.Extensions.Hosting;

namespace UnoChat.Service
{
    public class Startup
    {
        public Startup(IConfiguration configuration)
        {
            Configuration = configuration;
        }

        public IConfiguration Configuration { get; }

        // This method gets called by the runtime. Use this method to add services to the container.
        public void ConfigureServices(IServiceCollection services)
        {
            services.AddRazorPages();
            services.AddSignalR();

            services.AddCors(o => o.AddPolicy(
                 "CorsPolicy",
                 builder => builder
                    .AllowAnyOrigin()
                    .AllowAnyMethod()
                    .AllowAnyHeader()
                 )
            );
        }

        // This method gets called by the runtime. Use this method to configure the HTTP request pipeline.
        public void Configure(IApplicationBuilder app, IWebHostEnvironment env)
        {
            if (env.IsDevelopment())
            {
                app.UseDeveloperExceptionPage();
            }
            else
            {
                app.UseExceptionHandler("/Error");
                // The default HSTS value is 30 days. You may want to change this for production scenarios, see https://aka.ms/aspnetcore-hsts.
                app.UseHsts();
            }

            app.UseHttpsRedirection();
            app.UseStaticFiles();

            app.UseRouting();
            app.UseCors("CorsPolicy");

            app.UseAuthorization();

            app.UseEndpoints(endpoints =>
            {
                endpoints.MapRazorPages();
                endpoints.MapHub<Hubs.ChatHub>("/chathub");
            });
        }
    }
}
And that's it. Seriously that's all we need to create a service which is able to provide real-time communication services to a whole host of client applications.... I know, right!
UnoChat.Client.Console
Next we'll create a quick console application to test our SignalR service prior to diving into a cross platform solution with Uno.
BTW, the console app - by virtue of being .NET Core - is also cross-platform and will run on... well... pretty much anything.
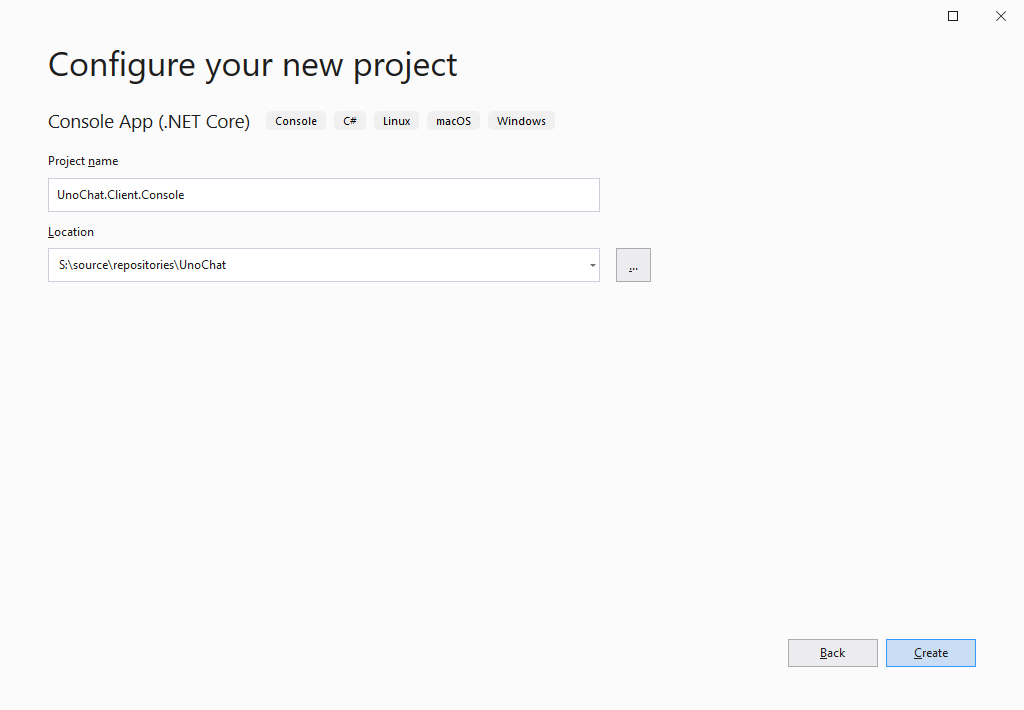
So, right click on the "UnoChat" solution and add a new "Console App (.NET Core)" project as shown here:
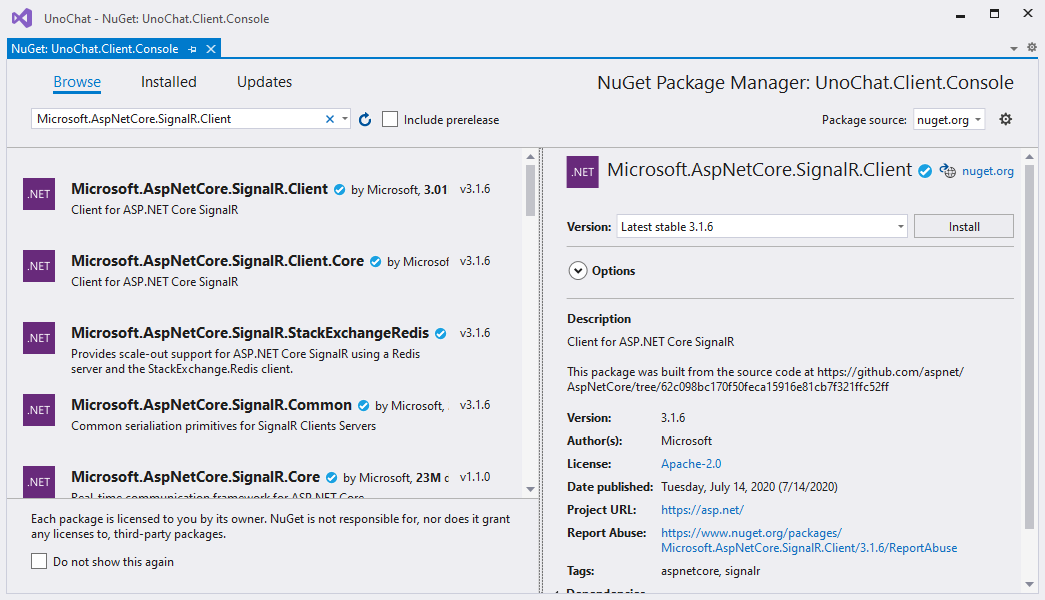
Then, add the Microsoft.AspNetCore.SignalR.Client nuget package to the UnoChat.Client.Console project as shown here:
Finally, replace the code in Main.cs with the following:
using Microsoft.AspNetCore.SignalR.Client;
using System.Threading.Tasks;

namespace UnoChat.Client.Console
{
    using Console = System.Console;

    class Program
    {
        static async Task Main(string[] args)
        {
            Console.WriteLine("Hi! Err... who are you?");

            var name = Console.ReadLine();

            Console.WriteLine($"Ok {name} one second, we're going to connect to the SignalR server...");

            var connection = new HubConnectionBuilder()
                .WithUrl("http://localhost:61877/ChatHub")
                .WithAutomaticReconnect()
                .Build();

            connection.On<string, string>("ReceiveMessage", (user, message) => Console.WriteLine($"{user}: {message}"));

            await connection.StartAsync();

            Console.WriteLine($"Aaaaaand we're connected. Enter a message and hit return to send it to other connected clients...");

            while (true)
            {
                var message = Console.ReadLine();

                await connection.InvokeAsync("SendMessage", name, message);
            }
        }
    }
}
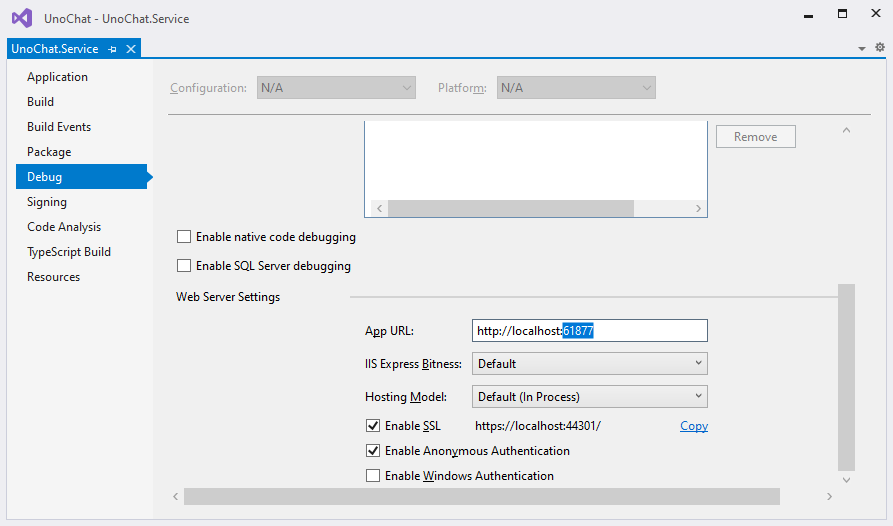
Note: You'll need to ensure the port number in the
.WithUrl("http://localhost:61877/ChatHub")line is correct. You can find the port number yourUnoChat.Serviceis set to use by right clicking on theUnoChat.Serviceproject, selectingProperties, navigating to theDebugtab and examining theApp URLsetting in theWeb Server Settingssection as shown here:
Local Testing
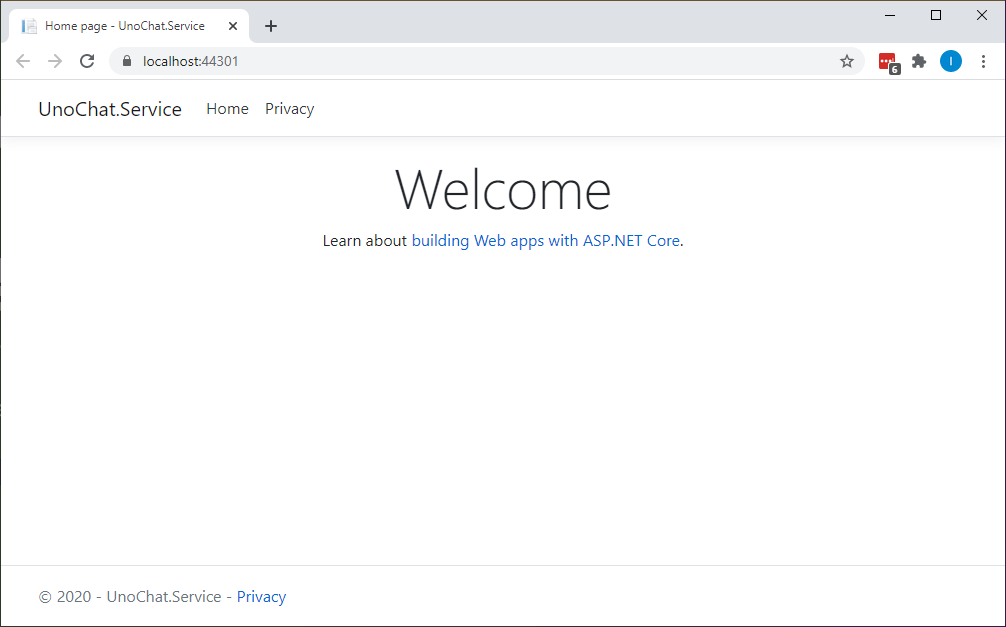
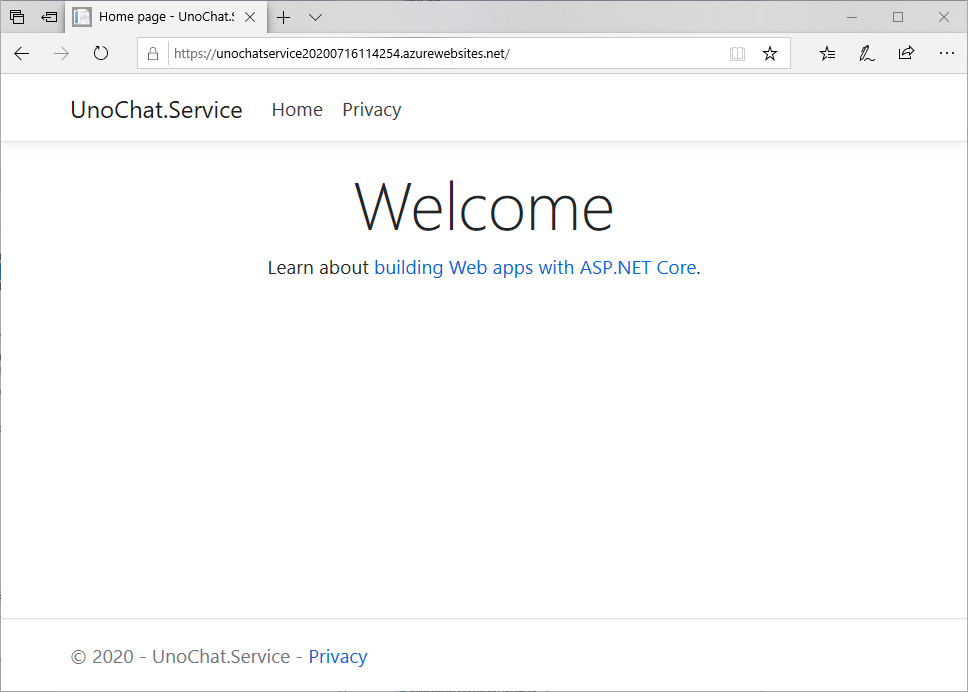
Now we can test our service with our client console. Right click on the UnoChat.Service project and select Debug->Start New Instance. After a few seconds compilation a browser window should open and show something similar to this:
With that running, go back to Visual Studio and right click on the UnoChat.Client.Console project and again select Debug->Start New Instance. A console window should appear asking who you are. Enter a name, hit return and wait for the app to tell you that it has connected. At this point you can send messages to the UnoChat.Service which should be echoed back to the console window prefixed with your name as shown here:
Just to show we're not just echoing these things locally, right click on the UnoChat.Client.Console project again and start a second instance using Debug->Start New Instance. In this window enter a different name and wait for connection. Now when you send a message, you'll see it in both console windows as shown here:
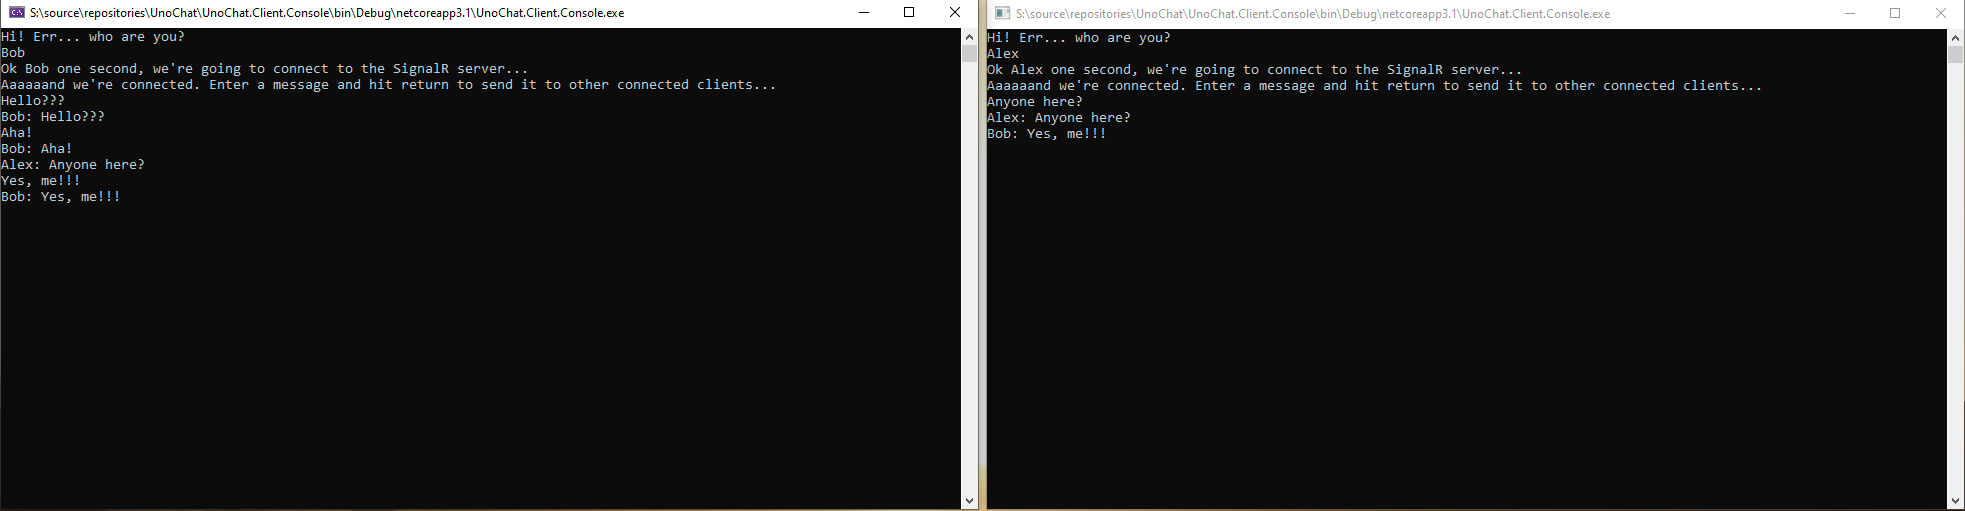
Pretty neat huh!
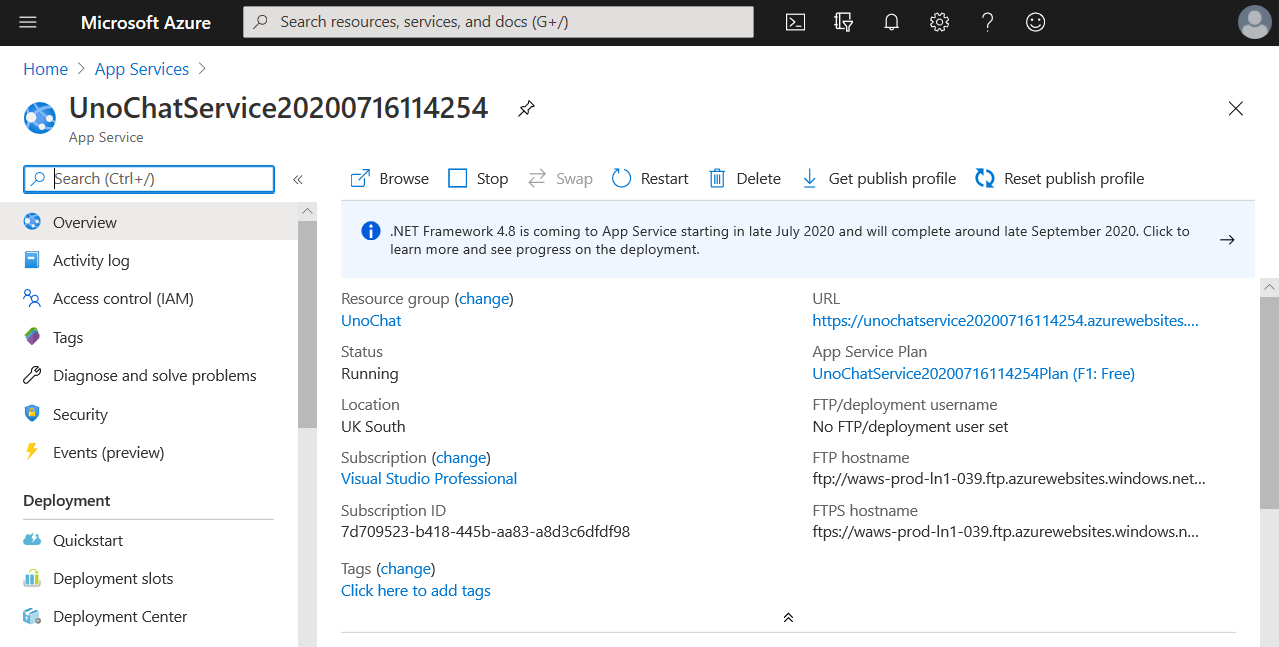
Deployment
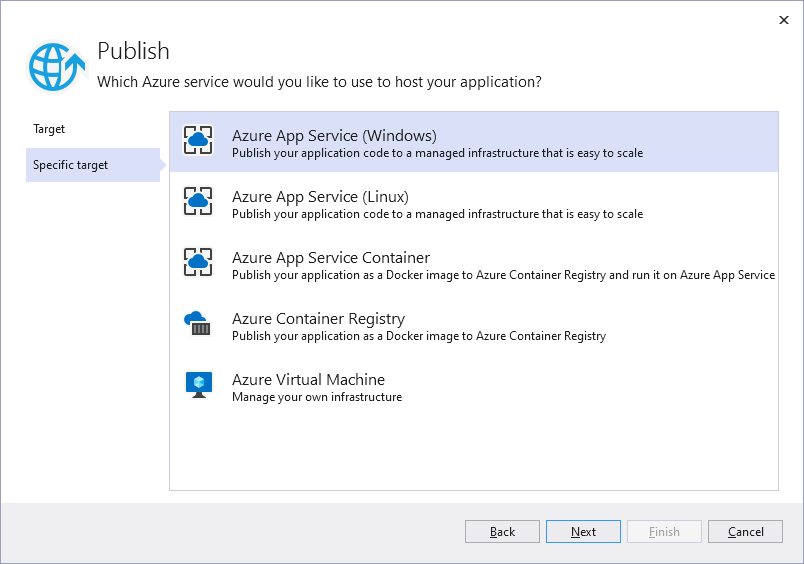
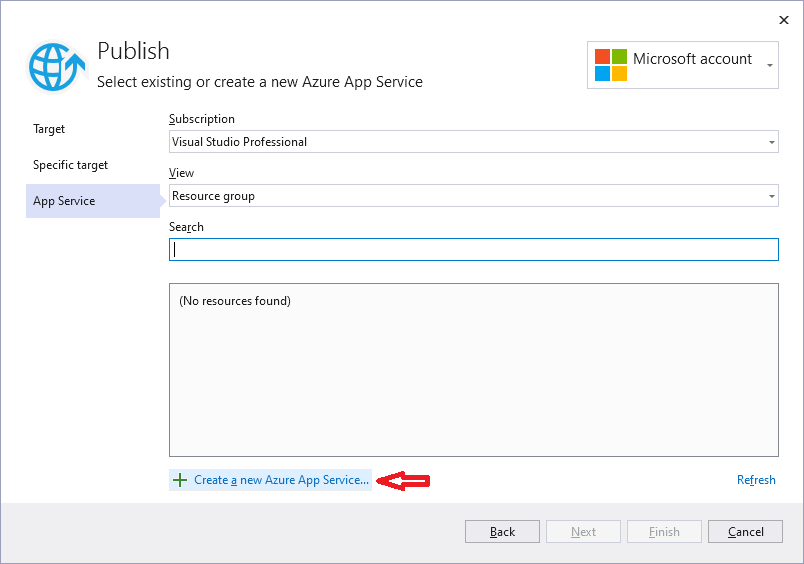
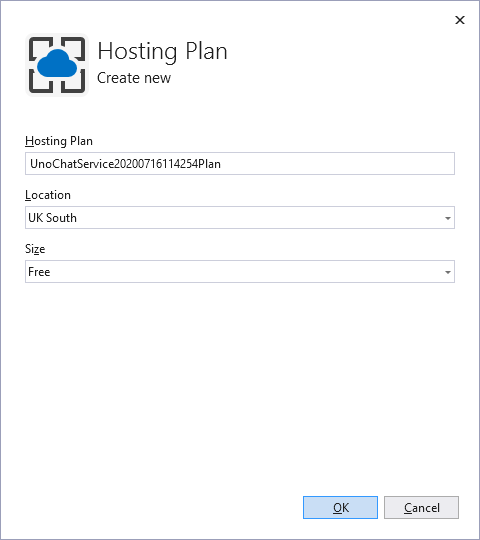
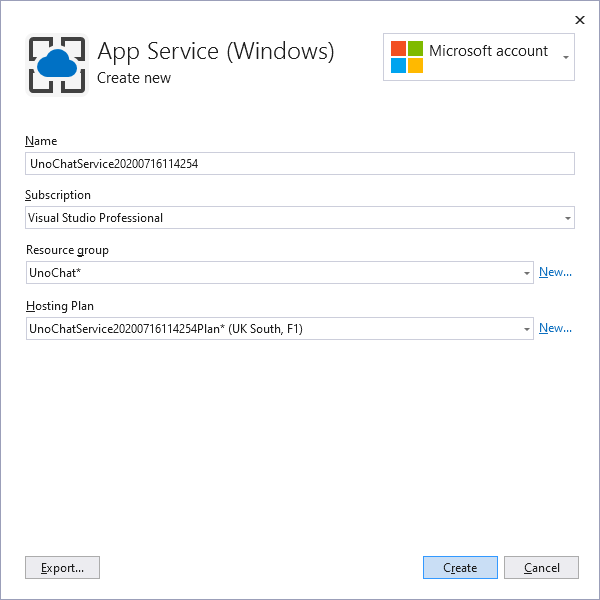
With our SignalR service running nicely, lets deploy it to Azure by right clicking on the UnoChat.Service project and selecting Publish.... I'm not going to cover this process in too much detail as it's thoroughly documented elsewhere but, if you've not done this before, the following screen shots should help you through:
 |
 |
 |
|
 |
 |
 |
|
 |
 |
 |
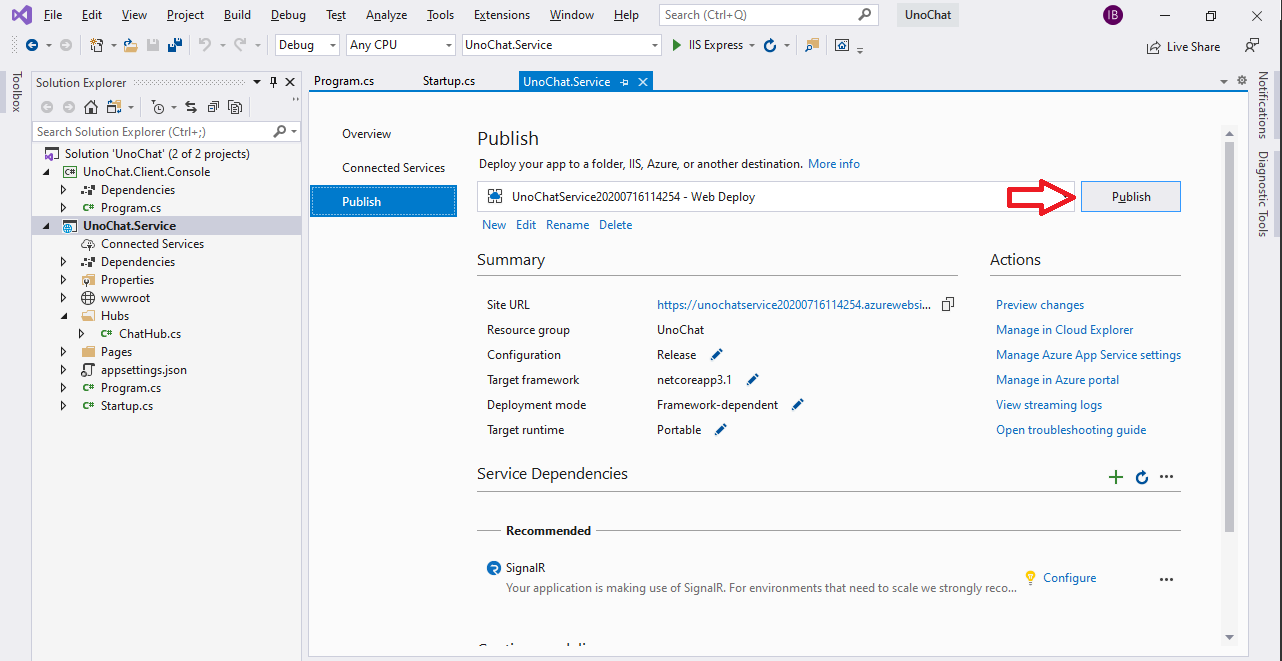
Still with me? Great.
Lets test our deployed SignalR service by updating the .WithUrl("http://localhost:61877/ChatHub") line in our UnoChat.Client.Console app to match the deployed service as shown in the last screenshot above; for me it's .WithUrl("https://unochatservice20200716114254.azurewebsites.net/ChatHub"). Once done you should be able to start the UnoChat.Client.Console app and send/receive messages to/from your deployed SignalR service.
Now for the magic...
Uno Client
Creating & Preparing An Uno Project
Back in Visual Studio, right click the UnoChat solution and Add->New Project.... Select Cross-Platform App (Uno Platform) from the Add a new project dialog and click Next. Name it UnoChat.Client on the Configure your new project dialog and finally click Create:
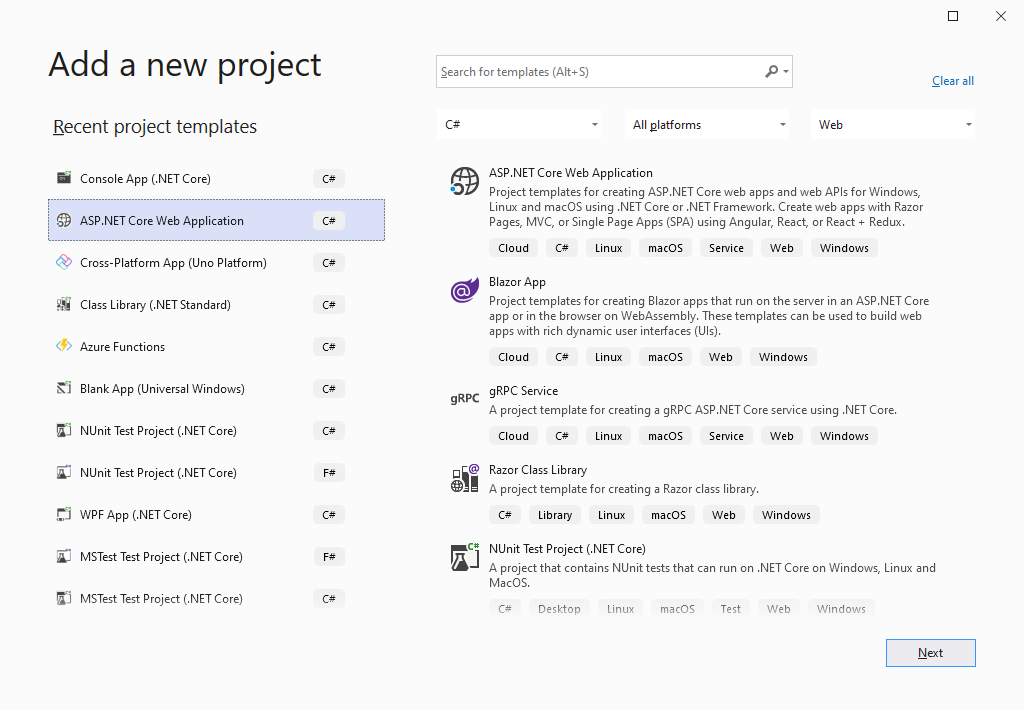 |
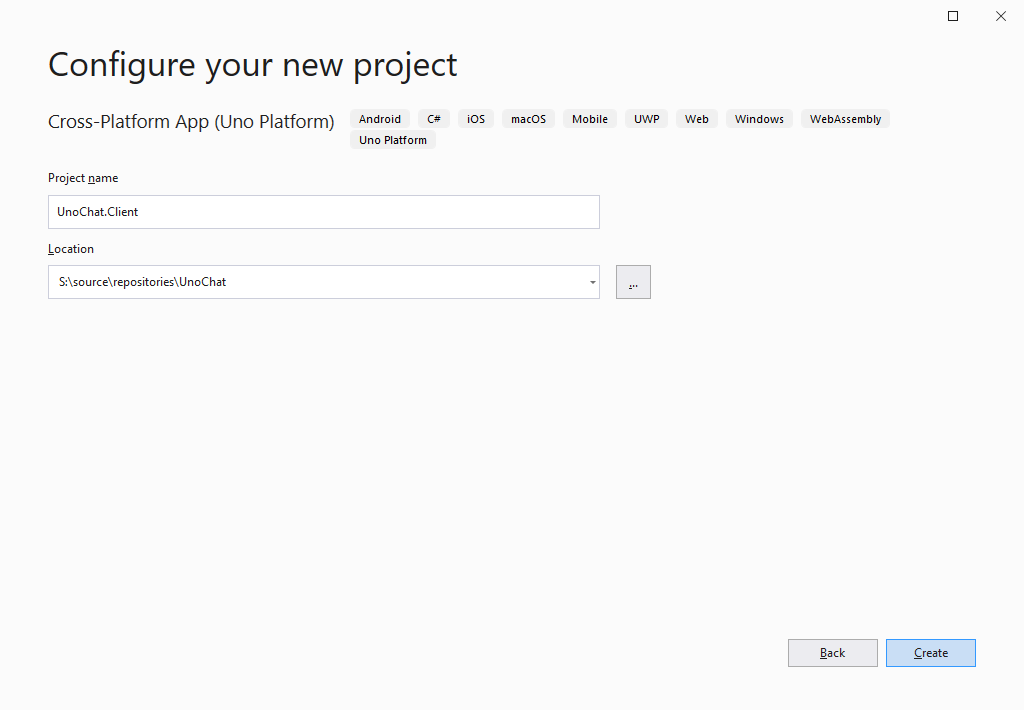 |
To help keep my solution organised, I like to group all the Uno "head" projects in a solution folder. This is shown below but don't feel obliged to follow suit:
Now, the first thing to do here is to get our dependencies in order using the following steps:
- Upgrade all
Uno.*packages to the latest non-prelease versions (at the time of writing this isUno.UI&Uno.UI.RemoteControlto v2.4.4,Uno.Wasm.Bootstrap&Uno.Wasm.Bootstrap.DevServerto v1.3.0) - Install the
Microsoft.AspNetCore.SignalR.Clientnuget package to all the head projects (UnoChat.Client.Droid, UnoChat.Client.iOS, etc, etc). - Install the
MVx.Observablenuget package to all the head projects (UnoChat.Client.Droid, UnoChat.Client.iOS, etc, etc).
Quick tip: Use the
Manage NuGet Packages for Solution...option from the solution's right-click menu to get this done much faster than modifying individual projects.
Lastly use the Properties window to change the Root namespace value for the UnoChat.Client.Shared project from UnoChat.Client.Shared to just UnoChat.Client (I'm kind hoping this change makes it into the Uno templates at some point).
MVx.Observable
I like to implement UI/UX flows using behavioural, declarative and functional paradigms. I wrote MVx.Observable to be a "(mostly) unopinionated, light-weight alternative to ReactiveUI provided as a library not a framework" and have written about it extensively here and here.
You don't need to use MVx.Observable to implement the functionality present in this project but I'd encourage you to at least give it a try as, like ReactiveUI, these patterns really can help manage UI state, ensure UX flows are testable and keep discrete behaviours... well, discrete.
MVx.Observable uses System.Reactive to embody it's behaviours in a reactive manner and, as these behaviours interact with the UI, we need to use IScheduler instances to ensure we update the UI from the correct thread. This is somewhat complicated by the fact that we're writing a cross-platform app which uses different IScheduler implementations to marshal updates to the appropriate platform threads. Fortunately, this complexity is easily tamed through the use of Partial Classes and Methods.
In the UnoChat.Client.Shared project, add a Schedulers.cs file with the following content:
using System;
using System.Reactive.Concurrency;
using System.Threading;

namespace UnoChat.Client
{
    public static partial class Schedulers
    {
        static partial void OverrideDispatchScheduler(ref IScheduler scheduler);

        private static readonly Lazy<IScheduler> DispatcherScheduler = new Lazy<IScheduler>(
            () =>
            {
                IScheduler scheduler = null;

                OverrideDispatchScheduler(ref scheduler);

                return scheduler == null
                    ? new SynchronizationContextScheduler(SynchronizationContext.Current)
                    : scheduler;
            }
        );

        public static IScheduler Dispatcher => DispatcherScheduler.Value;

        public static IScheduler Default => Scheduler.Default;
    }
}
Then, in the UWP head, override the OverrideDispatchScheduler method to provide the correct scheduler for the platform by adding a Schedulers.cs file to the head project with the following content:
using System.Reactive.Concurrency;
using Windows.UI.Xaml;

namespace UnoChat.Client
{
    public static partial class Schedulers
    {
        static partial void OverrideDispatchScheduler(ref IScheduler scheduler)
        {
            scheduler = new CoreDispatcherScheduler(Window.Current.Dispatcher);
        }
    }
}
Now we can safely use the scheduler in our solution knowing that we're able to easily marshal operations to and from the UI thread.
ViewModel
Leveraging MVx.Observable we're now going to create a ViewModel to manage all the interaction with SignalR ensuring we don't need have any logic in the view's code-behind.
Create a new ViewModel class in the UnoChat.Client.Shared project containing the following code:
using Microsoft.AspNetCore.SignalR.Client;
using System;
using System.Collections.Generic;
using System.ComponentModel;
using System.Linq;
using System.Reactive.Disposables;
using System.Reactive.Linq;
using System.Windows.Input;
using Uno.Extensions;

namespace UnoChat.Client
{
    public class ViewModel : INotifyPropertyChanged
    {
        private readonly MVx.Observable.Property<string> _name;
        private readonly MVx.Observable.Property<HubConnectionState> _state;
        private readonly MVx.Observable.Command _connect;

        private readonly MVx.Observable.Property<string> _lastMessageReceived;
        private readonly MVx.Observable.Property<IEnumerable<string>> _allMessages;
        private readonly MVx.Observable.Property<string> _messageToSend;
        private readonly MVx.Observable.Property<bool> _messageToSendIsEnabled;
        private readonly MVx.Observable.Command _sendMessage;

        private readonly HubConnection _connection;

        public event PropertyChangedEventHandler PropertyChanged;

        private static string DefaultName => typeof(ViewModel)
            .Assembly
            .GetName()
            .Name
            .Split('.')
            .Last();

        public ViewModel()
        {
            _name = new MVx.Observable.Property<string>(DefaultName, nameof(Name), args => PropertyChanged?.Invoke(this, args));
            _state = new MVx.Observable.Property<HubConnectionState>(HubConnectionState.Disconnected, nameof(State), args => PropertyChanged?.Invoke(this, args));
            _connect = new MVx.Observable.Command();
            _lastMessageReceived = new MVx.Observable.Property<string>(nameof(LastMessageReceived), args => PropertyChanged?.Invoke(this, args));
            _allMessages = new MVx.Observable.Property<IEnumerable<string>>(Enumerable.Empty<string>(), nameof(AllMessages), args => PropertyChanged?.Invoke(this, args));
            _messageToSend = new MVx.Observable.Property<string>(nameof(MessageToSend), args => PropertyChanged?.Invoke(this, args));
            _messageToSendIsEnabled = new MVx.Observable.Property<bool>(false, nameof(MessageToSendIsEnabled), args => PropertyChanged?.Invoke(this, args));
            _sendMessage = new MVx.Observable.Command();

            _connection = new HubConnectionBuilder()
                .WithUrl("https://unochatservice20200716114254.azurewebsites.net/ChatHub")
                .WithAutomaticReconnect()
                .Build();
        }

        private IDisposable ShouldEnableConnectWhenNotConnected()
        {
            return _state
                .Select(state => state == HubConnectionState.Disconnected)
                .ObserveOn(Schedulers.Dispatcher)
                .Subscribe(_connect);
        }

        private IDisposable ShouldEnableMessageToSendWhenConnected()
        {
            return _state
                .Select(state => state == HubConnectionState.Connected)
                .Subscribe(_messageToSendIsEnabled);
        }

        private IDisposable ShouldConnectToServiceWhenConnectInvoked()
        {
            return _connect
                .SelectMany(_ => Observable
                    .StartAsync(async () =>
                    {
                        await _connection.StartAsync();
                        return _connection.State;
                    }))
                .ObserveOn(Schedulers.Dispatcher)
                .Subscribe(_state);
        }

        private IDisposable ShouldDisconnectFromServiceWhenDisposed()
        {
            return Disposable.Create(() => _ = _connection.StopAsync());
        }

        private IDisposable ShouldListenForNewMessagesFromTheService()
        {
            return Observable
                .Create<string>(
                    observer =>
                    {
                        Action<string, string> onReceiveMessage =
                            (user, message) => observer.OnNext($"{user}: {message}");

                        return _connection.On("ReceiveMessage", onReceiveMessage);
                    })
                .ObserveOn(Schedulers.Dispatcher)
                .Subscribe(_lastMessageReceived);
        }

        private IDisposable ShouldAddNewMessagesToAllMessages()
        {
            return _lastMessageReceived
                .Where(message => !string.IsNullOrWhiteSpace(message))
                .WithLatestFrom(_allMessages, (message, messages) => messages.Concat(message).ToArray())
                .Subscribe(_allMessages);
        }

        private IDisposable ShouldEnableSendMessageWhenConnectedAndBothNameAndMessageToSendAreNotEmpty()
        {
            return Observable
                .CombineLatest(_state, _name, _messageToSend, (state, name, message) => state == HubConnectionState.Connected && !(string.IsNullOrWhiteSpace(name) || string.IsNullOrWhiteSpace(message)))
                .Subscribe(_sendMessage);
        }

        private IDisposable ShouldSendMessageToServiceThenClearSentMessage(IObservable<object> messageToSendBoxReturn)
        {
            var namedMessage = Observable
                .CombineLatest(_name, _messageToSend, (name, message) => (Name: name, Message: message));

            return Observable.Merge(_sendMessage, messageToSendBoxReturn)
                .WithLatestFrom(namedMessage, (_, tuple) => tuple)
                .Where(tuple => !string.IsNullOrEmpty(tuple.Message))
                .SelectMany(tuple => Observable
                    .StartAsync(() => _connection.InvokeAsync("SendMessage", tuple.Name, tuple.Message)))
                .Select(_ => string.Empty)
                .ObserveOn(Schedulers.Dispatcher)
                .Subscribe(_messageToSend);
        }

        public IDisposable Activate(IObservable<object> messageToSendBoxReturn)
        {
            return new CompositeDisposable(
                ShouldEnableConnectWhenNotConnected(),
                ShouldEnableMessageToSendWhenConnected(),
                ShouldConnectToServiceWhenConnectInvoked(),
                ShouldDisconnectFromServiceWhenDisposed(),
                ShouldListenForNewMessagesFromTheService(),
                ShouldAddNewMessagesToAllMessages(),
                ShouldEnableSendMessageWhenConnectedAndBothNameAndMessageToSendAreNotEmpty(),
                ShouldSendMessageToServiceThenClearSentMessage(messageToSendBoxReturn)
            );
        }

        public string Name
        {
            get => _name.Get();
            set => _name.Set(value);
        }

        public HubConnectionState State => _state.Get();

        public string LastMessageReceived => _lastMessageReceived.Get();

        public IEnumerable<string> AllMessages => _allMessages.Get();

        public string MessageToSend
        {
            get => _messageToSend.Get();
            set => _messageToSend.Set(value);
        }

        public bool MessageToSendIsEnabled => _messageToSendIsEnabled.Get();

        public ICommand Connect => _connect;

        public ICommand SendMessage => _sendMessage;
    }
}
While this code is fairly lengthy it includes a large number of behaviours such as asynchronous connection management and message handling for SignalR along with enabling and disabling controls based on the current state of the UI and/or connection. All these behaviours are separated into discrete methods allowing them to be easily modified, supplemented or removed by simply changing, adding or removing an appropriated named "ShouldXXXX" method.
View
With the ViewModel in place and taking care of all the fundamental logic for the application, we now need to use it from the view. In the code behind for MainView.cs add the following code:
using System;
using System.Reactive.Linq;
using Windows.UI.Xaml.Controls;
using Windows.UI.Xaml.Input;
using Windows.UI.Xaml.Navigation;

// The Blank Page item template is documented at http://go.microsoft.com/fwlink/?LinkId=402352&clcid=0x409

namespace UnoChat.Client
{
    /// <summary>
    /// An empty page that can be used on its own or navigated to within a Frame.
    /// </summary>
    public sealed partial class MainPage : Page
    {
        private readonly ViewModel _viewModel;
        private IDisposable _behaviours;

        public MainPage()
        {
            this.InitializeComponent();

            _viewModel = new ViewModel();
            DataContext = _viewModel;
        }

        protected override void OnNavigatedTo(NavigationEventArgs e)
        {
            base.OnNavigatedTo(e);

            var messageToSendReturn = Observable
                .FromEvent<KeyEventHandler, KeyRoutedEventArgs>(
                    handler => (s, k) => handler(k),
                    handler => MessageToSendTextBox.KeyUp += handler,
                    handler => MessageToSendTextBox.KeyUp -= handler)
                .Where(k => k.Key == Windows.System.VirtualKey.Enter);

            _behaviours = _viewModel.Activate(messageToSendReturn);
        }

        protected override void OnNavigatingFrom(NavigatingCancelEventArgs e)
        {
            base.OnNavigatingFrom(e);

            if (_behaviours != null)
            {
                _behaviours.Dispose();
                _behaviours = null;
            }
        }
    }
}
In this code we instantiate the ViewModel, set it as the View's DataContext and call it's Activate method when the user navigates to this view. Note how we pass an observable to the Activate method which will emit a value when the user hits return on the MessageToSendTextBox. This allows us to receive feedback from the UI without compromising View/ViewModel segregation.
The Activate method returns an IDisposable which, when disposed, will tear down all the associated behaviours, unsubscribe from events and release resources. Accordingly, we dispose of this IDisposable when the user navigates away from this view, thereby correctly managing the lifetime of the ViewModel's resources.
Finally, lets implement our UI by editing the MainView.xaml to the following:
<Page
    x:Class="UnoChat.Client.MainPage"
    xmlns="http://schemas.microsoft.com/winfx/2006/xaml/presentation"
    xmlns:x="http://schemas.microsoft.com/winfx/2006/xaml"
    xmlns:local="using:UnoChat.Client"
    xmlns:d="http://schemas.microsoft.com/expression/blend/2008"
    xmlns:mc="http://schemas.openxmlformats.org/markup-compatibility/2006"
    mc:Ignorable="d">

    <Grid Background="{ThemeResource ApplicationPageBackgroundThemeBrush}">
        <Grid.RowDefinitions>
            <RowDefinition Height="Auto"/>
            <RowDefinition Height="*"/>
            <RowDefinition Height="Auto"/>
        </Grid.RowDefinitions>
        <Grid.ColumnDefinitions>
            <ColumnDefinition Width="Auto"/>
            <ColumnDefinition Width="*"/>
            <ColumnDefinition Width="Auto"/>
        </Grid.ColumnDefinitions>
        <TextBlock Text="Name:" Style="{StaticResource BaseTextBlockStyle}" Grid.Row="0" Grid.Column="0" Margin="4" VerticalAlignment="Center" />
        <TextBox Text="{Binding Path=Name, Mode=TwoWay, UpdateSourceTrigger=PropertyChanged}" Grid.Row="0" Grid.Column="1" Margin="4"/>
        <Button Command="{Binding Path=Connect}" Content="Connect" Grid.Row="0" Grid.Column="2" Margin="4" Padding="16,4" HorizontalAlignment="Stretch"/>
        <ItemsControl ItemsSource="{Binding Path=AllMessages}" Grid.Row="1" Grid.ColumnSpan="3" Margin="4" />
        <TextBlock Text="Message:" Style="{StaticResource BaseTextBlockStyle}" Grid.Row="2" Grid.Column="0" Margin="4" VerticalAlignment="Center"/>
        <TextBox x:Name="MessageToSendTextBox" Text="{Binding Path=MessageToSend, Mode=TwoWay, UpdateSourceTrigger=PropertyChanged}" IsEnabled="{Binding Path=MessageToSendIsEnabled}" Grid.Row="2" Grid.Column="1" Margin="4"/>
        <Button Command="{Binding Path=SendMessage}" Content="Send" Grid.Row="2" Grid.Column="2" Margin="4" Padding="16,4" HorizontalAlignment="Stretch"/>
    </Grid>
</Page>
And that's that. Let's give it a go!
Testing
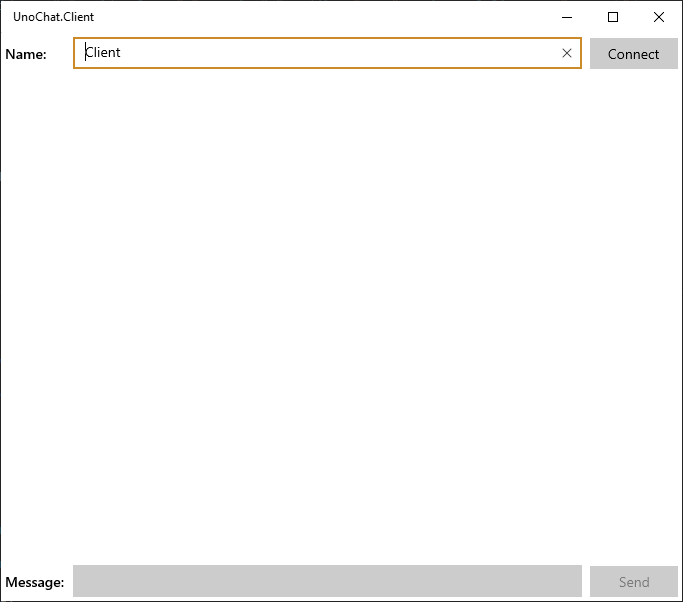
Set the UnoChat.Client.UWP project as the "Startup Project" and hit F5. After a short compilation cycle you should see the following:
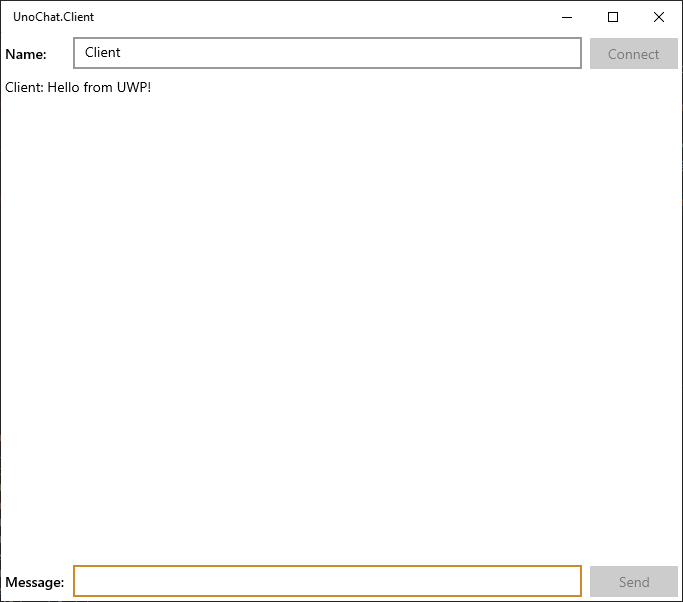
Click "Connect" and, after a short pause you should see the "Message" textbox become enabled. Enter some text in the "Message" textbox and click the "Send" button (or hit enter) and the message should be sent to SignalR. SignalR will then publish this message to all connected clients which, given we are one of the connected clients, will result in the message being sent back to us and being displayed in ItemsControl in the middle of the window as shown below:
But having one client on one platform is no fun!
Lets kick off the Android head project by right clicking on it and selection Debug->Start New Instance. After another short compilation an Android Emulator should started and our app should be deployed to it then run. Clicking "Connect" then (after connection is complete) entering a message in the "Message" text box and hitting "Send" should result in the following:
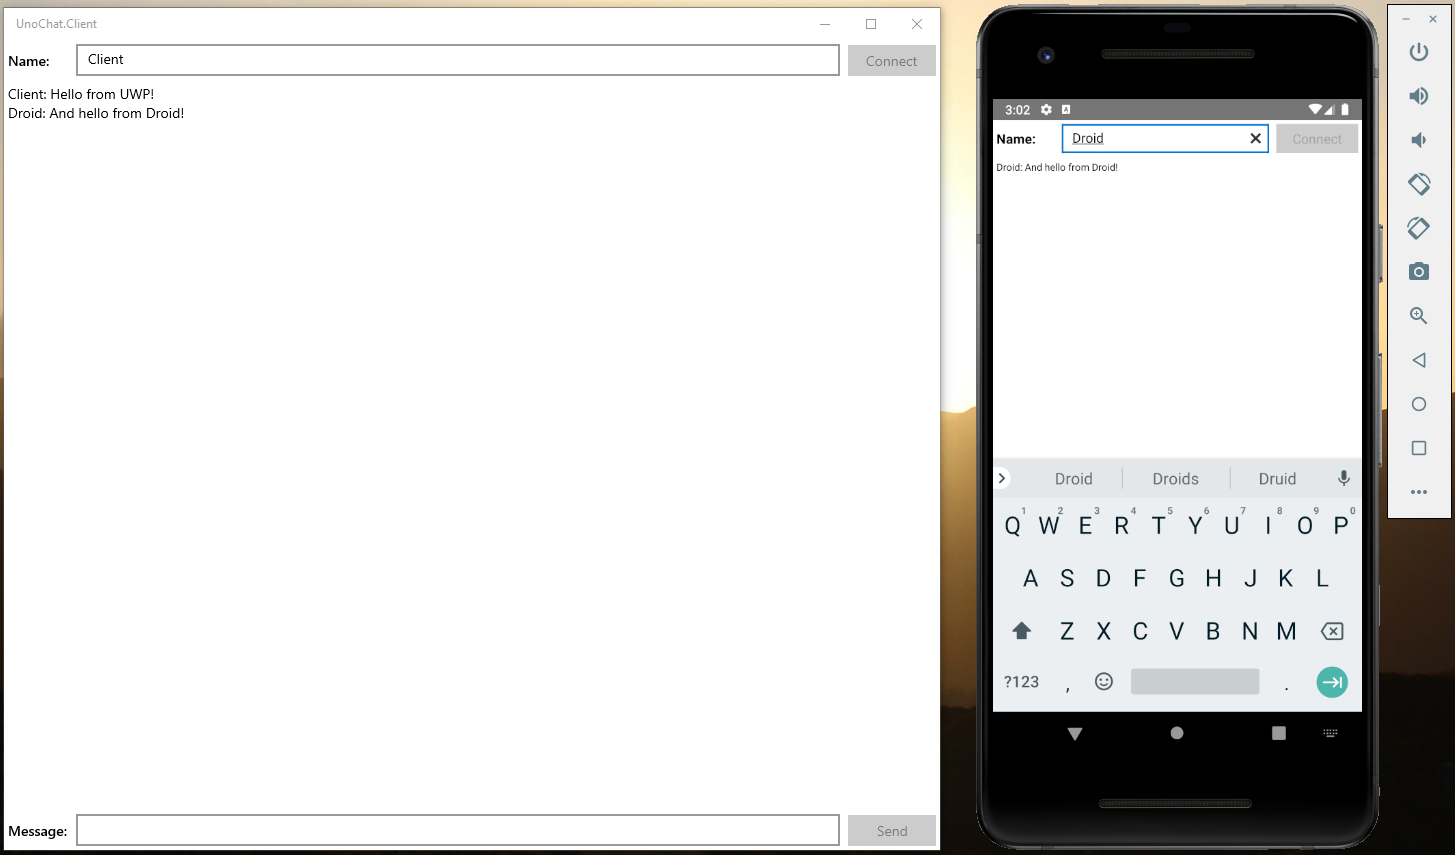
Nice, two platforms for the price on one!
Now (and you'll need to be paired to a Mac for this), right click the iOS head project and select Debug->Start New Instance. Once the iOS device emulator has started, follow the same steps as with with other head projects and you'll see the following:
That's three for three.
Now, right click on the WASM head and select Debug->Start New Instance. After a short compilation you'll see a browser window appear and.... get stuck at the splash screen.
Booo! So close...
Getting WASM Linked
Opening the browser's "Developer Tools" with F12 we see this on the Console:
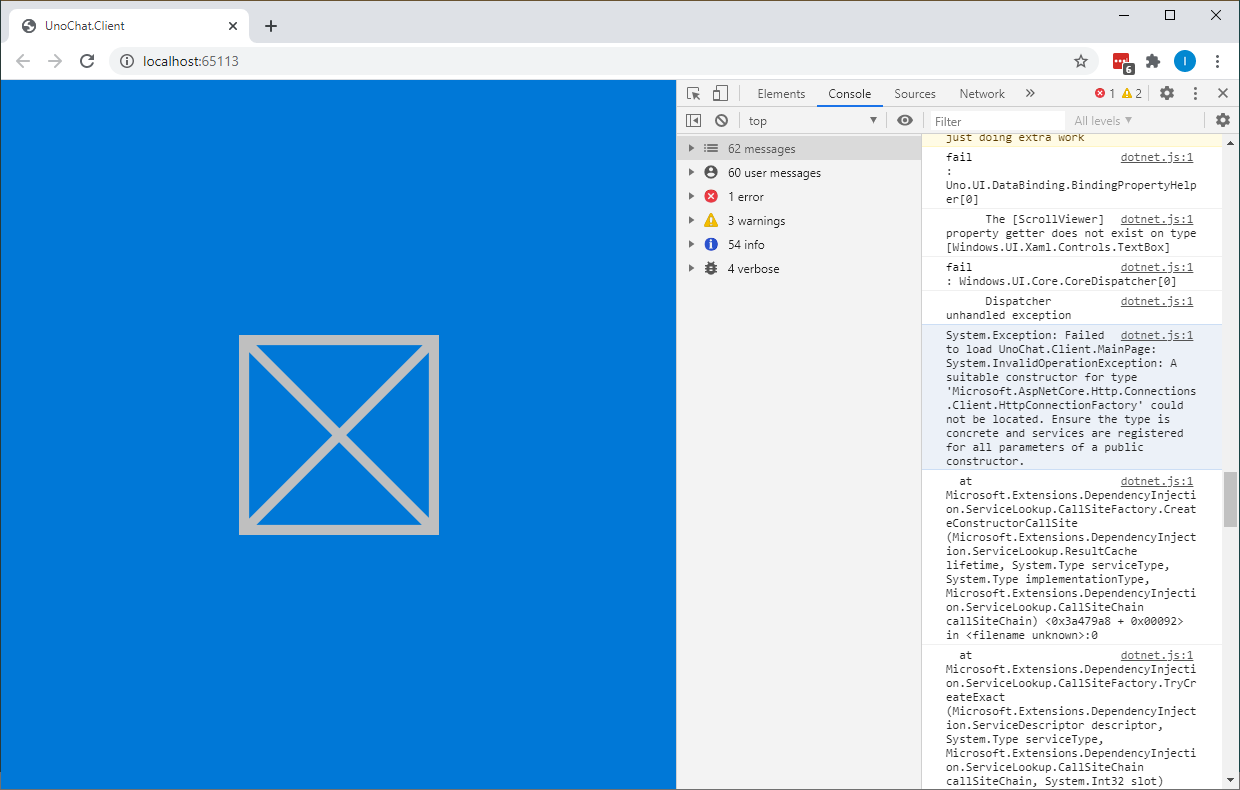
Well, we've seen these "A suitable constructor ... could not be found" exceptions before. They're due to the assemblies containing the associated types being omitted by the Mono linker. By looking up which assemblies the various types belong to we're able to explicitly instruct the linker to include the assemblies by modifying the LinkerConfig.xml file in the WASM head project.
After a few "start -> fail -> find type -> amend config" iterations I ended up with the following in my LinkerConfig.xaml file:
<linker>
  <assembly fullname="UnoChat.Client.Wasm" />
  <assembly fullname="Uno.UI" />

  <assembly fullname="Microsoft.AspnetCore.Http.Connections.Client"/>
  <assembly fullname="Microsoft.Extensions.Options"/>
  <assembly fullname="Microsoft.AspNetCore.SignalR.Client"/>
  <assembly fullname="Microsoft.AspNetCore.SignalR.Client.Core"/>
  <assembly fullname="Microsoft.AspNetCore.SignalR.Protocols.Json"/>

  <assembly fullname="System.Core">
	<!-- This is required by JSon.NET and any expression.Compile caller -->
	  <type fullname="System.Linq.Expressions*" />
  </assembly>
</linker>
And, with this in place starting the WASM head resulted in:
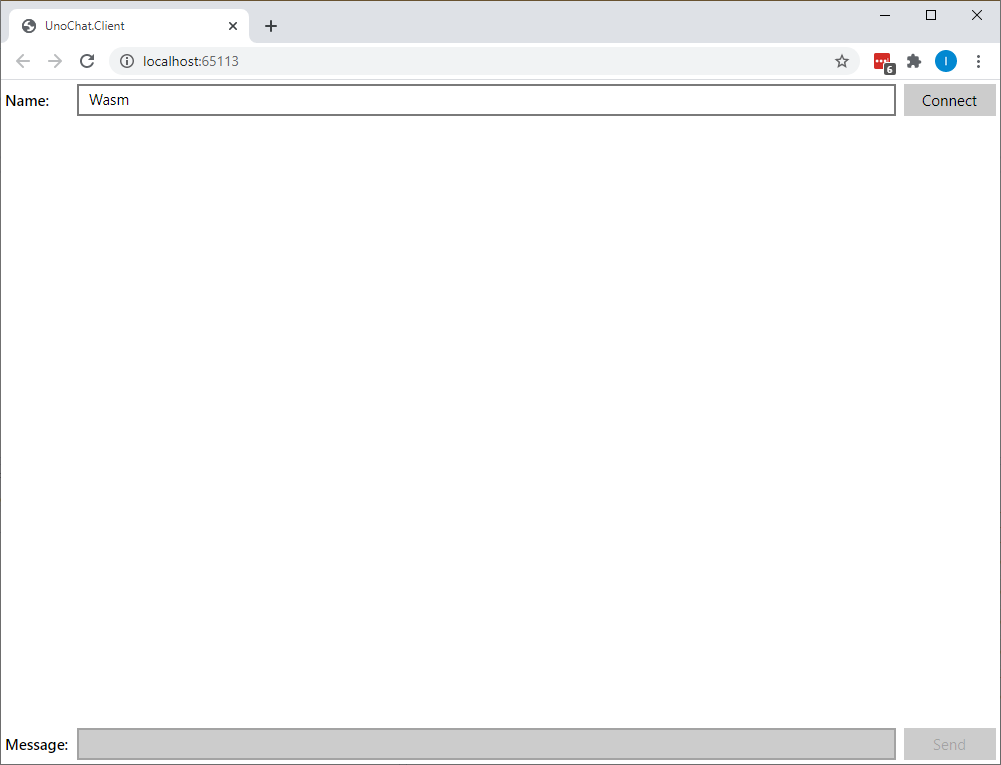
ooOOoo... exciting!! Could it be??
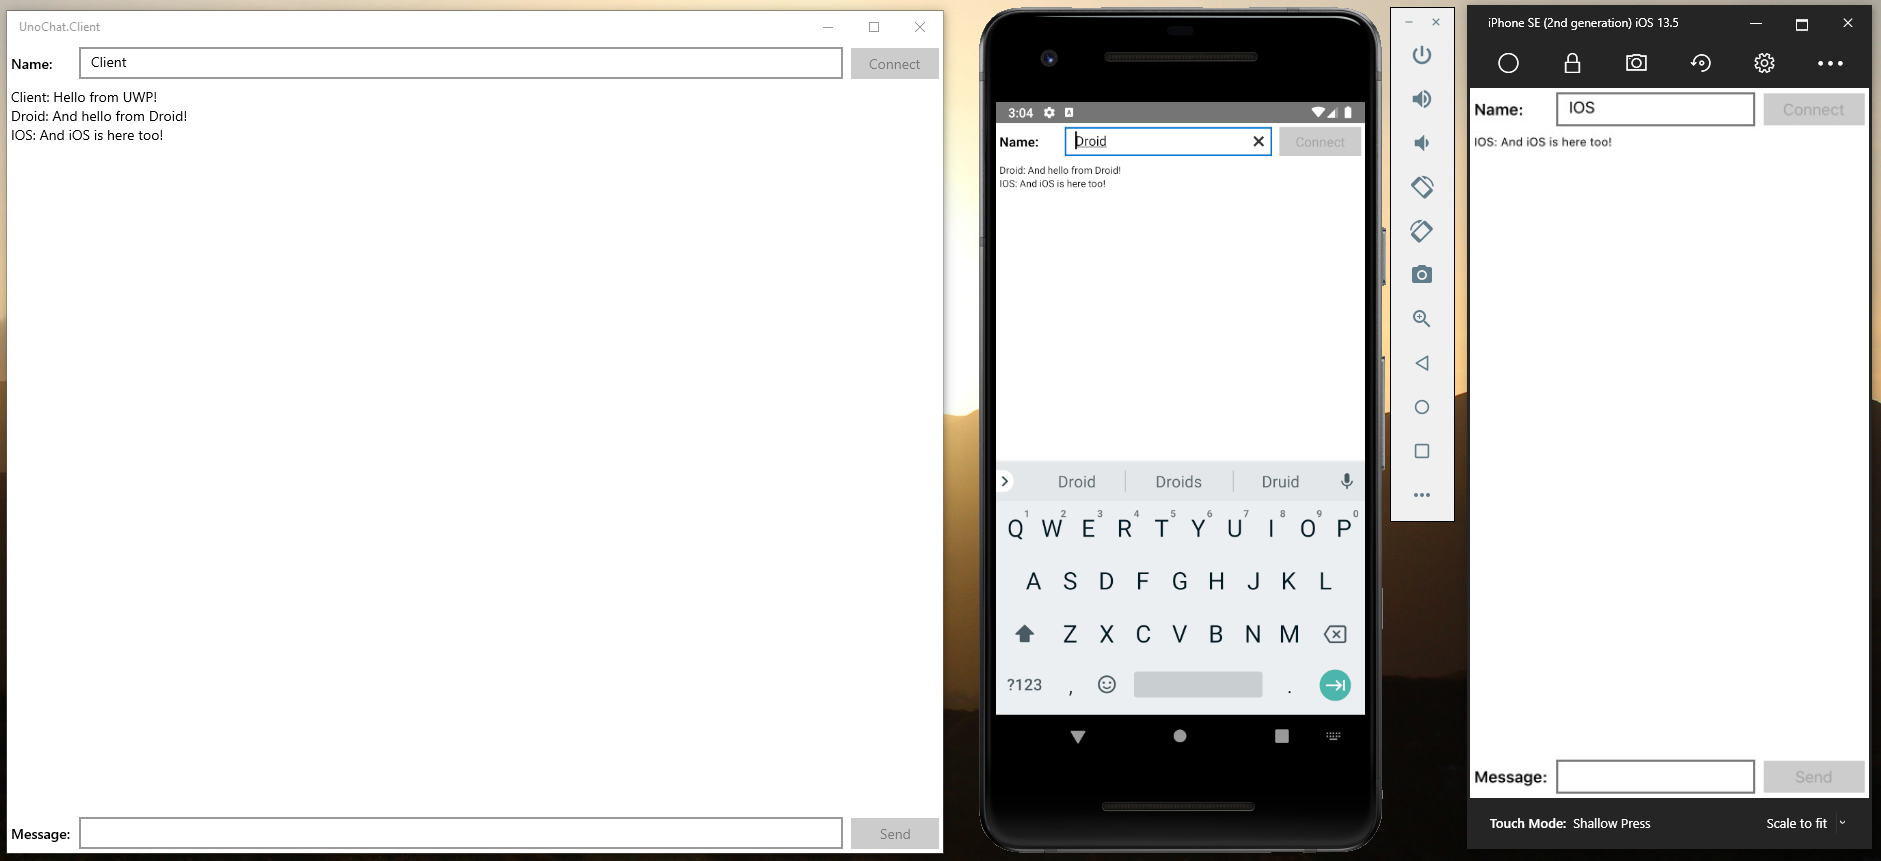
Yes, yes it could.
Here we have UnoChat.Client.Console (Red Leader), UnoChat.Client.UWP (Red 3), UnoChat.Client.Wasm (Red 6), UnoChat.Client.Droid (Red 5) and UnoChat.Client.iOS (Red Buttons) all connected to the SignalR service and all receiving real-time updates.
Nice.
Conclusion
And there we go. In about an hour (hey I stopped for lunch) we have an app which is capable of receiving real-time updates and which runs on pretty much every OS - either natively or through the browser. Moreover, the code to deliver this somewhat epic feat is short, concise, maintainable and - most importantly - 99% shared amongst the various project heads.
The Uno platform really has matured amazingly well since I first blogged about it as part of last December's Third Annual C# Advent. Back then I found that it worked... mostly... but not all the head projects functioned correctly and it required a whole host of kludges to get them all running from a shared codebase. Just over seven months later and the change is incredible: You now have an expectation of things working "out-of-the-box" and any minor difference/issue on a given platform to be an easy work around.
I can't wait to see what the Uno Platform has in store for us at UnoConf 2020 (personally I'm hoping for Uno on Linux and - most importantly - Raspberry Pis). Hope to see you all there on August 12th!
Lastly...
If you're interested in using the Uno Platform to deliver cross-platform apps or have an upcoming project for which you'd like evaluate Uno Platform's fit, then please feel free to drop me a line to discuss your project/ideas using any of the links below or from my about page. As a freelance software developer and remote contractor I'm always interested in hearing from potential new clients or about potential new collaborations.