In part I of this series I described how to use Xiaomi Mi Smart Home devices without compromising your home privacy or security.
And lo, with the sweet, sweet nut of privacy-friendly sensors laid before me, I raised the metaphorical hammer of code like an allegorical Thor about to deliver righteous justice to... and then I stopped. What was I trying to deliver righteous justice to. In fact, what the smeg did I actually want to do with all these things?
So focused had I been on finding a 'how', I hadn't really considered the what or why? Monitoring, sure but there had to be useful things I could automate.
At this point I decided to take a look around at what other people were doing and, almost inevitably, came upon the OpenHAB forums.
OpenHABian
OpenHAB has been around for years and for much of this time has been the go to software for home automation. Nowadays there a numerous other offerings and OpenHAB has had to rapidly evolve to stay competitive. To this end OpenHAB recently released OpenHAB 2 which, as far as I can tell, is a full rewrite based on Eclipse SmartHome framework.
While 'cloud based' versions of OpenHAB are available the normal use-case is to deploy a version of OpenHAB on the local network thereby keeping all processing locally too. To facilitate this, they now offer pre-built images of OpenHabian - a distribution for single board computes (i.e. the Raspberry Pi et al) that comes with OpenHAB pre-installed.
Anyway, I was interested in how OpenHAB might have evolved and love trying out new images on the Raspberry Pi (seriously it's like Docker except on real hardware and... well... works) so downloaded the latest version (somewhat confusing named 'version 1.4' even though it contains OpenHAB 2.2), etched it to an SD card, put the SD card in a spare RPi3 and booted.
Installation
Installation of OpenHABian is pretty straight forward, simply insert the newly prepared SD card and power on the Pi. One thing to note however is that the setup of OpenHABian requires internet access to download additional components / updates. As I had added the RPi3 running OpenHABian to my secured subnet, my first install of OpenHABian failed as there was no internet access available. A quick firewall exclusion and restart solved the problem.
Paper UI
One of the key enhancements in OpenHAB 2 is the introduction of 'Paper UI'. Paper UI is an HTML5 web application which allows a fully graphical setup and administration of Things and Items. Where previously you'd have to drop into textual configuration of components, Paper UI offers a simplified means of getting your home automation devices known to, and used by, OpenHAB.
Indeed, getting Paper UI to recognise and use my Xiaomi Mi Smart Home devices was simple and can be done as follows:
Install the 'Xiaomi Mi Smart Home Binding'.
- From the Paper UI, click the 'Add-ons' menu item on the left
- Click the 'Bindings' tab at the top of the page
- Search for 'Xiaomi'
- Click the 'INSTALL' button to the right of the 'Xiaomi Mi Smart Home Binding'
Add the Xiaomi Gateway(s)
- Once the 'Xiaomi Mi Smart Home Binding' has been installed, any gateways on the current subnet that have 'local network functions' enabled should magically appear in the 'Inbox' and have a notification shown.
- For each gateway on the subnet, simply add it as a 'Thing' with a unique name and in an appropriate location. Also don't forget to add the 'developer key' (copied from the Xiami Mi Home app after enabling 'local network functions') so you can issue commands to the gateway.
- Each time you add a gateway, the binding will query sub-devices registered with the gateway which will also then be shown in the inbox. These sub-devices can then be added as 'Things' for which you should remember to set the location so 'Items' linked to the 'Thing' (see below) are displayed correctly.
Add 'Items' to be displayed
- You should now see all your devices in 'Things'. Each one has several 'Channels' which can be 'linked' to an 'Item' by clicking the blue and white circular icon beside it. For most types of 'Channels', the default values displayed in the 'Link Channel' can be left as is.
- Each 'Item' linked to a channel is shown on the Control page with Locations seperated on to discrete tabs.
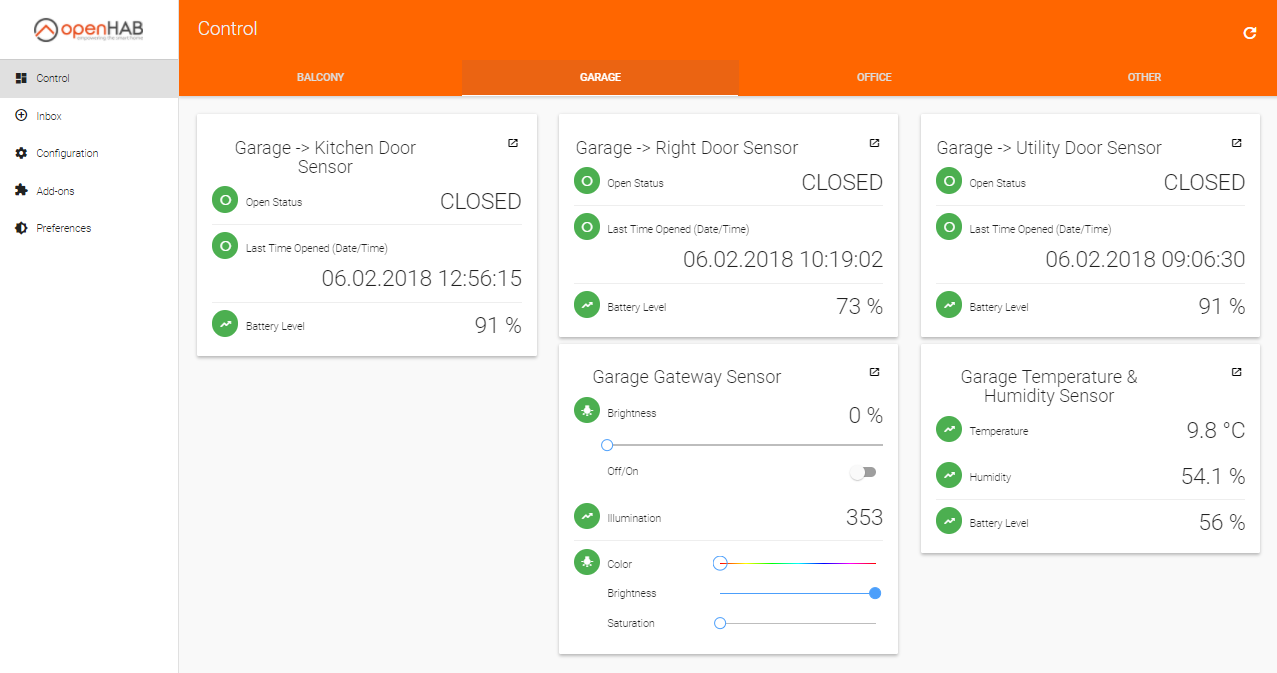
Once all your Xiaomi devices have been added as 'Things' and their respective 'Channels' linked to 'Items' you should end up with something like this in the 'Control' page:
So far so good. Now what?
Well, turns out not a lot. After getting your devices added to OpenHABian, you have to move into textual configuration if you want to actually perform any automation via interaction between devices.
"Oh", I thought, "That was a waste of time then".
Node-RED
On a whim, I decided to SSH into OpenHABian and play with the OpenHABian Configuration Tool. Most of the options were fairly straight forward and unexciting until I got to the Optional Components menu. Here a couple of items caught my eye, particularly the option to install Node-RED along side OpenHAB.
I'd heard of Node-RED previously but had never tried it. As I was about to junk the install of OpenHABian anyway, I decided I'd have a play... and this is where the magic happened.
For others who have not used Node-RED, it is a Node.js app designed for "wiring together hardware devices, APIs and online services in new and interesting ways". It has an amazingly simple yet ludicrously brilliant UI which makes experimentation with it's various 'nodes' extremely quick and easy. Moreover, the installation on OpenHABian comes pre-installed with nodes to interact with 'Items' in OpenHAB.
Despite, never having used Node-RED before, in just a few minutes I had the following flow deployed and running:
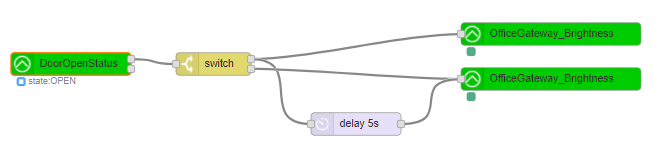
Which does the following:
- Uses an
openhab2-innode to listen to changes to theOfficeDoorSensor_OpenStatusvalue. - Uses a
switchnode to compare the status value to 'OPEN' or 'CLOSED' and emit the message to the appropriate port. - If the door has been opened:
- Use a
openhab2-outnode to issue a 'ON'ItemCommandto theOfficeGateway_Brightnesschannel (i.e. turn the light in the Xiami Mi Smart Gateway on). - Wait five seconds then use a
openhab2-outnode to issue a 'OFF'ItemCommandto theOfficeGateway_Brightnesschannel (i.e. turn the light in the Xiami Mi Smart Gateway off).
- Use a
- If the door has been closed then use a
openhab2-outnode to issue a 'OFF'ItemCommandto theOfficeGateway_Brightnesschannel (i.e. turn the light in the Xiami Mi Smart Gateway off).
Ok, the use case is fairly simple but wow, what an incredibly level of integration between disparate sensors / lights with just five nodes, a few connections and no bespoke code what-so-ever.
I was hooked.
Playing with Node-RED inspired me to start brain-storming potential use-cases and they soon started coming thick and fast. Broadly the use-cases fell into three main categories:
- Utility - mitigate small frustrations around the house
- Security - enhance home security
- Efficiency - reduce home power consumption
However, one use case I came up with fell into all three of these categories and a logical progression from the above flow.
A use case at last!
Our new 'forever home' has a built in double garage. While the doors on the garage are in pretty good condition, the locks are nothing special and present an obvious security weak spot. Indeed, we use the garage doors every day as it's a very convenient way into the house which increases the likelihood we'll forget to close the doors properly.
Furthermore, the flurescent lights in the garage are old and take an age to turn on. As we need to go through the garage to get to the utility room and can't see the way to the utility room until the light is on, we tended to simply turn them on at the beginning of the day and turn them off before going to bed each night, thereby consuming way more energy than necessary.
Understanding this, I used an additional gateway in the garage, coupled with sensors on each of the doors (garage door, kitchen door, utility room door) and an easily controllable IP camera to put together the following flow:
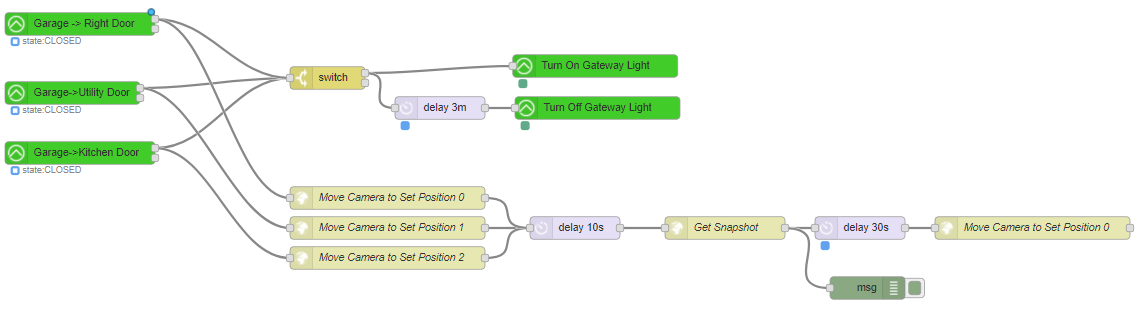
This does a couple of things:
Turns on the light in the gateway whenever any of the doors open
The light in the gateway is more than enough to light the way to the utility room which addresses the utility aspect of the use-case as we no longer need to wait for the garage light to come on. Furthermore, three minutes after the door was opened (regardless of whether it's been closed again), the light in the gateway is turned off. This is normally long enough for us to do whatever we needed in the garage and addresses the efficiency aspect of the use-case as we no longer leave a light on all day.
Turns the IP Camera to look at the opened door and takes a snapshot
The IP camera I've used has a useful feature whereby it can record several Pan/Tilt positions which it can then return to using a single command. I use this feature to point the camera at the door which has just been opened and use a further command to take a snapshot image of what it sees. This addresses the security aspect of the use case by ensuring video surveilance coverage of activity within the garage.
Ultimately I intend to upload this image to a cloud storage provider and send a notification to my phone if this happens within certain time constraints but this has yet to be implemented.
Moving forward
As you can see, the combination of Xiaomi Mi Smart devices, OpenHAB[ian] and Node-RED is extremely potent. Without writing any code (compiled, intepreted or DSL), I'm able to orchestrate some very advanced interactions between sensors, actuators and other services.
In the next post, I'll discuss how I've developed this platform even further into a full, voice activated, digital assistant while still maintaining privacy and security.